
Tool Reviews

Paint Sprayer Recommendations
"Finding a good paint sprayer doesn't need to be hard."
Finding a good paint sprayer can sometimes feel like a daunting task, so today I am sharing all of my recommendations for the best types of paint sprayers that I’ve used.
Now I have used several sprayers over time, so I felt it would be best to rank in the order of which ones I love the most, and you may notice that I am favorable towards one particular brand, but hey; when you're the best, you're the best.
Graco Magnum ProX19 Cordless TrueAirless Sprayer - $$$$
The Graco Cordless ProX19 is hands down my favorite because of its cordless ability. Most of the Graco machines are bomb, but taking the cord element away did it for me. Now I only use this bigger sprayer on big jobs but it's so worth having when you need it.

Graco TC Pro Cordless Airless Paint Sprayer - $$$
The Graco TC Pro is my favorite cordless handheld sprayer. Its easy to set up and aways leaves a clean finish. It is a little pricey but worth it in my opinion if you have a lot of spray jobs.

Graco Magnum X7 Paint Sprayer - $$
I utilized the Graco T7 on my closet and I must say this sprayer was super impressive. The only thing that keeps it from being number one is that it's corded, but still a solid sprayer.

The Home Right sprayer is the most affordable sprayer, and for the price, I was really impressed with how well it did.
You do have to thin your paint when using this sprayer, but for the price that's somewhat expected.
See it in action here (Painting at 7:00):
Graco X5 Stationary Airless Sprayer - $$
I was able to use the Grace X5, while spraying my deck and that was my first introduction to Graco's brand, I really loved the sprayer, but I love having wheels on the sprayer, so this is why it's the last on this list; however, it's still a great recommendation and priced a lot better than some of the others.
Check out this video to see the Graco X5 in action.

Werner Multi-Position 5-in-1 Ladder
"A multi-purpose ladder great for any job."
This by far is probably one of the most interesting tools that I have tried out. I was super excited to try out this multi-purpose ladder because I was so fascinated at the ergonomics of it.
"This review is sponsored by the Home Depot as a part of The Home Depot's Pro-Spective Campaign."
Whoever engineered this ladder definitely gets some kudos from me. Whether you're doing a simple light change in the home, or need to get on top of your roof, this ladder has all you need to get the job done.
"There are some affiliate links in this post, meaning I get a small commission if you purchase through these links, at no cost to you. Click Here to read my full disclosure."
Testing out the Multi-Purpose Ladder
The first thing I tested out when I got the ladder was all of the different positions on the ladder, of course. I was really impressed with how easy it was to operate.
 Here you can see my friend Taylor giving the ladder a spin. I really liked that the ladder felt really sturdy. With it being a multi-purpose ladder, I was worried that the stability wouldn't be as good since it can be set in so many positions, but I was pleasantly surprised to find that each position held pretty steady.
When it comes to ladders, stability is probably one of the most important things that I look for, so I was happy to see that the ladder felt safe. The slip-resistant feet help keep it stabilized, as well as the extra-flared bottom for good support.
 The first thing my friend Taylor said when she picked it up was, man this is light. Which I felt was another great thing about this ladder, it's not as heavy as I anticipated.
Favorite Features
ShatterProof J-Locks and Push Knobs
I have got to rave about Werners J-Lock and push knob system. When I first operated the ladder, I was a little nervous that my finger would get caught somewhere and get pinched while operating the ladder, but they did a really good job making sure that doesn't happen.

The ladder features oversized push knobs so you can pull the ladder legs apart and together and these shatterproof j-locks to allow you to lift the ladder up or down. Its really easy to operate and locks in place for safety.
5 Positions
This is an obvious favorite, but I love that you only need one ladder to do the work of five. The Werner ladder features 5 different positions. An extension ladder, a double sided twin step ladder, a stairway ladder, 90 wall ladder and can serve as 2 self scaffolding bases.
 Now I didn't get to test out the ladder serving as a scaffolding base, but I am definitely going to plan on getting a second ladder for future DIY projects. I plan on providing an update whenever I do.

How it Could Be Better
For me, the one thing that could have been a little better was the comfort of the ladder steps. Compared to my other ladder, the steps seemed to be less comfortable after standing on it for a long period of time. This is more of a want rather than a need, but it Werner were looking to make this ladder better, that's what I would improve. It is also a little heavy for a ladder. Understandable because of all of its functions but it’s not a ladder I would pull out every time.
The Werner Multi Ladder retails for $149 at the Home Depot.

Husky Tools: Fathers Day Guide
"A Husky Father's Day he'll never forget"
With Father's Day right around the corner, what better way to celebrate than a roundup of some great tools/items to get for your dad. These Husky items are some great products any dad would love to have around the shop.
"This review is sponsored by the Home Depot as a part of The Home Depot's Pro-Spective Campaign."
If you're looking to give your dad a smile next week, be sure to check out some of these awesome items below.
Husky Connect Rolling Cart
This is probably my favorite item, the Husky rolling cart. This cart features a 3-piece mobile system with a small organizer, tool box and rolling cart. I really like the interlocking system that allows you to easily attach and detach the three pieces together.
 If your dad is someone who always has trouble finding those nuts and bolts, he will love the 12 removable bins in the top part organizer. I used screws often, and this definitely comes in handy. I also love that the tool box and bottom rolling cart has a lot of space for bigger tools. I also love the size of the cart, its spacious enough to fit quite a bit of items in my shop but small enough to sit tucked away in a corner. It's a win win for sure.
The wheels are light and easy to roll, the perfect addition for any shop. If your dad travels often to do construction jobs or work off-site, Im sure he would love to have this hand rolling cart to easily store some of his tools. I absolutely love my rolling cart and I'm sure your dad would too.
The Husky Rolling Cart retails for $69.97 at the Home Depot.
Husky Pro Hybrid Tote with Tool Organizer
This next item is one that's come in handy a few times for me while traveling; the Husky Tote. This tote is constructed of heavy duty fabric and water resistant materiel; meaning it's going to be durable on those work sites.
 They feature heavy duty feet on the bottom that protects the bottom base, which is nice, it keeps the bag protected underneath, and the center of the tote is really spacious and can fit quite a few tools.
 I always manage to stick a bunch of my smaller power tools in there. I also like that it comes with a separate little tool organizer, where you can organize your wrenches or other small tools you may have.
The Husky Tool Organizer retails for $44.97 at the Home Depot.
125 PC Superior Access Ratchet Set
If there is one thing I can remember my dad using in the shop often, it was his ratchets and interestingly its one of the tools he always asks to use when he comes to visits. Now let's look into this 125 piece access ratchet set.

Even better; it's small enough to fit in that Husky Rolling Cart. This set features 144 position ratchet technology with a narrow swing arc. It includes two ratchets,8 accessories and 115 sockets. There's no job you can't get done with his set. I especially love that it comes with a lifetime warranty; no questions or receipt required. Now if that doesn't sweeten the deal, I don't know what will.
If you are someone who likes durability, good news, this set is made of chrome alloy steel, meaning it will be able to stand the wear and tear of time.
The 125 PC ratchet set retails for $129.00 at the Home Depot.
Husky Interlocking Organizer
I use these Husky organizers often and I love having them around the shop. Whenever I'm building, these come in handy when handling screws and things of that nature. It helps me stay organized, because lord knows I need it.

If your dad needs organization like me, this is the perfect way to help him get things sorted. The organizer features ten removable compartments and if you want more than one, they feature an interlocking system that allows you to look them together, if you so desire. The lid is very durable with a ploy carbonate materiel and the folding handle makes it really easy to stay away. Even better, they are inexpensive.
The Husky Organizer retails for $11.97 at the Home Depot.
Universal Mechanics Tool Set
If the 125 pc set is too much for you, this 60 piece mechanics tool set may be the second best option. one of my favorite items in this set is the smaller socket that allows you to fi Tinto a space as little as 1 in.

 This set also features a lifetime warranty, no questions asked. You can also throw in this 3PC Ratchet set for a little extra; a set that covers 1/4", 3/8" and 1/2", pro access ratchets with industry leading 2.5 arc swing.
Get The Mechanic Tool Set at the Home Depot.
Welp, that wraps up the Husky Father's Day Guide, I'm sure anyone of these options will put a smile on dad's face this Father's Day. As always, thanks for reading guys. XOXO, Ashley

Bernzomatic Torch Kit Review
"The Bernzomatic torch kit has got the flame"
"This review is sponsored by the Home Depot as a part of The Home Depot's Pro-Spective Campaign.
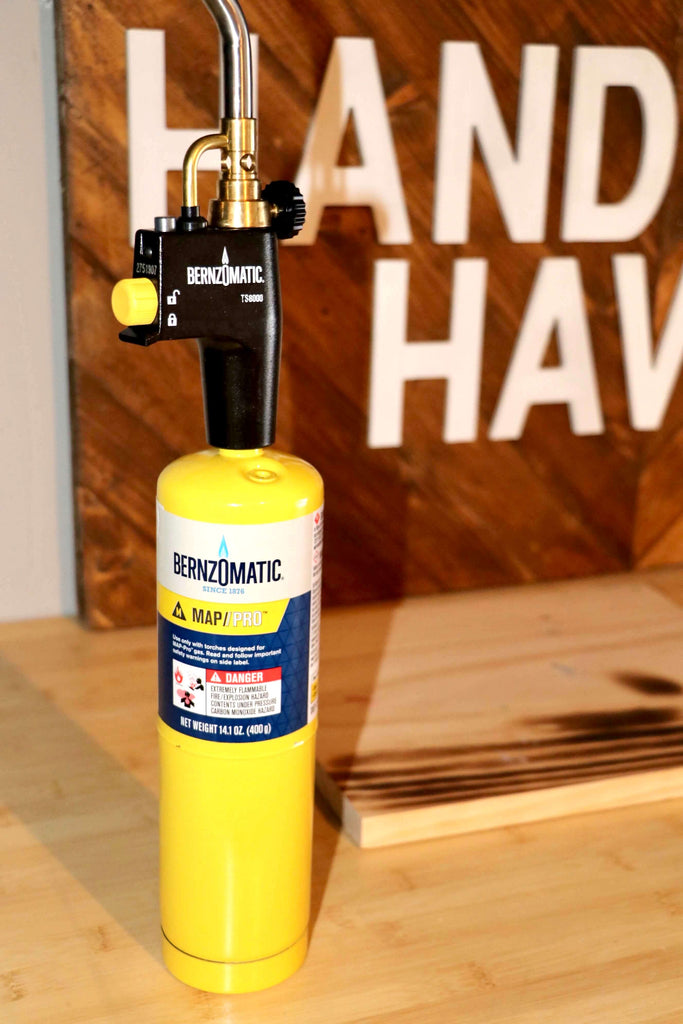
WHATS INCLUDED
The Bernzomatic Torch Kit comes packed with a TS8000 torch head and a 14.1 oz. MAP-Pro cylinder. There are also torch kits available that comes with a torch holster, which may come in handy for some projects. There is also an extension hose available if you find that you enjoy this torch kit.
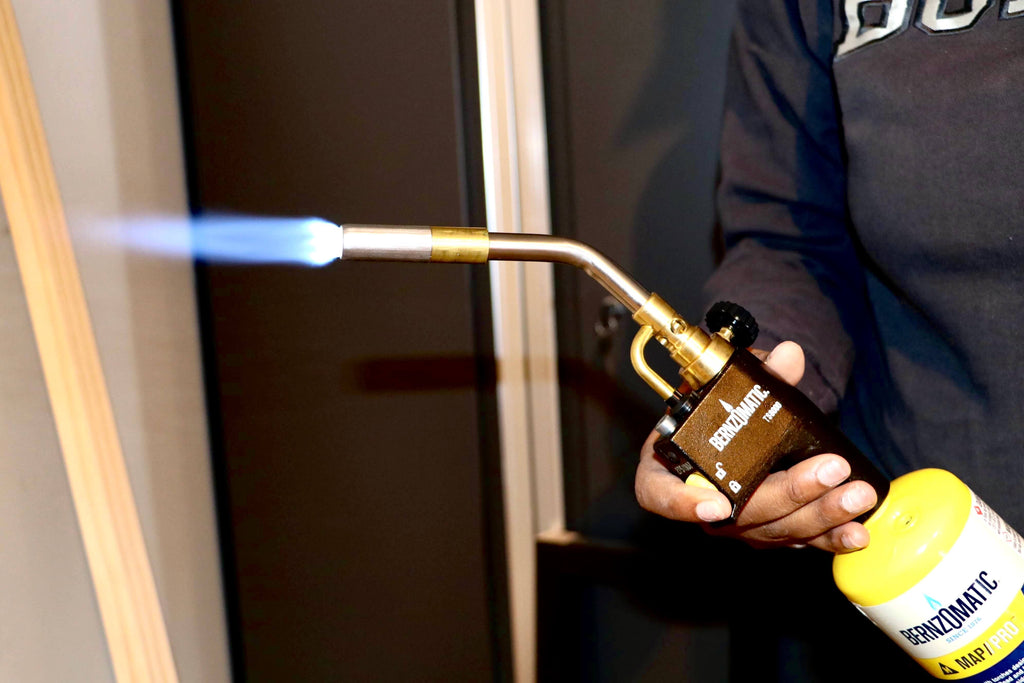
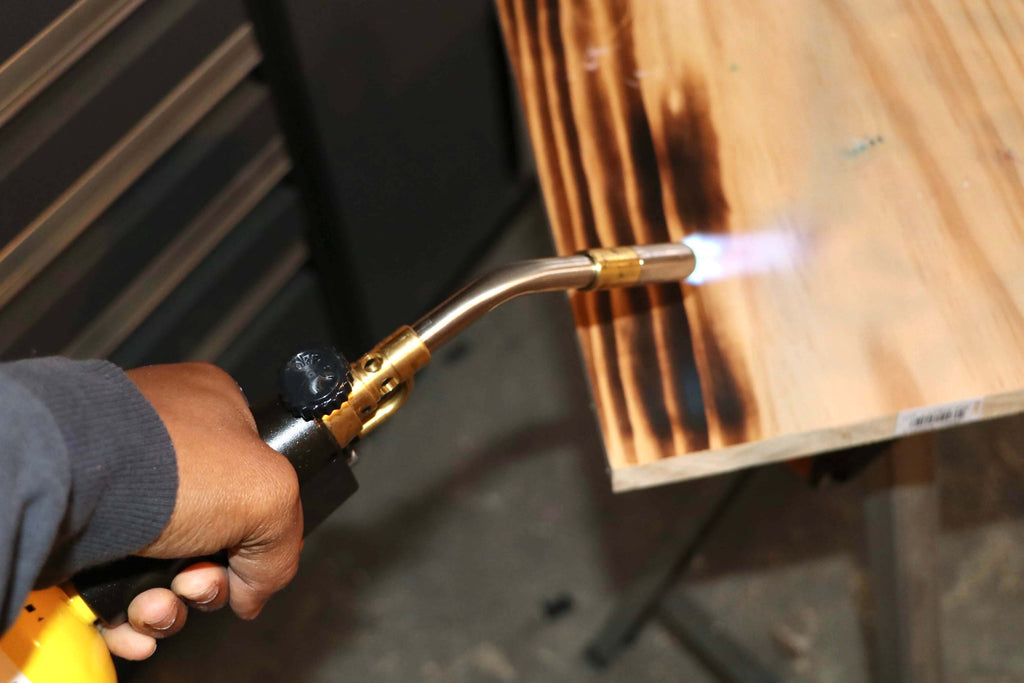
TESTING OUT THE BERNZOMATIC TORCH KIT
I really like that this torch kit is easy to use. It features an aluminum body for durability and the small size makes it easily manageable. It can also be pressure regulated for inverted use and cold temperatures.
I don't know if this would take the place of an actual soldering tool, but it is definitely great for charring wood projects and some quick metal soldering activities.
Operation Steps and Safety Tips
This is probably one of the only tools where I actually took the time to read the manual being that we are dealing with fire. Just so you can get a feel for how easy this torch is to start, here is a quick breakdown of the steps I took to get this torch going:
- Make sure the torch is cool.
- Turn flame adjustment knob fully counterclockwise.
- Turn ignition button to on.
- Point the torch in a safe direction and press the ignition button in.
- After flame is extinguished, turn ignition to off.
- After use, turn flame adjustment knob fully clockwise.
- Remove cylinder from torch.
And there you have it, 7 easy steps to operate the Bernzomatic Torch Kit. 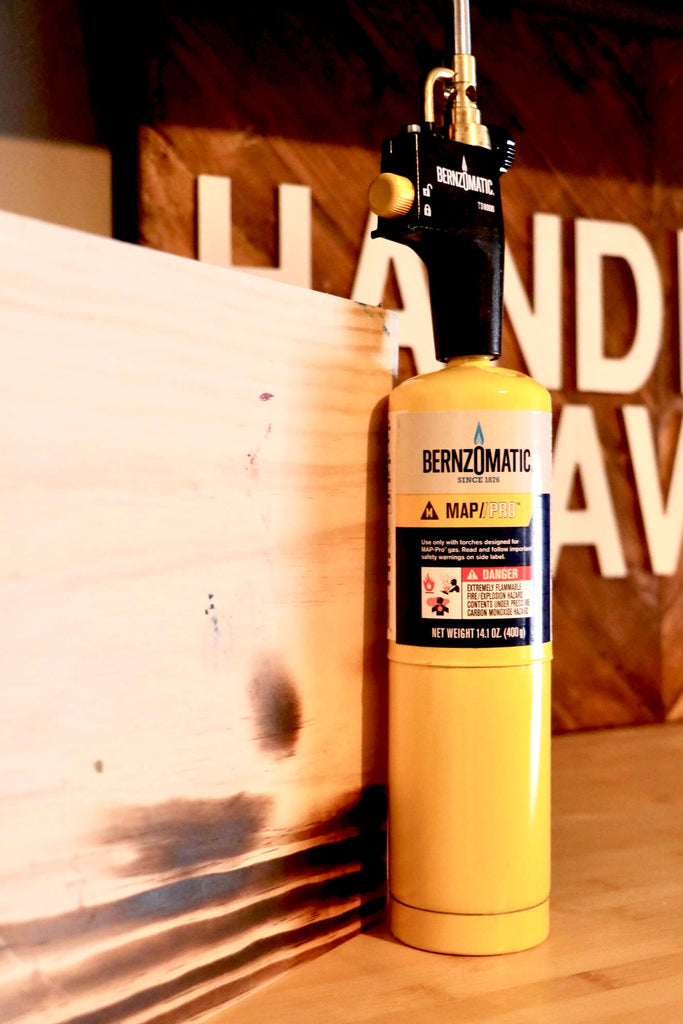
Here are a few things to remember when operating/storing the Torch Kit:
- Do not force the flame adjustment knob while turning it off.
- When not in use, be sue to detach the torch from the cylinder and store in separate areas.
- Do not expose the cylinders to super hot conditions (above 120 degrees F)
- Store the cylinder in a well ventilated area.
HOW IT COULD BE BETTER
The gas flow valve knob was very easy to adjust which may also be a con. If you're not paying attention, I can see how it can get moved while in operation without you realizing it. Maybe a little resistance on this knob would make this torch kit that much safer. You can never go wrong with your safety.
The Bernzomatic Torch Kit retails for 54.97 at the Home Depot!

RIDGID Heated Jacket Review
"With winter among us, the Ridgid Heated Jacket and Firm Grip Pro-Fit Flex Gloves are the perfect combination for the shop"
I don't know about you, but I always dread the winter months when it comes to building. It seems like I always experience a loss in motivation during winter because it's just so darn cold out in my shop. Fortunately, if you're experiencing the same, I've got a solution for you.

Ridgid Heated Jacket


I really like the idea of having a heated jacket on during winter time. I was hoping for a little more heat in the jacket, but it was still nice to have some kind of warmth rather than nothing.
I did notice that you feel the heat a lot more when the jacket is zipped up, most likely because the heating zones are in the upper frontal parts of the jacket. So make sure you zip up to get the best use out of the heated jacket.
There are three heat settings, but I imagine that my setting would always be set to high, based interest he amount of heat that’s provided.
 One feature I really liked, was being able to plug up a USB device to the power source. In my opinion, this elevates the jacket. Even if you aren't wearing the jacket, you can used this power source around the shop to plug up your phone or other electronics. KUDOS RIDGID.
The jacket also features a cell phone pocket and cell phone cord slots that allows you the option to plug your phone up in various places in the jacket.

The jacket also features a hood that is removable. I like that fact that we have the option to either have a hood or not because I can see how it could get in the way, especially with hair like mine, but also nice to have it when raining.
BTP Firm Grip Pro-Fit Flex Impact Glove with Touchscreen Compatibility
With the heated jacket, it's only right to have a good pair of gloves to keep those hands warm. These firm grip gloves have a tough textile outer layer that's very flexible for regular movement with impact protection.

The part I really like is the touchscreen compatibility. You do have to press extra hard to operate a screen but if I'm wearing gloves in the shop they have to be touchscreen compatible.
 They feature a lightweight EVA foam in a cool pattern and the PRO-FIT flex impact is great for jobs like demolition, operating power tools, roofing and more.

I hope you enjoy my review on the RIDGID Heated Jacket and come to a closer decision on whether or not it's the perfect jacket for you.

Ryobi Drill and Drive Kit Review
"Ryobi's got the Insert and Power Bits to fit your driving needs."
It's always so easy to get wrapped up in all of the cool tools but we often forget about the essentials. It's always good to have a good drill set around so I'm excited to share the details for this Ryobi Multi-Material Drill and Drive Kit (60-Piece).
What's Included?
The Ryobi Multi-Material Drill and Drive Kit comes packed with 60 drive and drill bits and a clear front carrying case. It provides a variety of bits used for a wide range of applications. Drill bit types include twist bit, spade bit, screwdriver, nut driver, hole saw, bit extender, etc.

Testing Out the Ryobi Multi-Material Drill and Drive Kit
I decided to test out a few bits in the Ryobi Kit just to see how they stood up and I wasn't dissapointed. One of the great things about these bit is that they are made to withstand many types of materials, whether it be wood, metal, plastic or masonry, these bits will get the job done.
 The spade bit drilled into the wood really nicely, I almost wish there were a few other spade bits in this kit. The spade bit in this particular kit is 1".

Next, I decided to try out one of the drill bits. The drill bits provided range from a wide variety of sizes, which will definitely come in handy while building.
 Since these bits are supposed to be able to handle metal, I wanted to drill into this aluminum sheet to see how well the drill bit would do with materiel other than wood. As expected, it drilled through the materiel quite nicely.

After testing out a few bits, I was pretty pleased with my Ryobi Drill and Drive Kit.
Favorite Features
The Case
I really like the clear class on this kit because I don't have to open t to see if there is something that I need inside. I also like that it is slender because it slides right into my tool drawer.
 I also like that the bit hooks are strong, you really have to snap the bits into place and they don't fall out easily.

How could it be better?
I personally would have liked this kit better if it had a few more spade bits and a little less drill bits but overall I was pretty satisfied with the kit.
The Ryobi Multi-Material Drill and Drive Kit retails for $21.97 at The Home Depot.

Ridgid 18V Drill/Driver and Impact Driver Combo Kit Review
"Diving into the 18-Volt Lithium-Ion Cordless Drill/Driver and Impact Driver 2-Tool Combo Kit"
"This review is sponsored by the Home Depot as a part of The Home Depot's Pro-Spective Campaign."
Today, I am excited to dive into a new RIDGID drill review with you guys. I have tested out the Ridgid 18V Drill/Driver and Impact Driver Combo Kit and I am sharing all of the juicy details. Let's get into it.
WHATS INCLUDED?
The 18-Volt Lithium-Ion Cordless Drill/Driver and Impact Driver 2-Tool Combo Kit comes packed with the one Drill/Driver, an Impact Driver, two 18-Volt 2.0 Ah Batteries, a 18-Volt Charger, one tool bag, two driving bits, accessories and two belt hooks.

TESTING OUT THE RIDGID 18V DRILL/DRIVER AND IMPACT DRIVER
To test out the Ridgid 18V Drill/Driver and Impact Driver Combo Kit, I decided to use it on a project I was building. I used the drill/driver to drill in some pocket holes into some 2x2 lumber and I used the Impact driver to screw in pocket holes.
The drill/driver features 2-speed settings; it seemed to do fairly well on setting 2. With most of my other drills, it usually doesn't make a difference which setting I'm on when Im creating pocket holes, but for this particular drill/driver, it worked best on setting 2. The drill/driver had a little weight to it, but not too much to where it was uncomfortable. Handling it while working on my project was pretty pleasant.
This particular drill features all metal gears, specifically for extended job site durability. It seemed to be able to withstand most of the strain I was putting on it, but I would most likely use this kit for smaller DIY projects. This would be a great kit for a beginner DIYer.

The Ridgid Impact Driver features 3 speed settings to provide speed and adjustable power for any job. I would say the Impact Driver is the better tool of the tool kit. It's Hex Grip Micro texture exterior made it really comfortable to use while building.
Its supposed to be the best-in-class torque with 2,250 in. lbs. of torque and from what I saw it may live up to the name but I have had better experiences with other impact drivers. She is a good one, but not the best but my opinion may be jaded because I normally work with brushless models.
 After testing out the Ridgid 18V Drill/Driver and Impact Driver Combo Kit with the provided 2ah battery, I decided to switch the batteries out to see how much of a difference it would make, and the 2.0ah battery seemed to compete well with better battery. I didn't see a very big difference in operation. It also seemed to hold a charge pretty well.
FAVORITE FEATURES
Bit Storage
If you are anything like me, a majority of your time in the shop is spent trying to find things you need. That's why I particularly love this bit storage. I always know where it is and have easy access to it anytime I need to screw in some screws.

LED Light
The LED light is usually common across models these days, but always one of my favorite features. The grip light engages independently of the trigger to illuminate your work surface.

HOW COULD IT BE BETTER?
After doing some research, I discovered that there could be a possibility that these particular RIDGID batteries are not covered under the lifetime warranty. I wasn't able to confirm for sure, but it may be something worth looking in to. If they aren't, then my recommendation to make this kit better would be too somehow get these batteries under warranty, in the event something happens.
This Ridgid 18V Drill/Driver and Impact Driver Combo Kit Review retails for $159 at the Home Depot.

Woodworking Tools for Beginners
"So you want to be a woodworker? Check out this list of essential woodworking tools to get started."
When I first started woodworking, I didn't have anyone to tell me the essential basic tools I needed to get started, so I figured I'd share the basic woodworking tools you need to get started. Let's dive in.
There are some affiliate links in this post, meaning I get a small commission if you purchase through these links, at no cost to you. Click Here to read my full disclosure.
Now for me, even though I was a beginner woodworker, I decided to not get the most dinkiest tools just because I was a beginner. I knew this was an interest that I would keep with, so for some of these tools I decided to get a step up from what people would call a beginner tool, so I'll be giving a few tool suggestions for each basic item.
Drill
First, we are starting off with the power drill. This is probably the most used tool that I have and that you will use. Drills are used in the woodworking shop for so many reasons these days, making it an essential tool for woodworking.
 Most people will argue that a corded drill is better but I live in the land of cordless, so my suggestions will be cordless models.
If you are looking for a good beginner drill, here are some of my recommendations.
- For Ryobi drills, I am recommending the hammer drill because it gives you a little more power for drilling and a little more versatility with it being a hammer drill. I have tried Ryobi's cheaper drill models and for me they just don't make the cut. Being that the drill is one of the most used tools, you want to make sure you get something solid. Check out my full tool review here.
RIDGID Drill/Driver - (Top Recommendation)
- This Ridgid Drill is a beast of a tool. I have been using this drill for about a year and have had very good success with it. With its 1,3000 lbs. of torque RIDGID's Hammer Drill/Driver is an industry leader and features over 100 settings for dialing in with it's micro clutch. This is an excellent drill with great power and torque. It is a little heavier than my other drills, but the power and performance outweighs the annoyance of the weight. Check out my full tool review here.
- This Dewalt Drill has also proved to be a pretty good fit for me. It is a little pricey but DEWALT has always been a reputable brand and its something that will last you. This 20-Volt cordless tool is ideal for most drilling/fastening applications and it's high-speed transmission features two speed settings.
Kreg Jig
Now this is a tool you might not see in most peoples essential tool list, but I would highly recommend this tool for people who are new to woodworking. The Kreg Jig is a fun tool used for joinery.
 I bought this tool very early on in my woodworking journey and I am so glad I did. If you are hesitant on whether or not this tool is the right tool for you, I am listing a few Kreg Jig options below to help get you started.
- This K3 pocket jig is a smaller version of what you will get in the master system. If you don't want to commit to getting the big master system, this would be my next recommendation.
K4 Master System - (Top Recommendation)
- The K4 Master System is the tool I use. I actually have two of these things, and after the drill, it is probably my most used tool. I personally like this model because it gives you everything you need.
Kreg Jig 320 - $39
- The Kreg Jig 320 features two drill guides, a removable spacer and thickness stops for 1/2 in., 3/4 in. and 1 1/2 in. material that allow you to build with materials such as plywood and boards.
Check out this video below to see me use a few of the Kreg jig models in action.
Compound Miter Saw
Compound Miter Saws would probably be most next used tool in my shop. They are very similar to circular saws in that they make the same rip and cross cut as a circular saw, but the miter saw is fixed in an arm or a track, making it more accurate.

Most miter saws come in two popular blade diameters, 10 inch and 12 inch. Most series of angles can be cut with a miter saw. Let's take a look at a few of m recommendations.
- The Ryobi 12" Sliding Miter Saw was the first saw that I ever bought and it was the first saw I ever operated. For a girl who had never built anything, I had a pretty smooth experience. If you are a beginner woodworker who plans on doing woodworking as just a hobby I would recommend this saw. I specifically love that it comes with a laser. The laser allows you to see exactly where the blade would be cutting, which was very helpful for me as a beginner. Although, I had great experiences with this miter saw, over time, I noticed that it wouldn't out-stand the wear and tear I would be putting on it. If you are looking to get heavily into woodworking, I wouldn't recommend this miter saw but if you are a beginner hobbyist who wants to just dabble, this is a great option.
RIDGID 12" Sliding Miter Saw - (Top Recommendation)
- This Ridgid Miter Saw is what I currently use and man is she a beast. I personally love that it has a 70 degree bevel capacity. It doesn't have a laser but it does have a shadow light that allows you to see where the blade will hit which is just as good in my opinion. I also have the Ridgid Miter Stand which in my opinion is the best I've ever seen. It allows you to break down the saw and move it around with ease. It is also compatible with other models if you opt for another saw. The Ridgid miter saw Runs neck and neck with the Dewalt Miter Saw, but you can’t beat Ridgid’s Warranty. Check it out more in detail in this video below.
- This DEWALT is a little cheaper than the RIDGID but still a solid choice. I've used it a few times and have had a great experience with, it does not have a laser or shadow light, which was very helpful to me as a beginner woodworker, but I don't have too many bad things to say about it. I bought this saw for my dad who does construction often and he loves it.
Cordless Milwaukee 10" Sliding Miter Saw
- Although I think corded Miter Saws are a much better option. I had the opportunity try out this cordless Miter Saw and was super impressed. If you are someone who travels a lot with your tools and need a cordless option, I would highly recommend this saw. It is a bit pricey but worth it in my opinion. Check out the video review here if you're interested.
Brad Nailer
The brad nailer is another tool that most may not consider an "essential" tool but for me, this tool has been very helpful and pleasing in my woodworking journey.
Brad nailers are mostly used detailed applications such as trim work, cabinetry and moldings. They are designed to fire brad nails ideal for binding wood trim.

Fun story about the brad nailer, I actually won this nailer in a giveaway and I'm so glad I did. I don't know if I would have realized how much I needed it if I hadn't have won one. I use this brad nailer often and would highly recommend it to any beginner woodworker.
If you're wondering just what the brad nailer is capable of, here is a quick look at a project I did using my Ryobi Brad Nailer. I completed this wall paneling project by brad nailing 1x2 trim to my blank wall to create this fun accent wall. Check out the project here to see how this Ryobi Brad nailer helped me transform my living room.

- This Ryobi Brad Nailer nails up to 1700 nails per charge and is compatible with the 18V Ryobi. battery system. It features AirStrike Technology, which eliminates the need for noisy compressors, bulky hoses, or expensive gas cartridges
Dewalt 18 Gauge Brad Nailer (Top Recommendation)
- I have also had good experiences with this DEWALT brad nailer, in my opinion, the Ryobi Brad Nailer is just as good, but if you are looking to keep the same brand, this brad nailer is also a good recommendation. The only difference from the Ryobi brad nailer is that it doesn't fire right away when you pull the trigger.
Ridgid Pancake Compressor w/ Brad Nailer and Finish Nailer
- If you are more a pneumatic person. This Ridgid Pancake compressor set is a great option for a beginner, specifically because it comes with a compressor, which can be used for a ton of other things. It comes along with a brad nailer and a finish nailer all in one, so you are getting a lot of bang for your buck. I bought this set a while ago, and even though I have cordless nailers, I still get use out of the air compressor.
Jigsaw
This tool doesn't get as much use as the tools listed above, but it definitely comes in handy when needed. I use a jigsaw mostly for cutting curvy lines into wood.
 Most saws are made to cut in a straight line but the jigsaw gives you the flexibility to cut complicating shapes and patterns.
Cordless Ryobi Brushless Jigsaw (Top Recommendation)
This cordless jigsaw has been a pleasant tool to have. If there is any tool I would want to be cordless, it would be a jigsaw because of all the curves and turns you make when operating it. I would highly recommend this jigsaw if you plan on using it often. Compatible with the Ryobi 18V battery series.
This recommendation is for the more advanced individuals that may use the jigsaw a ton.
Circular Saw
When working with lumber, the circular saw has proved to be a very useful tool. It is an electric saw that turns a round blade to cut wood and other materials depending on the blade.
 Sometimes the miter saw is just too stationary for a straight cut, so I use my circular saw often to make lap joints and other less conventional cuts.
- I have gotten good use out of this DEWALT circular Saw, it features up to a 57 degree bevel cut capacity and features a brake. I would also recommend the Diablo Steel Demon blade to go along with this saw, as you can see from the picture above, it cuts through metal. See it in action here. Most circular saws come with blades but I know Diablo to be the best.
Ridgid 18-Volt 7 1/4 Circular Saw - (Top Recommendation)
- I was really impressed by this particular circular saw model. It cut through plywood like butter. If you're looking for a nice model, this is the circular saw for you. See it in action here.
Makita Rear Handle Circular Saw (Highly Recommended)
- This Makita Rear Handle Circular saw isn't something I would necessarily suggest to a beginner, but it's too good of a saw for me not to recommend it. This saw is hands down my favorite and has replaced all of my circular saws since purchasing it. The cuts this saw makes are so smooth and I highly recommend this tool for anyone who plans on pursuing woodworking on a serious basis.
Random Orbital Sander
One of my favorite things to do after finishing a furniture piece is sanding. I hope you could detect the sarcasm in my voice. Most furniture pieces need a little sanding at the end so it is vital to have a Random Orbital Sander Handy.

Random orbital sanders are handheld tools where the sanding blade delivers a random-orbit action. They are primarily used for sanding.
Dewalt Cordless Orbit Sander - $129 (Top Recommendation)
- This is my favorite sander by far. I have had great experiences with it and well worth the price in my opinion. It's variable-speed dial provides speed control and it's one-handed locking dust bag attaches securely to the sander to help with dust collection. It also features a rubber overmold grip for comfortability.
Ridgid Sander- $69
This Ridgid orbital sander is another great option at a great price. It also comes with a polisher kit and carrying bag. Most orbital sanders in my experience are pretty close to each other so any one you get will most likely be a good option.
Ryobi Corner Cat Sander - $35
This isn't an orbital sander but it has come n handy when trying to get into the hard to reach corners.
Now let's take a quick recap of everything you need to get started.

Now that we have made it through the essentials list, I still wanted to give you a little extra and provide you with a list of other useful tools that I have found very helpful to have in my shop.
Sawhorses - When working in the shop, you need something to build on. I would suggest getting a good pair of sawhorses that you can set stuff on or even set a piece of plywood on to make a quick workspace.
Measuring Tape - If you plan on building furniture, a measuring tape is a must to get those accurate measurements. This is really an essential, but there are tons of options out there.
Level - When building furniture, making sure everything is level is really important. Make sure you have a level handy to make sure things are straight and even.
Square - Just like a level, a square is essential during building to make sure things are square and also when putting together tools to make sure they are also square.
Drill Bit Set - You'lle need some help driving in those screws. Get you a good Drill Bit set to go along with your drill.
Shop Vac - With all the woodworking you'll be doing, rest assured there will be dust flying. Make sure you have a good shop vac around to clean up the mess.
Clamps - Clamps are the one tool you'll never have enough of. Clamps come in handy when trying to join lumber together, especially if your a one person team.

DEWALT Atomic One Handed Reciprocating Saw Tool Review
"DEWALT's Atomic Hand Recip Saw is making a name for itself"
DEWALT has always been a respected brand in my eyes and not much has changed with this DEWALT one handed reciprocating saw. Today I am sharing all the ins and outs of this saw, hopefully I can answer any unanswered questions you may have.

What's Included
The Dewalt One Handed Reciprocating Saw comes packed with the DEWALT reciprocating saw, a belt hook and two saw blades. Battery is not included with it but the reciprocating saw is compatible with the 20V battery series.
Testing out the Dewalt Reciprocating Saw
This tool review was super exciting to do because I had a helper to help me out with testing it out. My dad wants to give her a try, so I thought why not review it together.
 My dad had an older corded DEWALT model that he used, so we decided to compare the two and see which one he liked the best.
With the saw being one handed and compact, it was really easy to maneuver when cutting. This would be a great tool for someone with smaller hands. Compared to the older model, you can really tell a difference in the torque, the blade doesn't slow down during the cut and it really is a powerful little machine.

I wouldn't replace this with a full size reciprocating saw, but for quick jobs or jobs in small spaces, this compact saw would definitely be my go to.
We cut through some 1/2" plywood and also cu through some metal nails and it cut smoothy. My dad was very impressed.
 Another feature I liked that I don't see often with reciprocating saws is its ability to stand up straight when sitting on the battery. Most reciprocating saws don't have the ability, you have to sit them on the side which sometimes results in them falling over, but I was pleasantly surprised to learn that this DEWALT Atomic Recip saw was different. Kudos DEWALT.
 Want to see for yourself? Check out this quick video showing off the DEWALT Atomic One Handed Reciprocating Saw.
 Want to see for yourself? Check out this quick video showing off the DEWALT Atomic One Handed Reciprocating Saw.
Favorite Features
Compact
I really like the size of this tool. With it only 12.5" from front to back, it is easy maneuverable and easy to use with one hand.

Quick Change Accessory System
The quick change accessory system allows you to put the blade in seamlessly. Theres no guessing with this tool.

LED Light
This seems to be becoming standard on most tools, but the LED light is always a great addition to help illuminate dark work spaces.
How It Could be Better?
I couldn't think of anything that I would want to see differently on this tool and that doesn't happen often, so I'm giving this DEWALT Atomic Reciprocating Saw a big thumbs up. I definitely love my new addition to the shop.
The DEWALT One Handed Reciprocating saw redials for $129.00 at the Home Depot.

Pumpkin Candle Holder
"The Dremel 4V Rotary Tool is carving its way through."
"This post is sponsored by the Home Depot as a part of The Home Depot's Pro-Spective Campaign."
With thanksgiving around the corner, I figured I would get into the holiday spirit by making something festive around the house. So I decided to create this fun and easy project, a pumpkin candle order, and I have a little help from my friend, the Dremel 4V Rotary Tool.

There are some affiliate links in this post, meaning I get a small commission if you purchase through these links, at no cost to you. Click Here to read my full disclosure.
Materiels
- Dremel 4V Rotary Tool
- Foam Pumpkin
- Flowers
- Candle
- Candle Holder
- Floral Foam
Step 1: Trace Circle
The first thing I did was use my glass candle holder to trace the circle I wanted to cut on top of the pumpkin. I just used a regular marker to mark the circle onto the pumpkin.

Step 2: Cut the Circle
Then I started cutting the circle using my Dremel 4V Rotary Tool. I decided to use a blade from my Dremel EZ lock cutting kit to help me get the job done.

The Dremel 4V Rotary tool was designed for beginner crafters and DIYers, so don't be intimidated by this tool. Even if you are new to using rotary tools, it allows you to approach rotary easily with this cordless tool. I love that it's small and compact and easy to handle.

I also love that it has a lot of flexibility with all of the different accessories, making it the perfect tool for jobs in and around the home.
Step 3: Decorate
After I cut the whole out, I placed in my glass candle holder to make sure it fit and added flowers and floral to decorate it.

I also added some floral foam into the bottom to give the candle some height, and WAAA-LAH! We are finished. I know, that seems very easy right? Well it was.
I acknowledge that the Home Depot is partnering with me to participate in the THD Pro-Spective Tool Review Program. As a part of the program, I am receiving compensation in the form of products and services, for the purposes of promoting The Home Depot. All expressed opinions and experiences are my own. My post complies with the Word of Mouth Marketing Association (WOMMA) Ethics Code and applicable Federal Trade Commission guidelines.

Acrylic Place Cards using the Dremel Stylo
Get into the holiday spirit with these fun acrylic place cards using the Dremel Stylo Craft Tool.
With the holidays around the corner, I thought what better way to invite my guest over than with some personalized place cards, and I'm using my Dremel Stylo Craft Tool to get it done.
"This post is sponsored by the Home Depot as a part of The Home Depot's Pro-Spective Campaign."
Before I do the real thing, I figured I'd play around and get some practice in first, so I decided why not share that process with you guys.
There are some affiliate links in this post, meaning I get a small commission if you purchase through these links, at no cost to you. Click Here to read my full disclosure.
 First to get started you will need some acrylic place cards and if your not good at lettering it may not be a bad idea to have a template to help make your lettering look as good as it possibly can. I had some old stickers laying around that I used to help me draw out some words.
 For those non calligraphers, place something underneath the acrylic place card and trace over it. I outlined my letters first and then filled in the letters with the Dremel Stylo.
 These acrylic placards are perfect for this Dremel Stylo, it easily carves out the acrylic and you can easily see the words once you're done. If you are a calligrapher, you will really enjoy this tool.
 It features a comfortable grip and with its slim size and minimal vibration, it allows you to work on fined detail applications such as this one.
  I also like that the Dremel Stylo isn't incredibly loud. It has a compact motor that makes the craft tool fairly quiet, making it great in home use.

If you'd rather see it in action, check out the video below.
Here is an excerpt from my full tool review on the Dremel Stylo.
FAVORITE FEATURES
Lightweight Design The sleek design on the Dremel Stylo definitely makes it easier to use, compared to other Dremel rotary tools that where much bulkier. It also has a very comfortable grip.

Quiet Motor When doing a project like calligraphy, it can be pretty time consuming, so I really love the quiet motor. It isn't completely silent, but quiet enough were I don't mind having it run for minutes on end.
Variable Speed The Dremel Stylo's variable speed ranges from 5,000 RPM to 22,000 RPM. This gives optimal speed control for applications such as wood engraving, glass etching and much more.
THE DREMEL STYLO VERSATILE CRAFT TOOL RETAILS FOR $49.97 AT THE HOME DEPOT.

Milwaukee Cordless Tower Light Review
"Milwaukee is shining bright with this Cordless Rocket Dual Power Tower Light"
One thing I have always been short on is lights in the shop. My "shop" is really my two car garage and it definitely didn't come equipped with much lighting, so I was super excited to try out this Milwaukee M18 18-Volt Lithium-Ion Cordless Rocket Dual Power Tower Light.
There are some affiliate links in this post, meaning I get a small commission if you purchase through these links, at no cost to you. Click Here to read my full disclosure.
What's Included
This box comes packed with the one Milwaukee M18 18-Volt Lithium-Ion Cordless Rocket Dual Power Tower Light. Home Depot also offers kits that included the charger and battery but luckily this tool is fully compatible with the M18 system, so I used one of my other Milwaukee batteries to test this power light out.

Testing out the Milwaukee Power Tower Light
Any tool I can set without using a manual is a win for me. This light pretty much is self explanatory. It setups and breaks down easily and serves as a great addition to a dark shop.
I was happy to see the different light settings on the power light and how easy it was to change between them with a push of the power button.

The Milwaukee M18 18-Volt Lithium-Ion Cordless Rocket Dual Power Tower Light also seems pretty durable. When I bump into it, it will slide before it tips over, which is great for me, because I'm always moving things around in my shop. I also love the tower portion of the light, it came in handy when working on the ground, I was able to put it beside me and shine it directly down on the project I was working on.
Favorite Features
5-Second Setup
The setup was really as easy as 1,2,3. I like the ability to be able to easily break down the light for storage or traveling.

2,500 Lumens
My shop definitely needs light help, so the more lumens the better. The Milwaukee M18 18-Volt Lithium-Ion Cordless Rocket Dual Power Tower Light provides 2,500 lumens of brightness. This would be an awesome light for a job site, it definitely is a great addition to my garage.
Cordless and A/C
Although I'm a huge fan of cordless, its nice to be able to have the option to plug in the light for unlimited power. Who doesn't love options?

How it Could Be Better?
I think this light is a bit pricey. I think now that I have one, I'm glad to have it but I don't know if I'm happy about the cost. It would be nice if it was priced a bit lower. Nonetheless, I am glad to have it as a part of my shop.
