
WoodWorking

DIY Pantry Shelf
"Bringing DIY to the Pantry! Build an easy pantry shelf for $50"
Hey Guys ! Kelly here with City Girl Meets Farm Boy! Every spring, I get the itch to get organized, especially in my kitchen. My pantry is a tiny closet and I decided this year I was ready to change that. Since I am on a budget, I had to search for ideas of how to make one myself with the resources I had. I searched the internet and pinned ideas on my Pinterest page. I fell in love with a plate rack from Shanty2Chic, but I had to change it to fit the pantry setting I was looking for. I then shopped at Ikea to see if there was something there that fit my budget. I found another shelf that was too small for me but was a great set up.
I took both of these ideas and created my own shelf that would fit my needs and my area. I decided to convert an extra bedroom into a pantry/mud room and add this shelf into the space. The best part is, it was built with all 2x4s, which are so inexpensive.
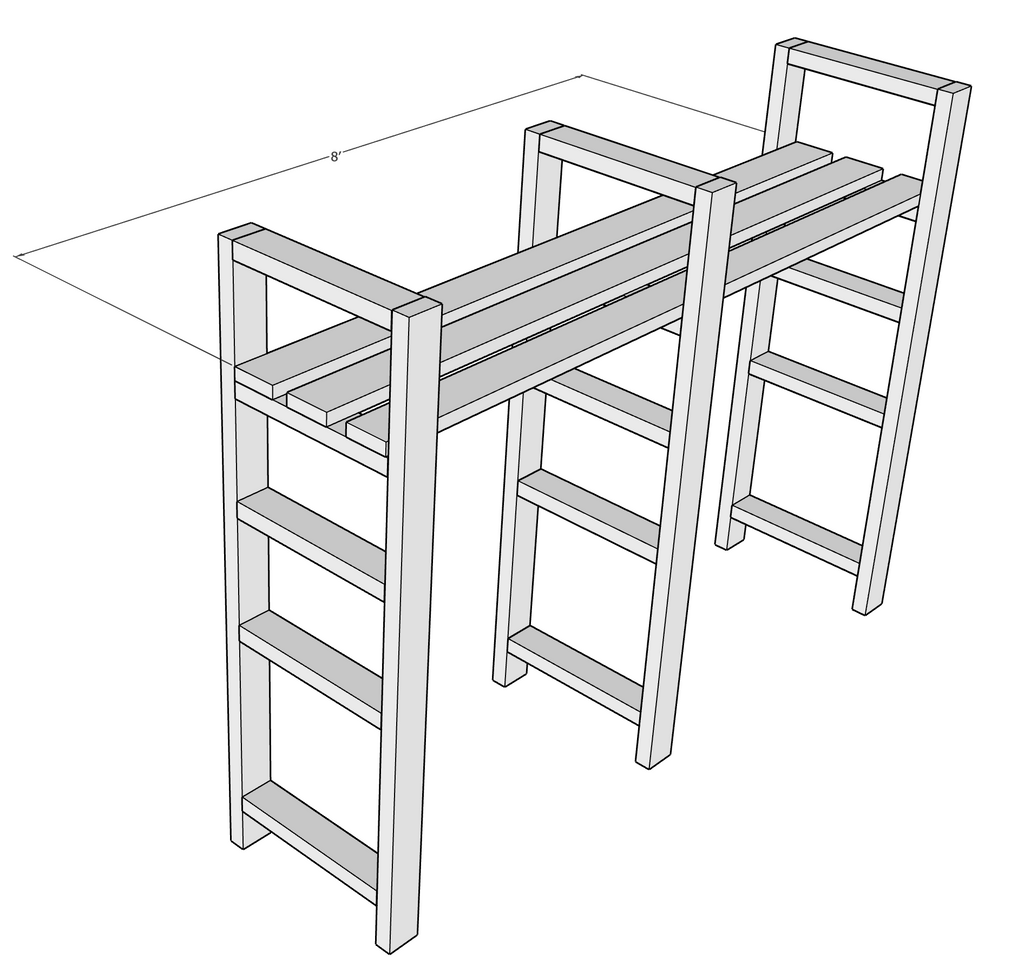
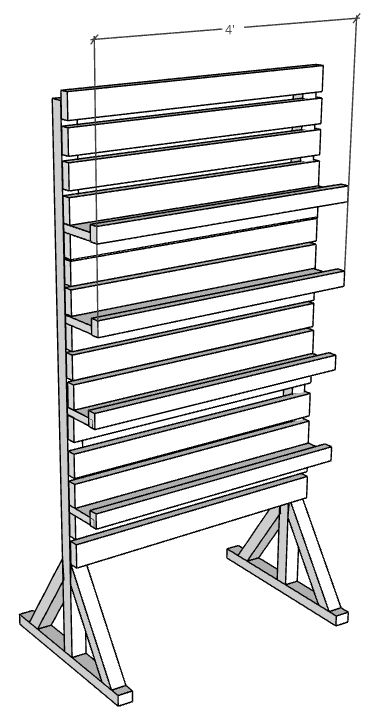
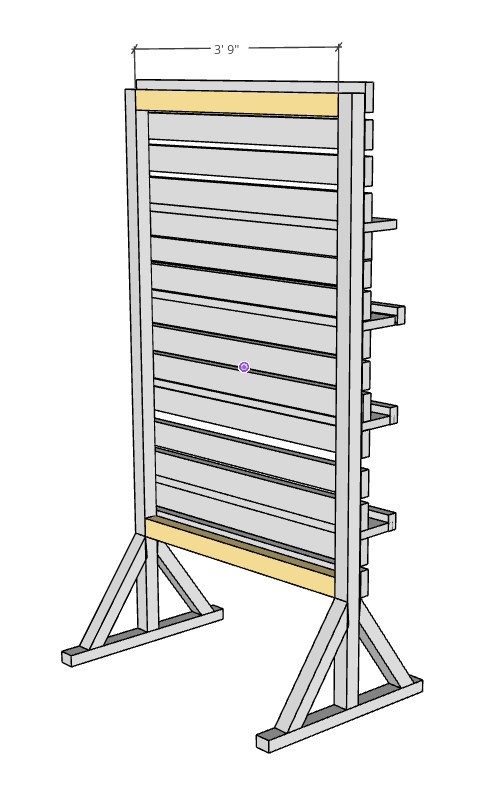
Dimensions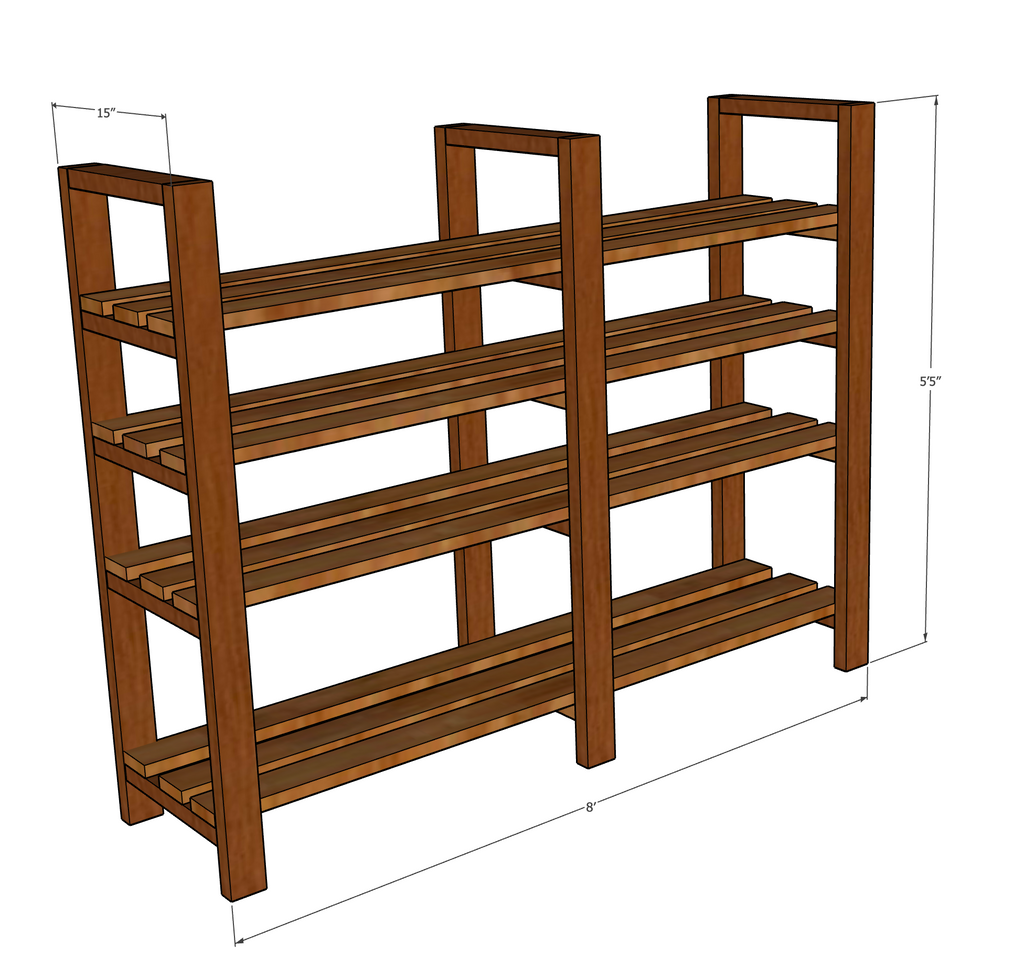
Supplies Needed
- 22 - 2x4s @ 8 feet long
- Kreg 2 1/2 inch screws
- 2 1/2" Wood Screws
- 2 1/2 inch wall screws
- Real Milk Paint Company - Arabian Night and White mixed
- Varathayne Briarsmoke
- Real Milk Paint Top Wax
- Paint and stain supplies
- Sand paper (I used 100 grit)
Tools Needed
- Hand Drill
- Miter Saw
- Kreg Jig
- Level
- Measuring Tape
- Stud Finder
- Sander
Step One - Take Measurements
Use your measuring tape to measure how tall you want your shelf to be, how deep you need it, and how long you need it to be. With four shelves, you also want to consider the spacing (you can solidify later) and what you want on each shelf. My spacing was 8 feet long, 5.5 feet tall and 15 inches deep.
Step Two - Purchase Materials
Head to The Home Depot to pick up your 2 x 4's, screws, paint and stain. Ask for help if you need it! You can even have them cut the boards.
Step Three - Cutting Wood
The 2 x 4's come in 8 foot long pieces and so that made things easy. Use your miter saw to cut your wood down to size.
Here is my cut list:
* 12 boards @ 8 feet long
* 6 boards @ 5.5 feet long
* 15 boards @ 1 foot long
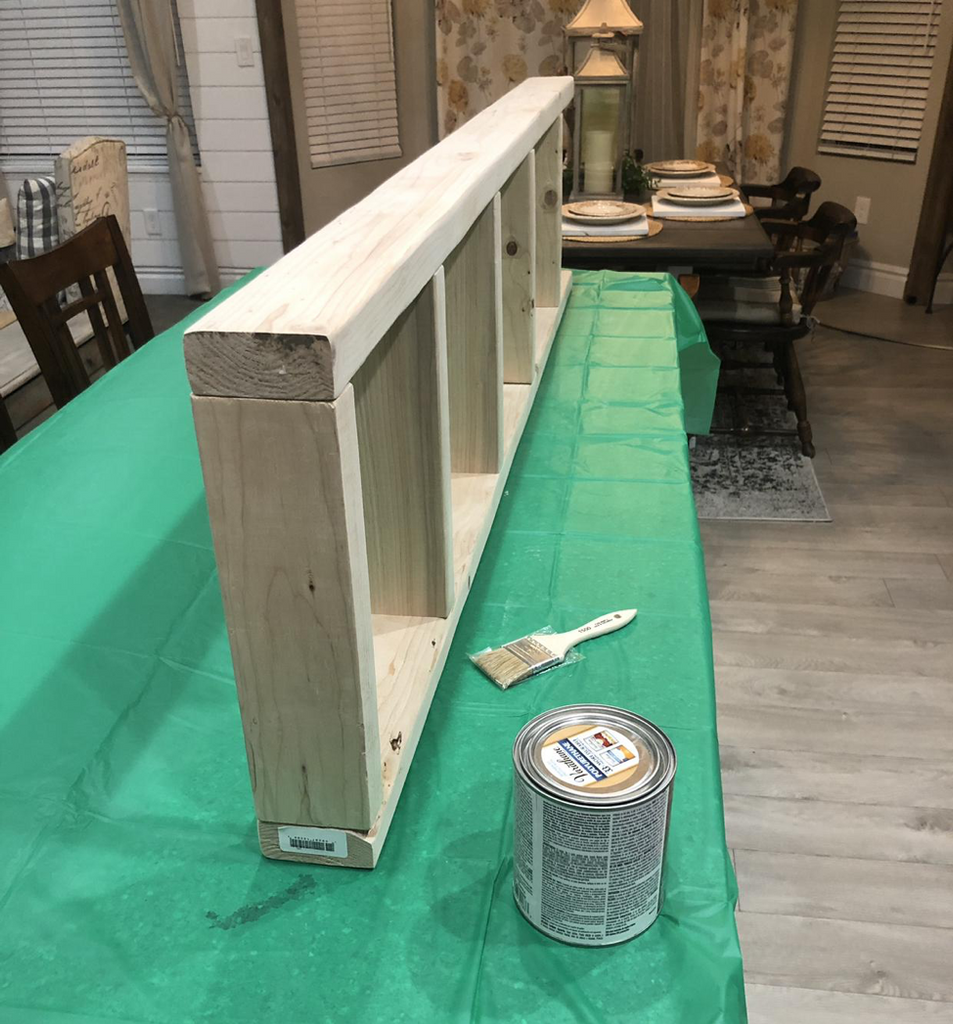
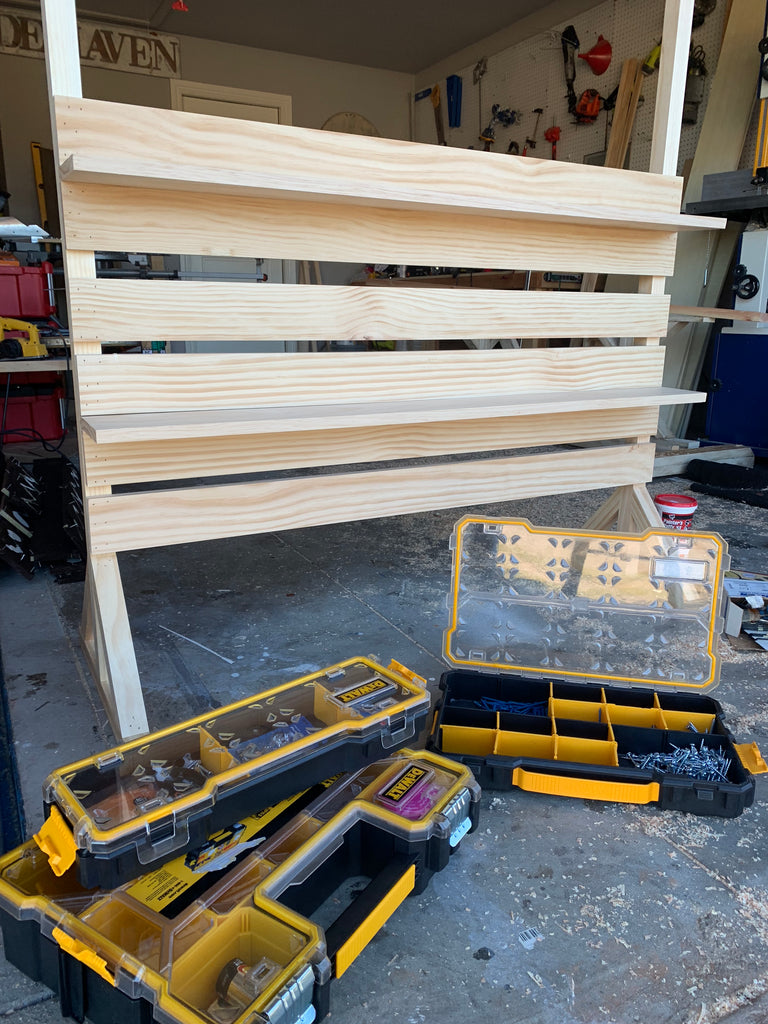
Assemble the three pantry shelf legs and then begin staining the 2x4s.
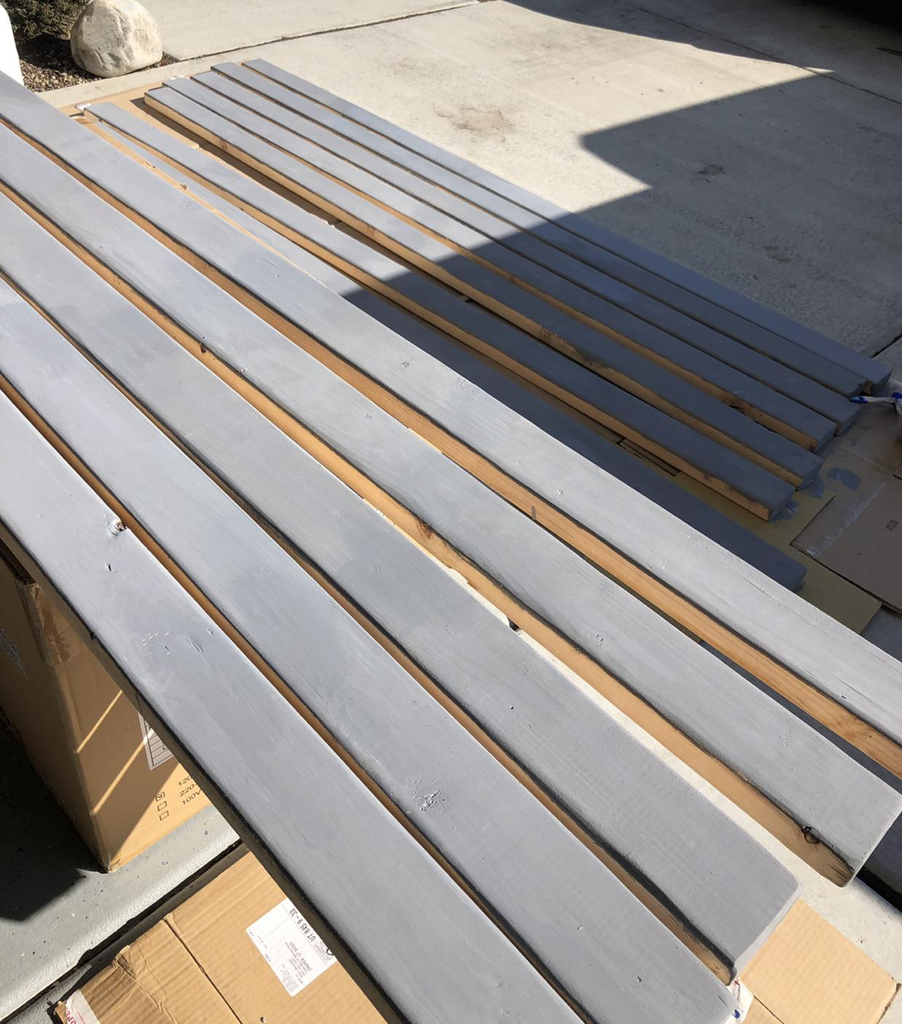
Step Four - Sand, Paint and Stain
I decided to sand, paint and stain first. You can use a hand sander and smooth out the edges. I painted my 12 boards that were 8 feet long. After the stands were made, I stained those boards. Your top coat can be added now or at the end.
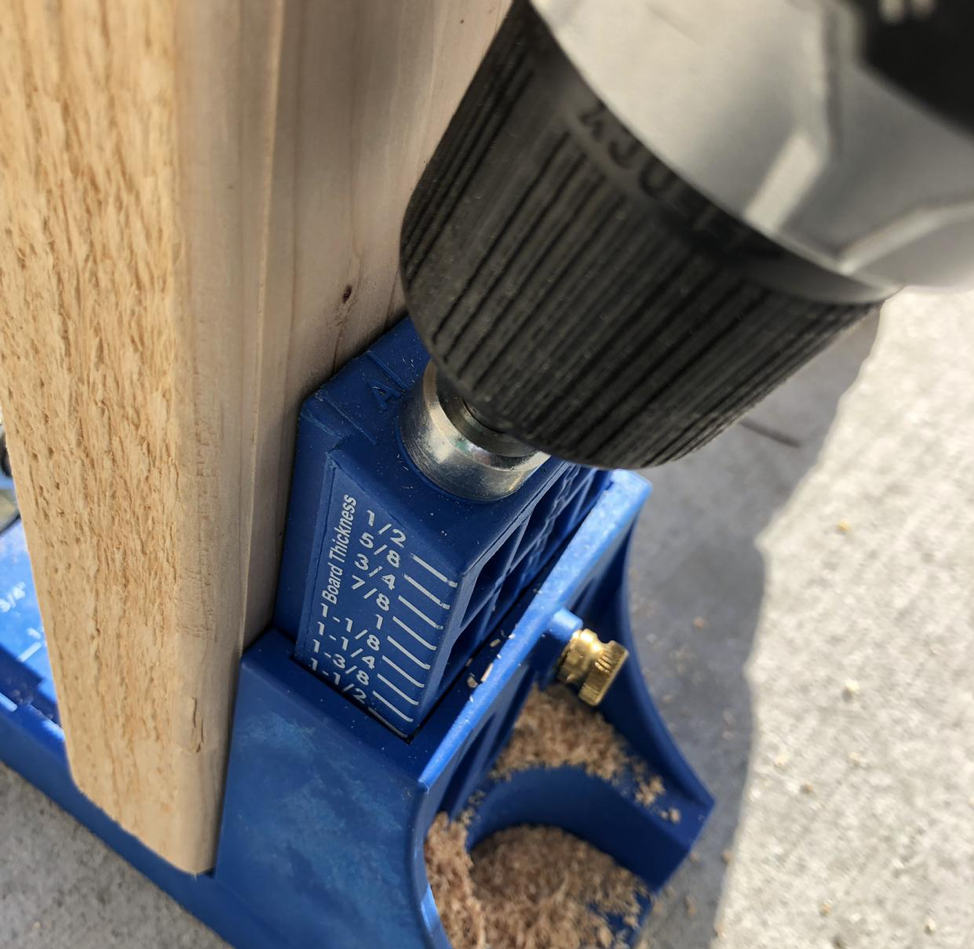
Step Five - Pocket Holes
Creating pocket holes is the key to this project. If you have never used a Kreg Jig before, then read all about that here. You use the measurements required for a 1 1/2 inch board. Even though it's a 2 x 4, the exact width is 1 1/2 inches.
Using your hand drill, create the pocket holes using a Kreg Jig K4 Pocket Hole System on a 1 1/2" setting, with 2 1/2" Pocket Hole Screws to attach along with Wood Glue.
Here is where you will add these holes:
- No holes in the 8 foot long boards
- No holes in the 5.5 foot long boards
- 2 holes, side by side and about 1 inch apart, on the ends of EACH 1 foot board. Make sure they are on the same side.
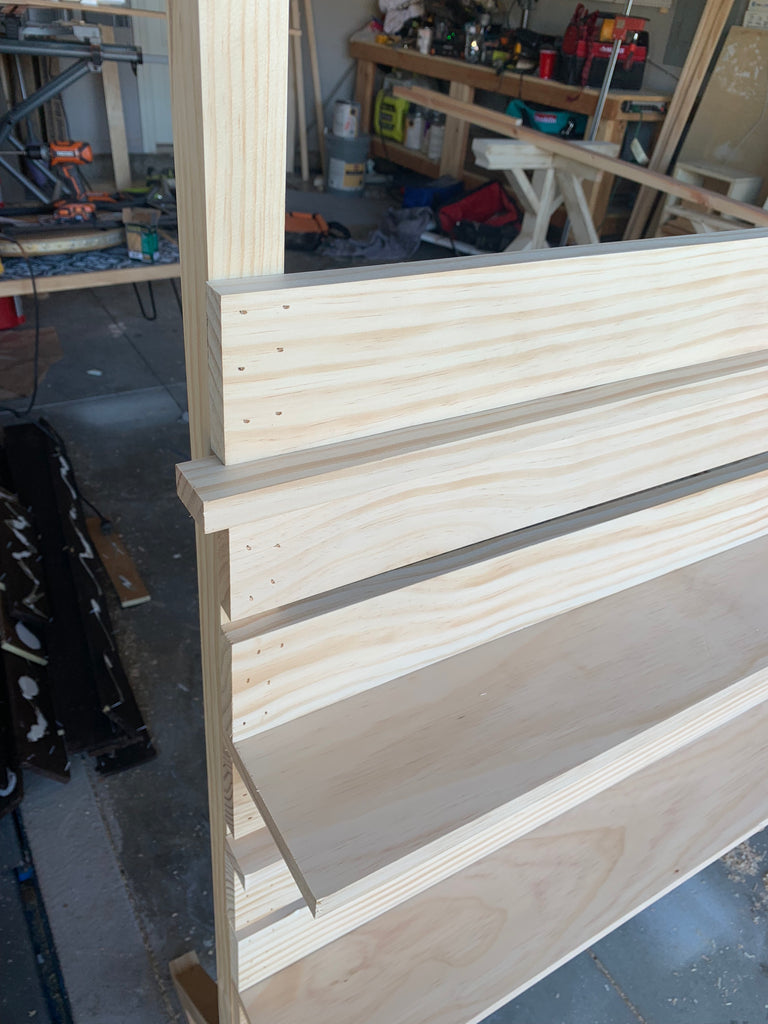
Step Six - Mount Boards
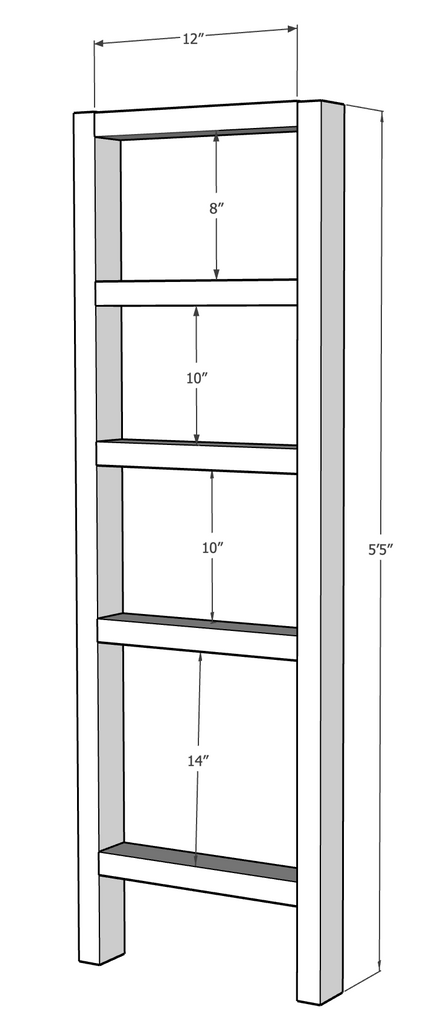
This is the fun part! You will mount 4 one foot long boards to one of the 5.5 foot boards using your hand drill. The spacing is up to you. But you have to make sure each shelf is the same! Here is my spacing:
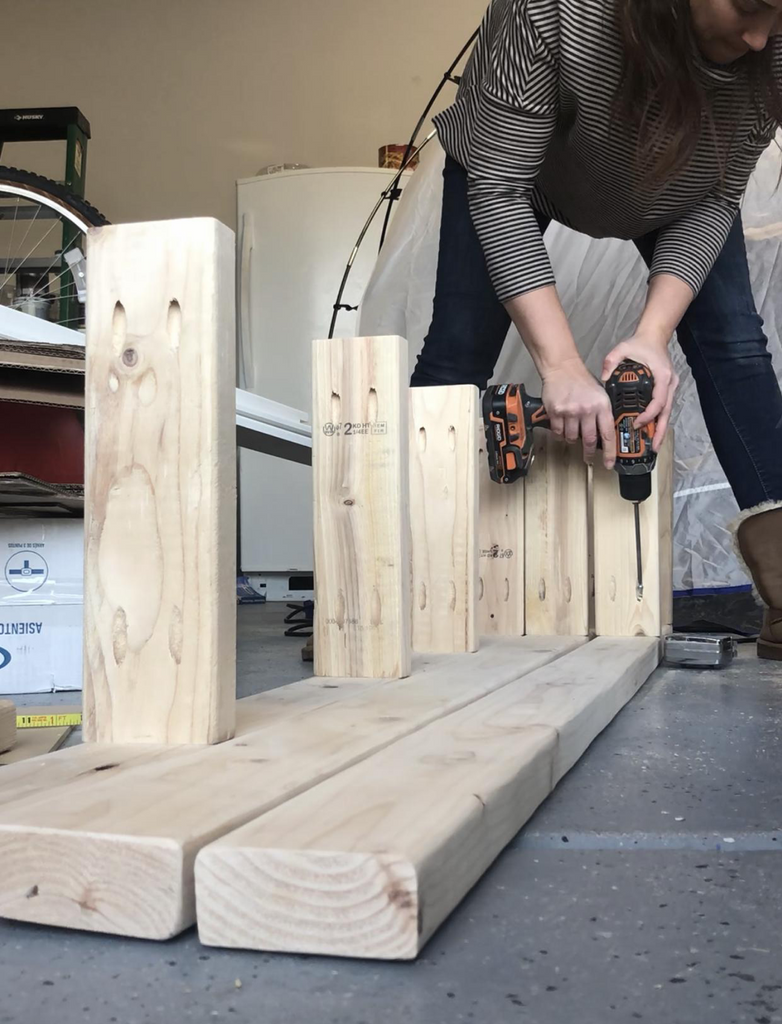
I started with my first shelf and drilled it to the top of my 5.5 board using 2 1/2" Pocket Hole Screws. I measured 8 inches and mounted one again. Measured 10 inches, mounted, 10 inches, mounted, 14 inches, mounted. Repeat 3 times.
Reference the measurements above.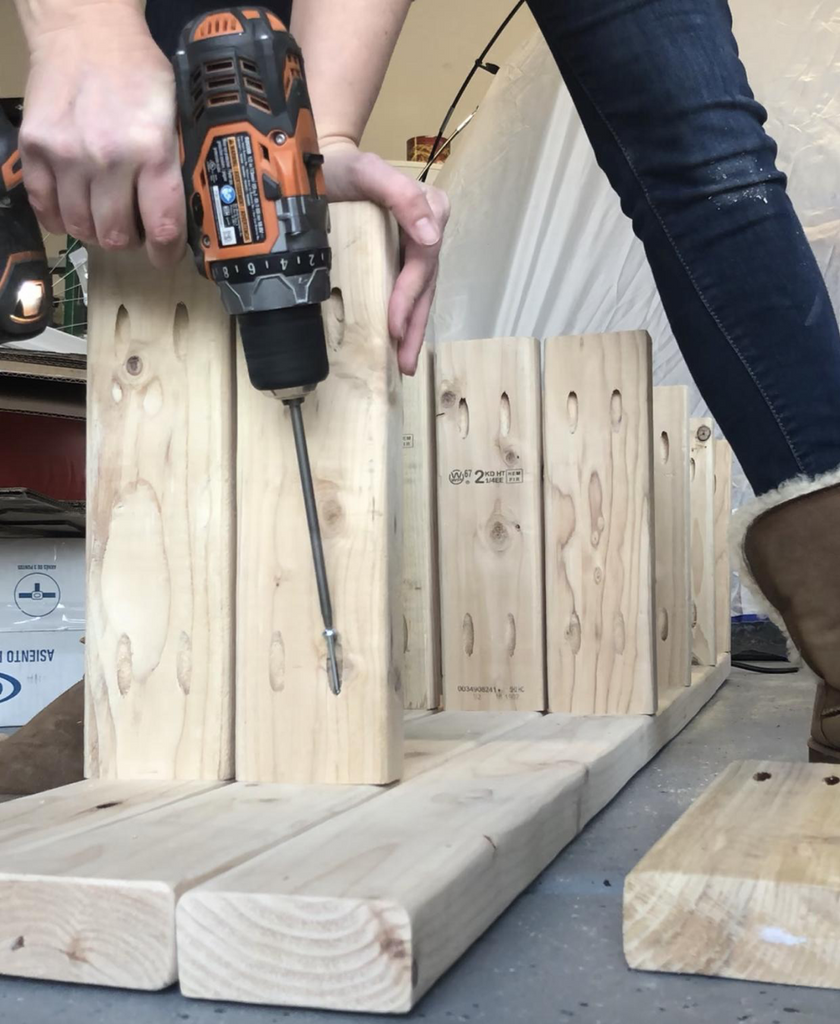
HINT: After the first stand, do not measure the distance between each shelf as you mount. Measure from the top of the board each time. This keeps your entire piece on the same page. If you mount and measure between each shelf as you mount, and you are off by a few milimeters, then all the rest of your boards will be off. The distance I choose correlated with the things I would use on my shelf.
After you mount the first set of shelves, you will add the next 8 foot board to the back and mount again. Your first shelf stand is done! Do this 2 more times.
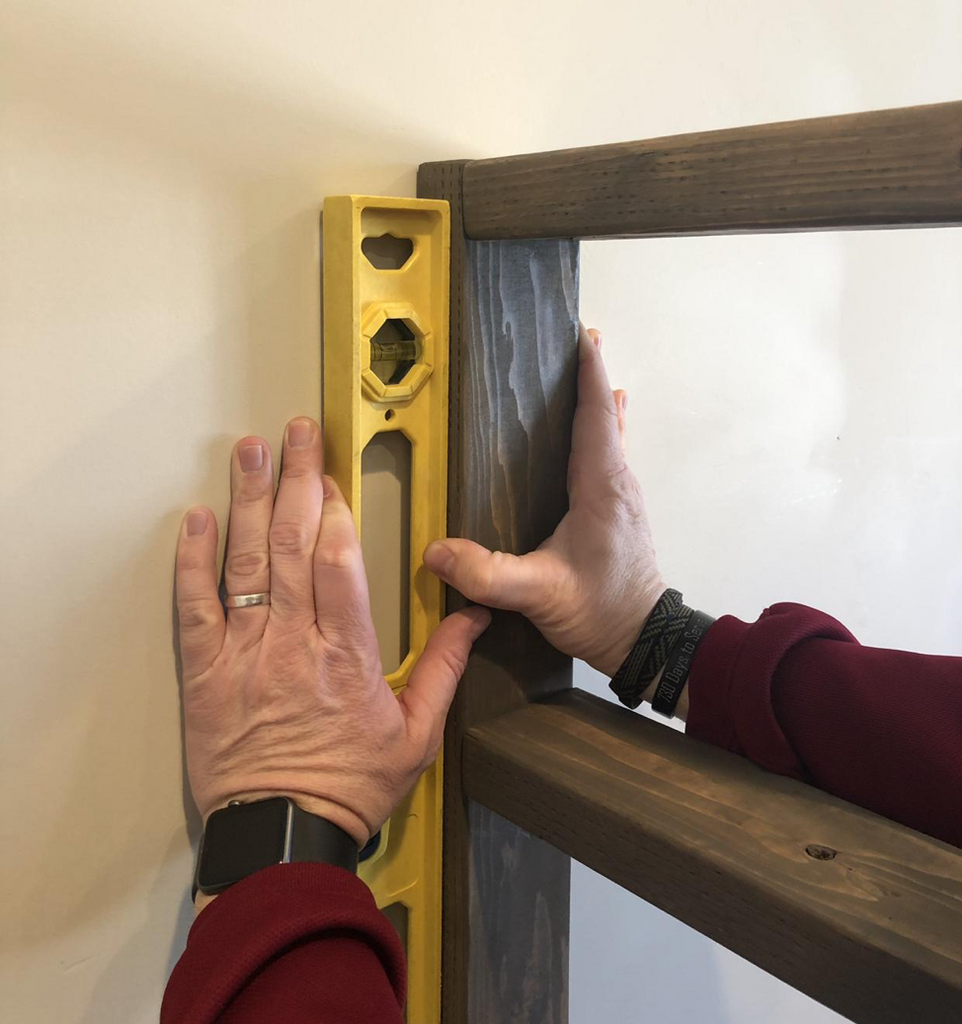
Step Seven - Put Your Shelf Together
You are almost done! Now you will mount your stands to the wall and add your shelving.
- Find the studs in your walls using your Stud Finder. You will be drilling your stands to the wall for stability. If you cannot find the studs you will need to add anchors.
- Pre-drill the 2 1/2 inch wall screw into the top and bottom of the stand.
- Place your stand up against the wall and use your level to make sure it is straight.
-
Drill into the studs.

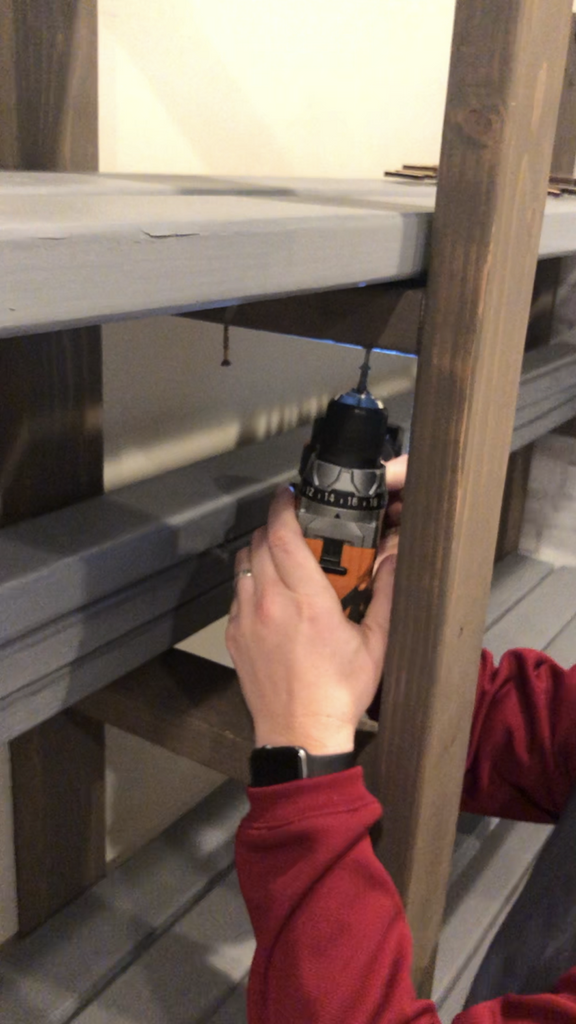
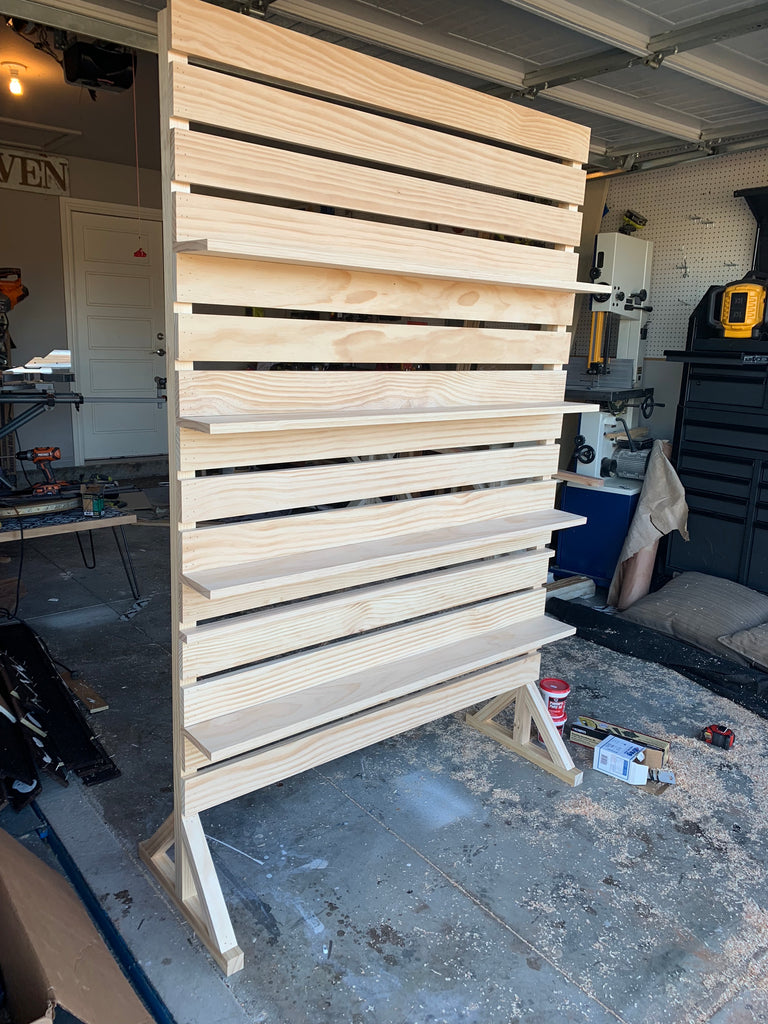
Step Eight - Add Shelves
This part is super simple. Add three 8 foot boards to each shelf and space them equally. Drill the 2 1/2" Wood Screws up through the BOTTOM of the shelf into the 8 foot board. This is so you can not see the screws.
 Your shelf is now complete! You have built a large pantry shelf for under $50!
 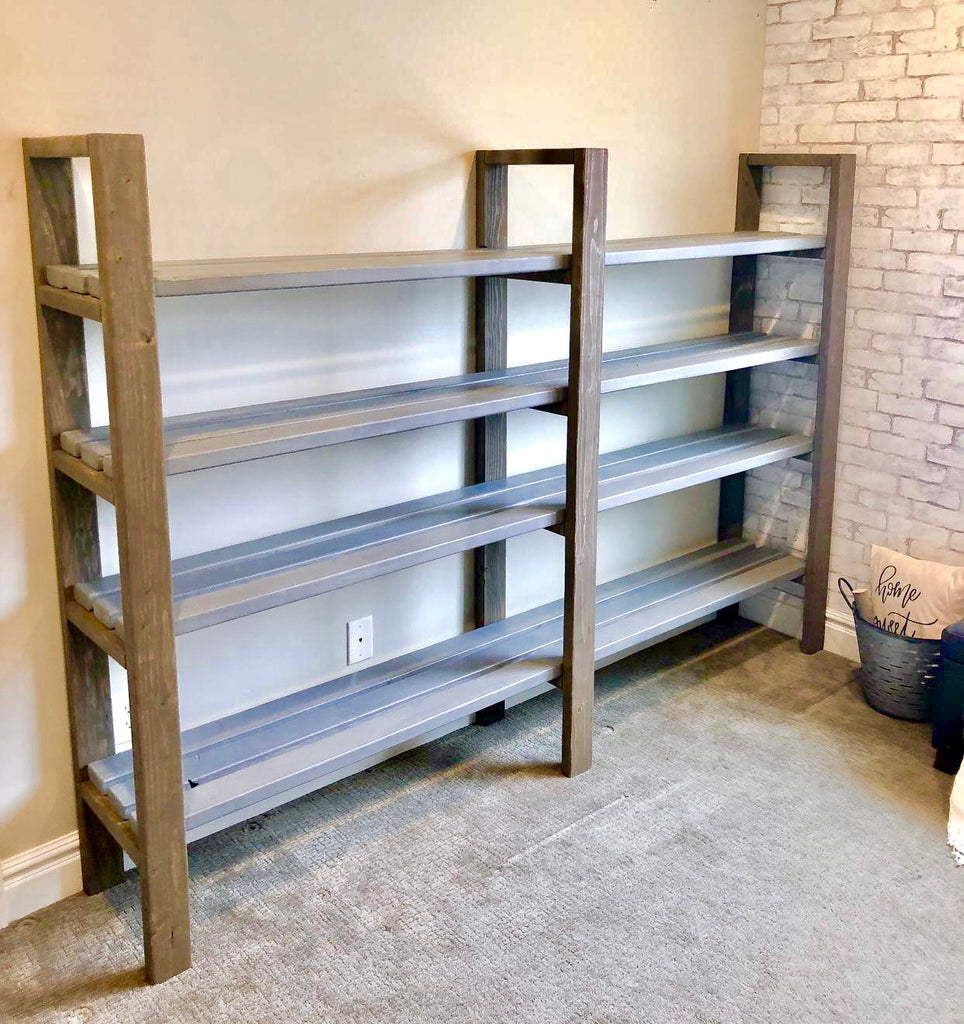 and let's take one more look of it all styled up! To see how I styled my pantry shelf, check out my post here and for more fun projects be sure to check out my blog here.

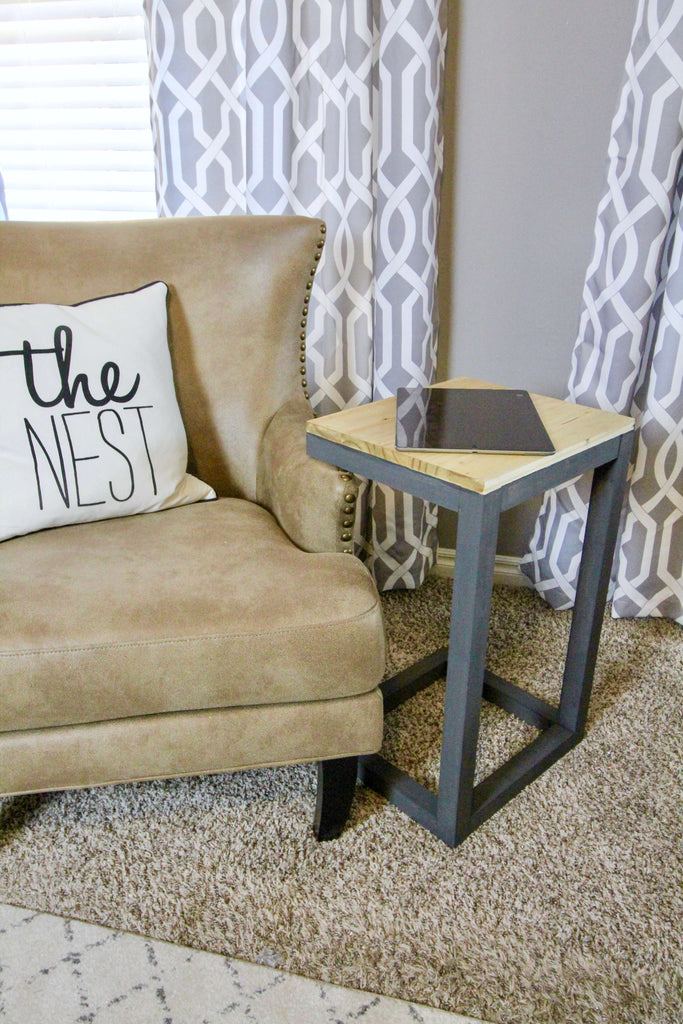
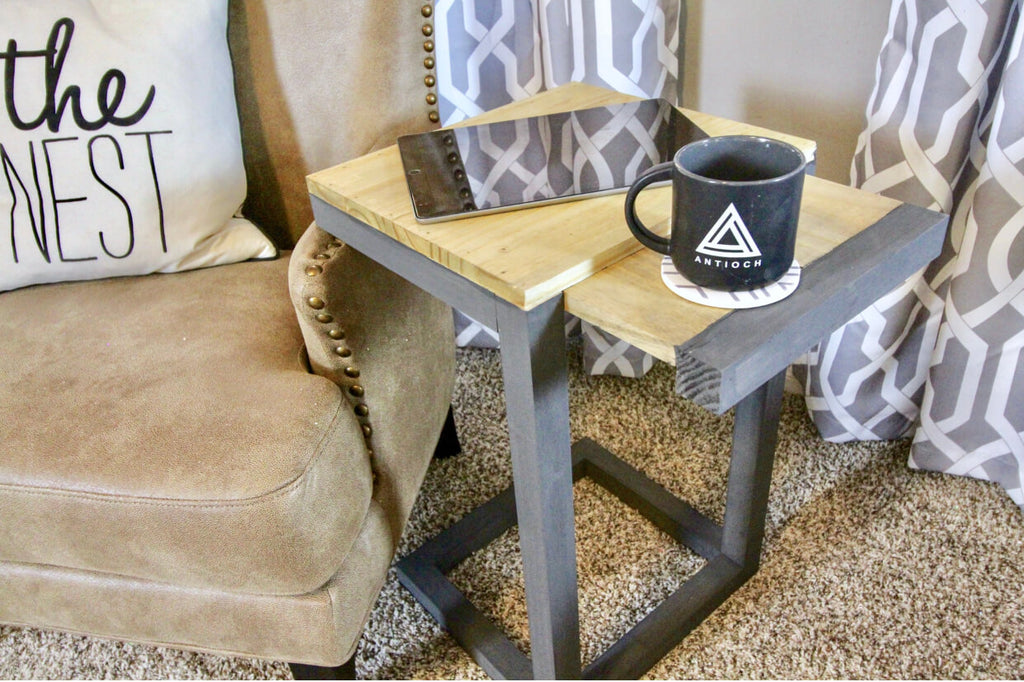
Pull Out Side Table
"A DIY side table with a little something extra"
I must admit I am always a huge fan of hidden features, so this DIY side table was a fun build for me. A simplistic build with a cool built in feature, it doesn't get any better than that.
This post is sponsored by the Home Depot as a part of The Home Depot's Pro-Spective Campaign."
There are some affiliate links in this post, meaning I get a small commission if you purchase through these links, at no cost to you. Click Here to read my full disclosure.
Even better than that, I got to use some really cool tools during this build. My new compact DEWALT 20-Volt Cordless Brushless Drill/Driver and Impact Combo Kit was super helpful during this build. The kit also came with two batteries and a tool bag. This drill/driver and impact kit is ideal for most drilling and fastening applications.

I also want to note that I am a fan of DEWALT's Premium battery pack. IT includes a 20-Volt battery and dual-port charger. its protected by a 3 year warranty and comes with a 1-year free service contract. Can't beat that.
Lets get to it!
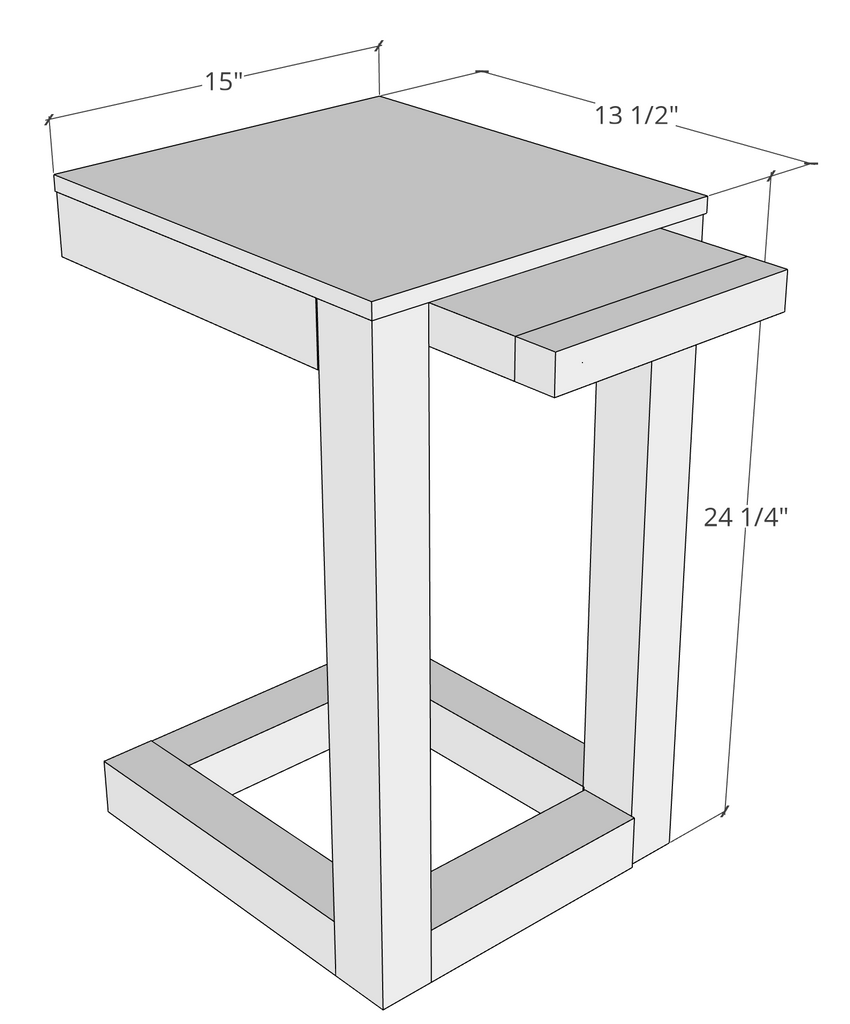
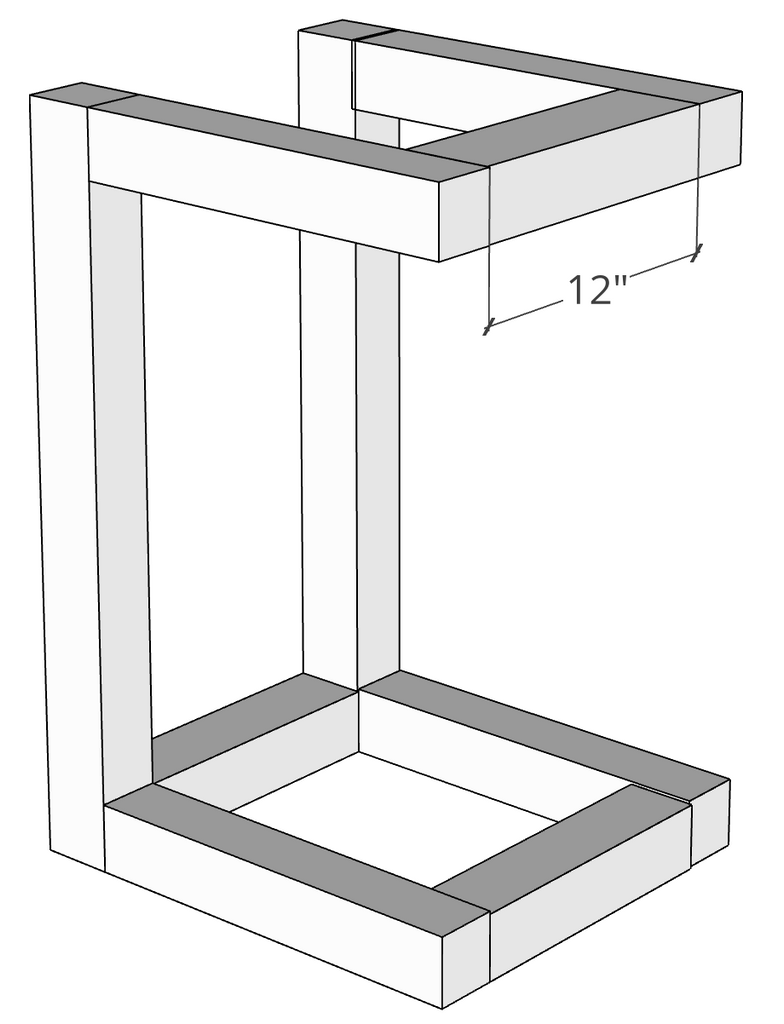
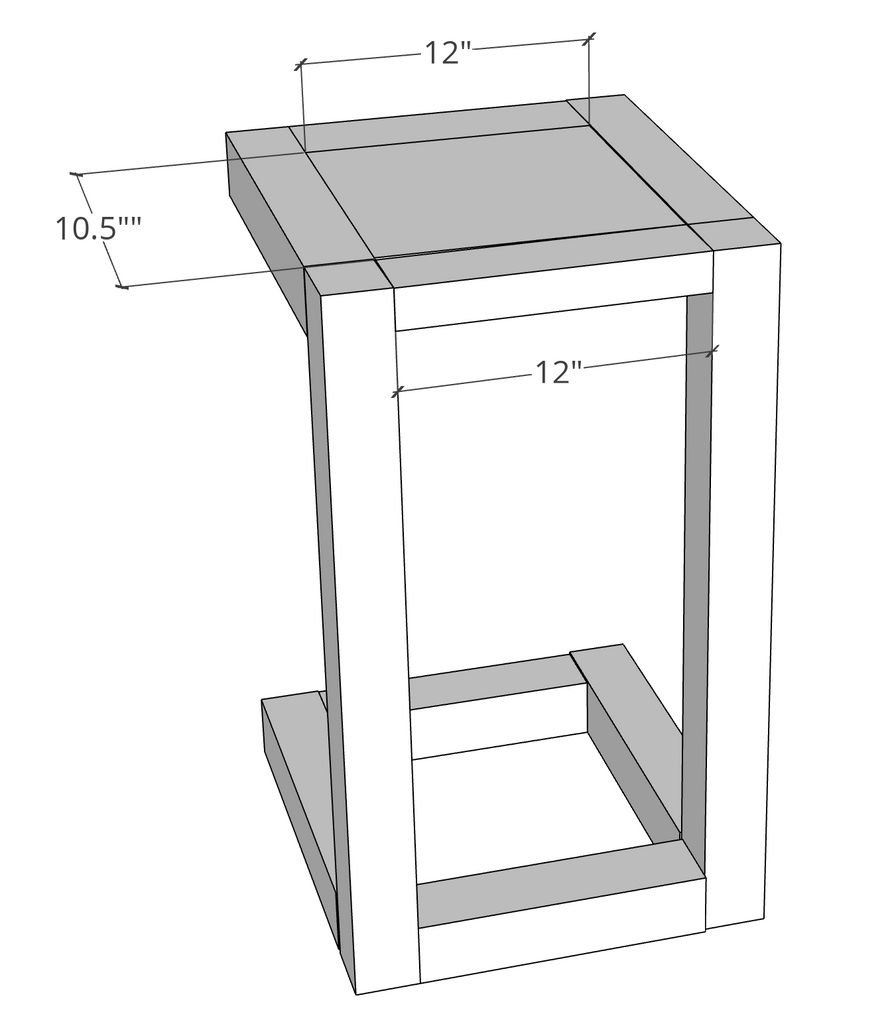
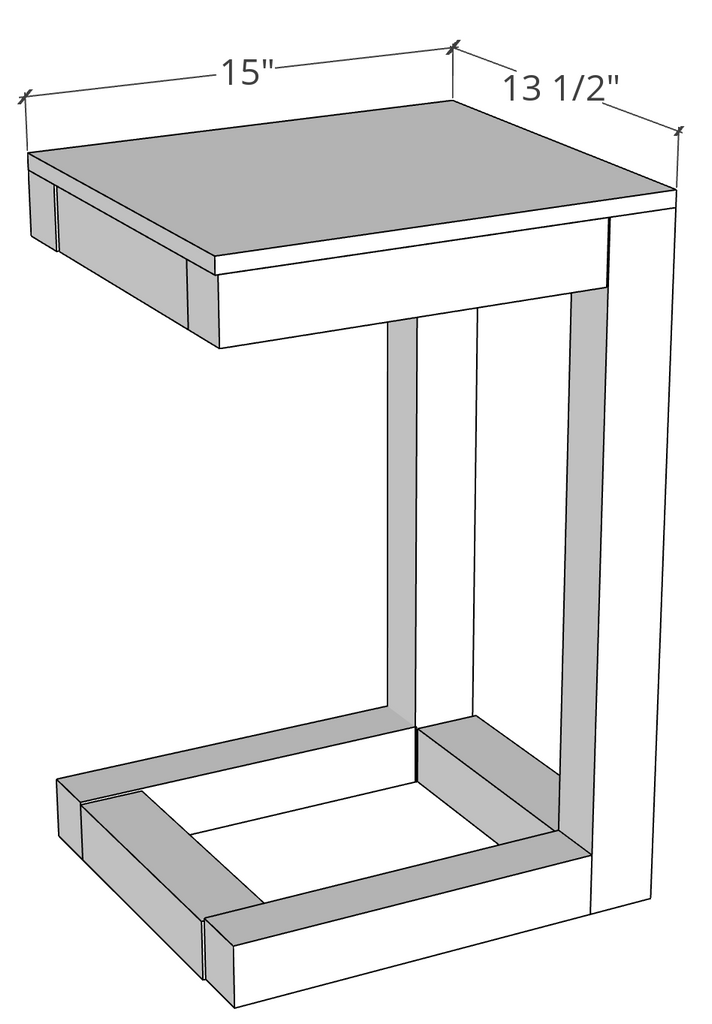
Dimensions
Materiels
2 - 2x2 @ 6ft
1 - 3/4" plywood (2x4)
1 - 1/2" Pocket Hole Screws
Square Dowel
Cut List
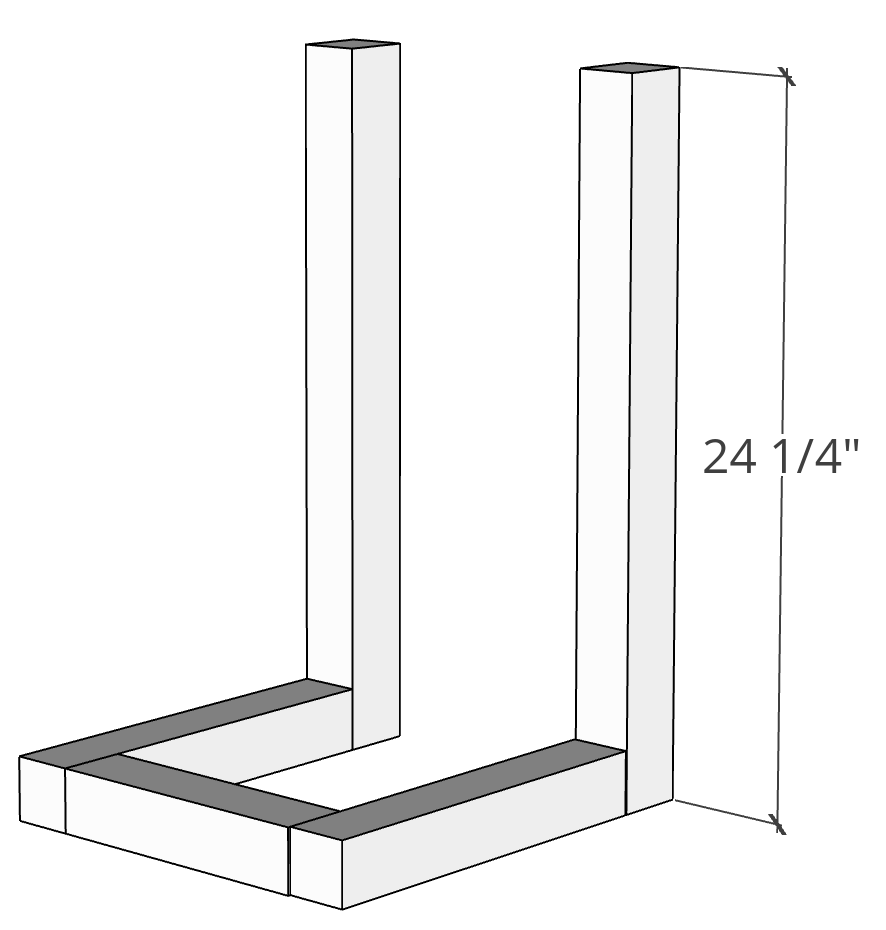
2 - 2x2 @ 24 1/4"
8 - 2x2 @ 12"
1 - 3/4" plywood (13.5"x15")
1 - 3/4" plywood (10.5"X 12")
Tools Used
DEWALT 20-Volt Cordless Brushless Drill/Driver and Impact Combo Kit
Ryobi Brad Nailer
Ridgid Miter Saw
Step 1: Attach the bottom 2x2s together using a Kreg Jig on a 1 1/2" setting, with 2 1/2" pocket hole screws to attach along with wood glue.
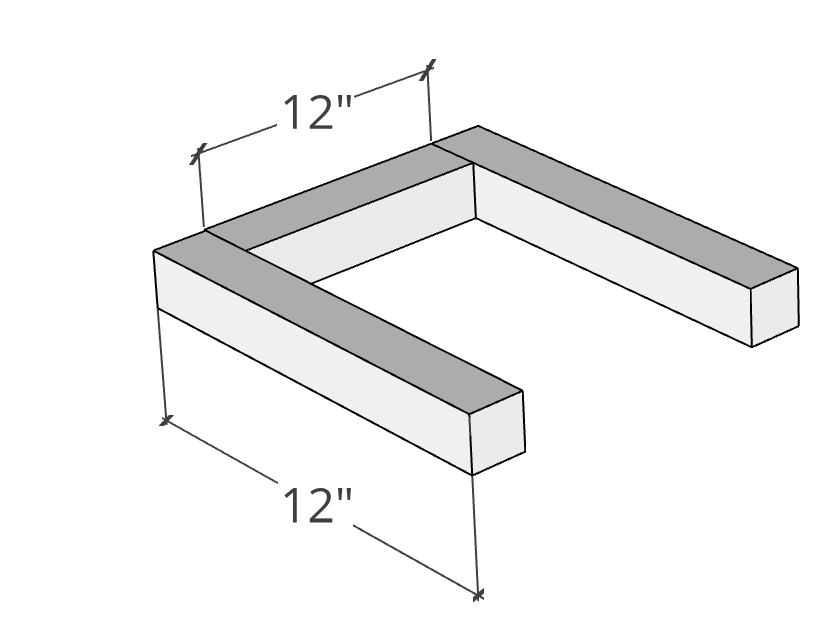
I used my DEWALT Drill/Driver to drill in my pocket holes along with my handy dandy Kreg Jig,
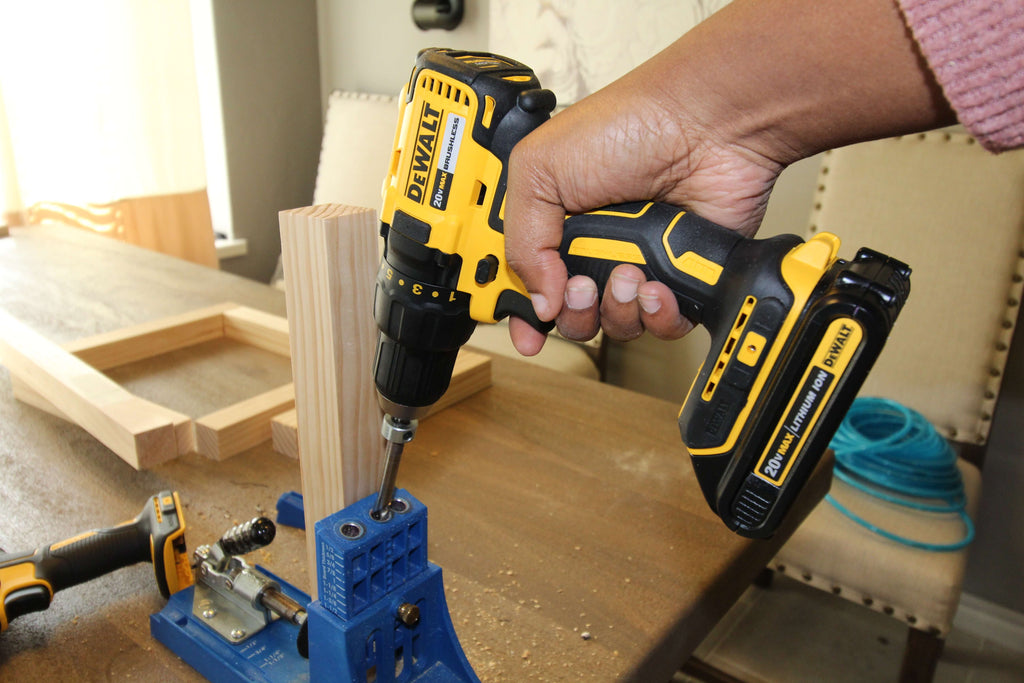
and I used my DEWALT Impact driver to drive in my pocket hole screws into the bottom 2x2 slates.
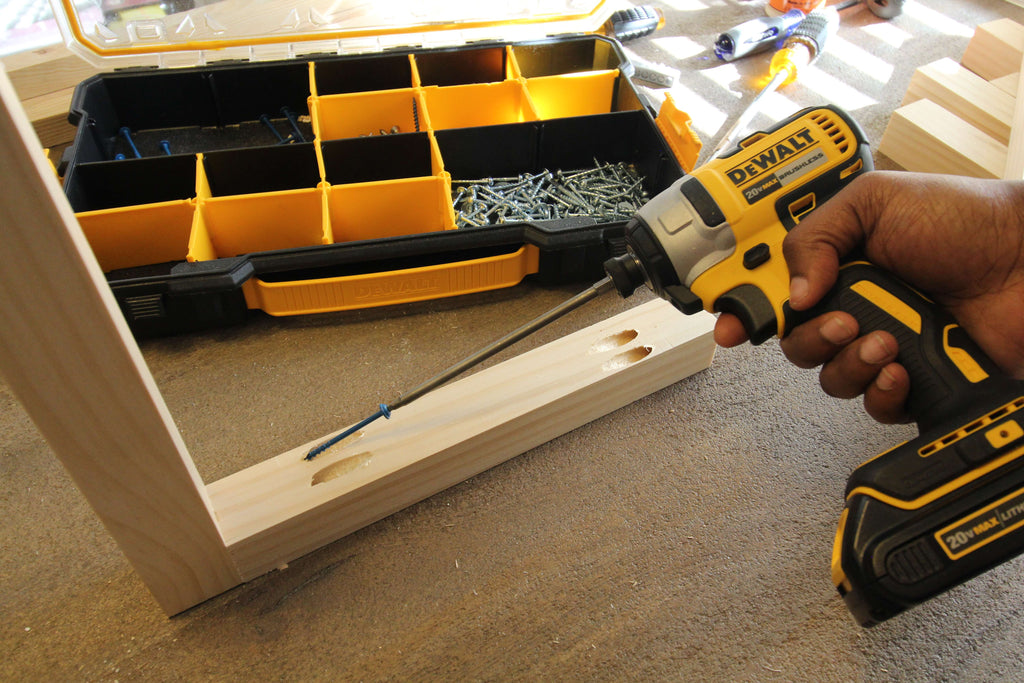
Step 2: Attach the assembled bottom to the (24 1/4") 2x2s using a Kreg Jig on a 1 1/2" setting, with 2 1/2" pocket hole screws to attach along with wood glue.
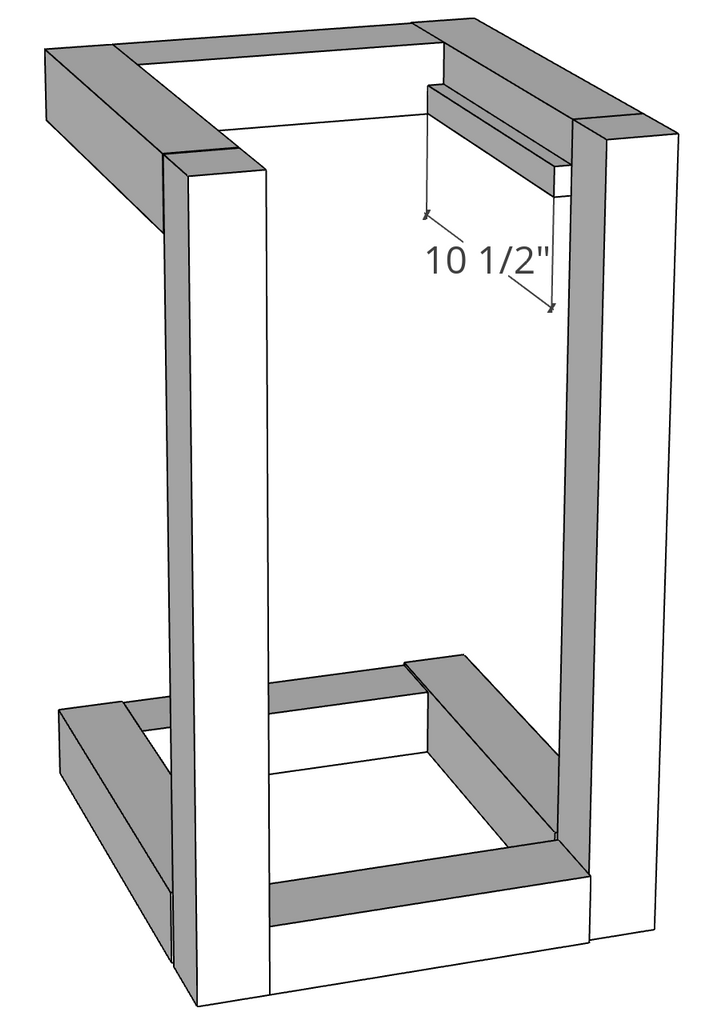
Step 3: Attach the top (12") 2x2 supports to the assembled pull out table using a Kreg Jig on a 1 1/2" setting, with 2 1/2" pocket hole screws to attach along with wood glue.
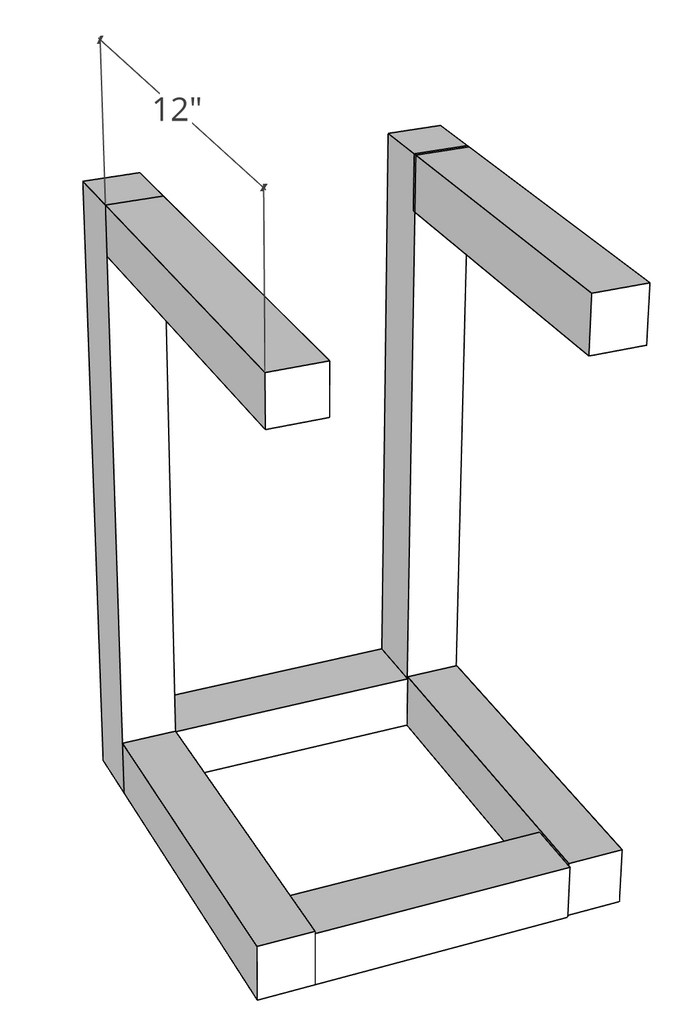
Step 4: Attach the front (12") 2x2 to the assembled pull-out table using a Kreg Jig on a 1 1/2" setting, with 2 1/2" pocket hole screws to attach along with wood glue.
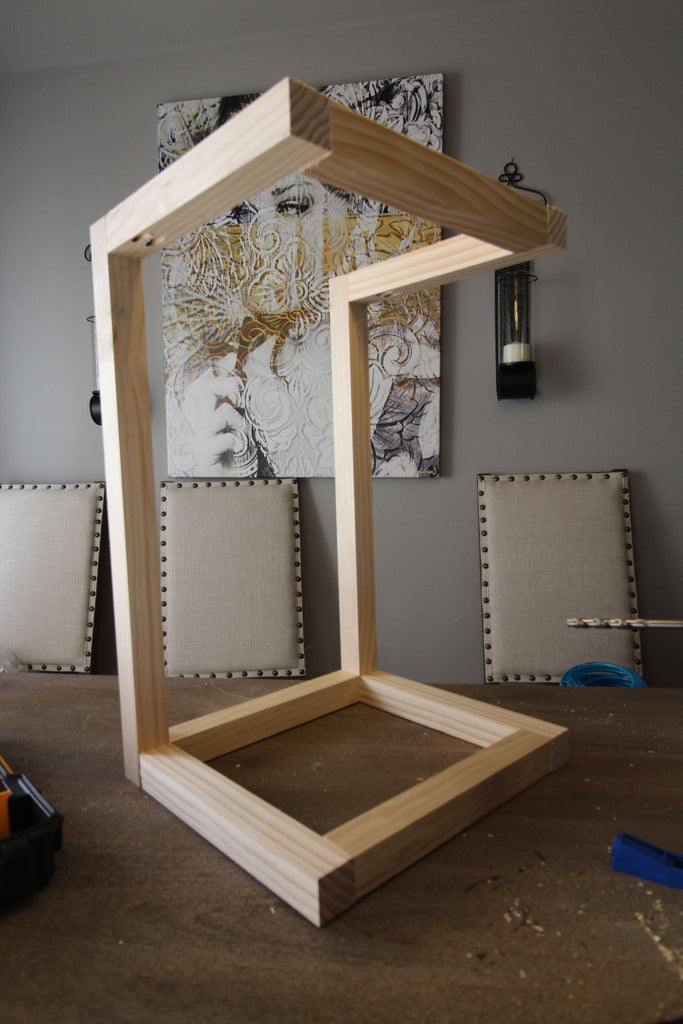
Once the pull out table is assembled it should look a little something like the picture below.
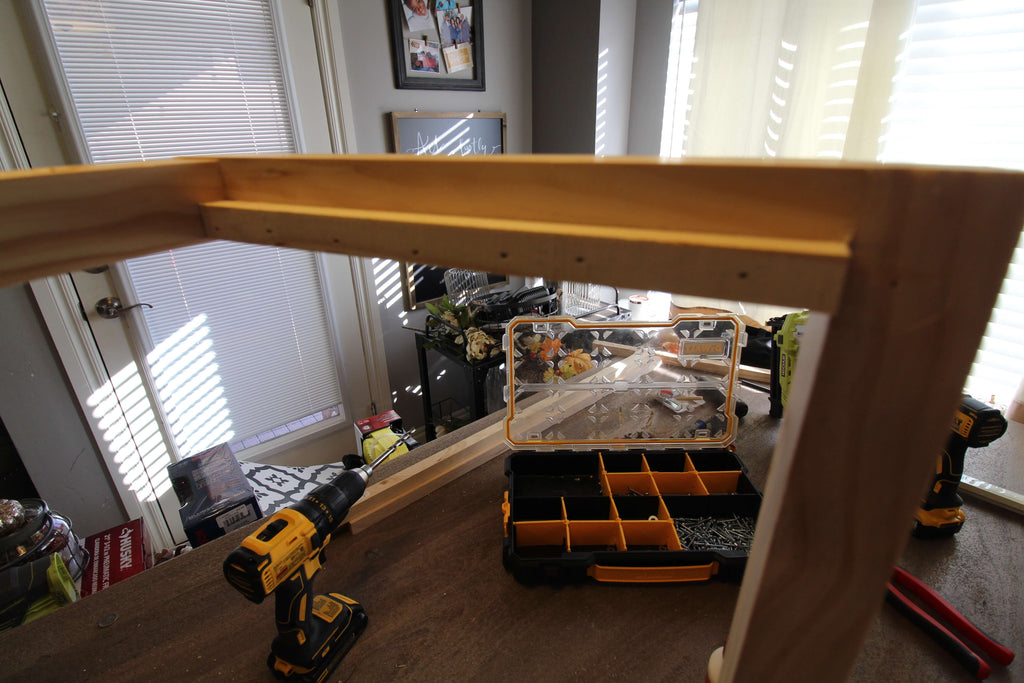
Step 5: Next add the dowels to the assembled pull out table. Attach the dowel with a brad nailer, wood glue and brad nails.
The dowels should be placed so that that 3/4" piece is flush with the top of the assembled base.
Step 6: Next assemble the pull out under table by screwing the smaller 3/4" plywood piece to the (12") 2x2 using a Kreg Jig on a 3/4" setting, with 1 1/4" pocket hole screws to attach along with wood glue.
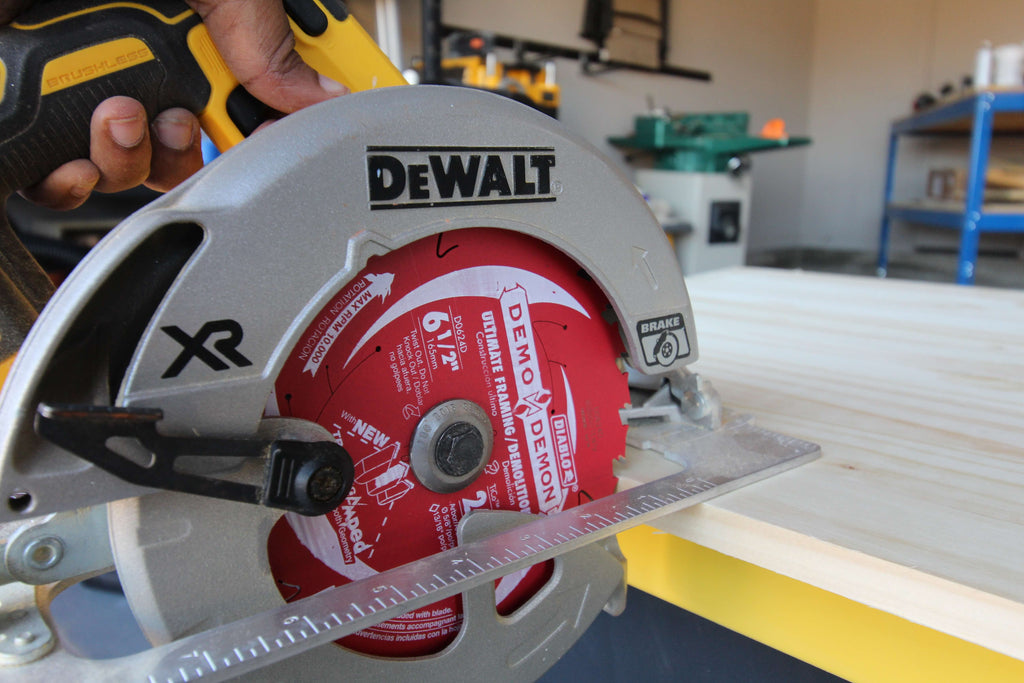
I cut the two 3/4" tabletop pieces using my Circular saw and Demo Demon saw blade. This blade has a lock tooth technology the allows a strong bond between the blade and the carbide tooth allowing deep impact resistance and longer life. It has great tracking control and made a smooth, effortless cut. Out of all the Diablo blades I have used, this by har has been my favorite. The cut was flawless.
Step 7: Attach the 3/4" top to the assembled pull-out table using a brad nailer and brad nails.
Step 8: Fill all pocket holes using my special technique. See details here.
and WAA-LAHH! There you have it. A DIY Pull Out Table
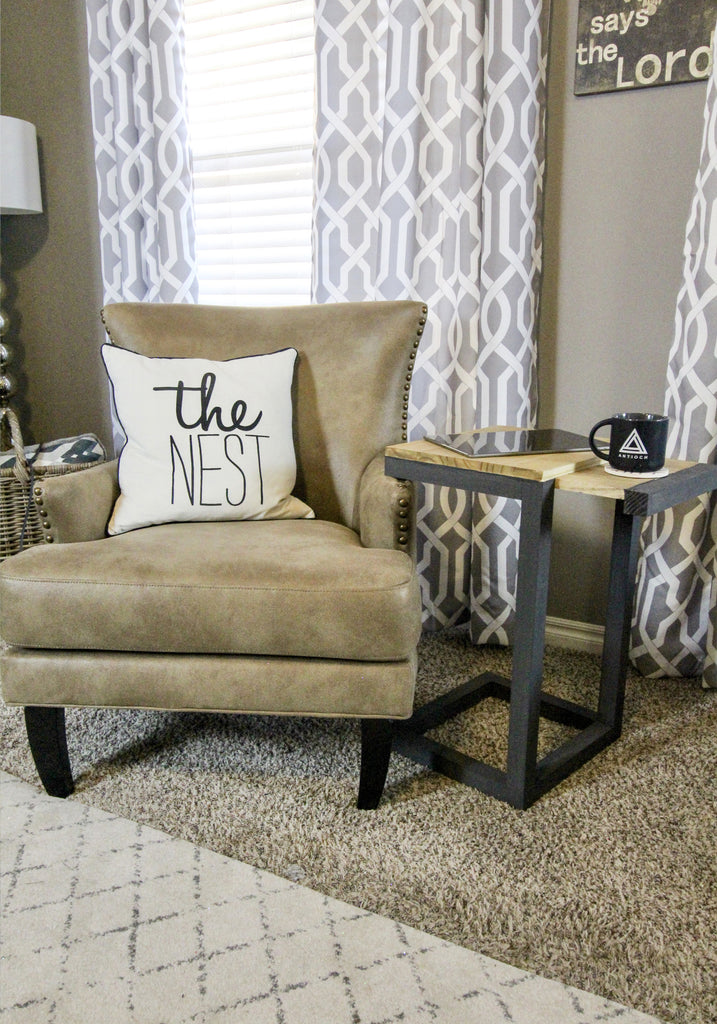
I am so excited about this build and can't wait to see your go at it!
Thanks for reading! XOXO, Ashley
I acknowledge that the Home Depot is partnering with me to participate in the THD Pro-Spective Tool Review Program. As a part of the program, I am receiving compensation in the form of products and services, for the purposes of promoting The Home Depot. All expressed opinions and experiences are my own. My post complies with the Word of Mouth Marketing Association (WOMMA) Ethics Code and applicable Federal Trade Commission guidelines.

DIY Donut Wall
"A donut wall for a great cause."
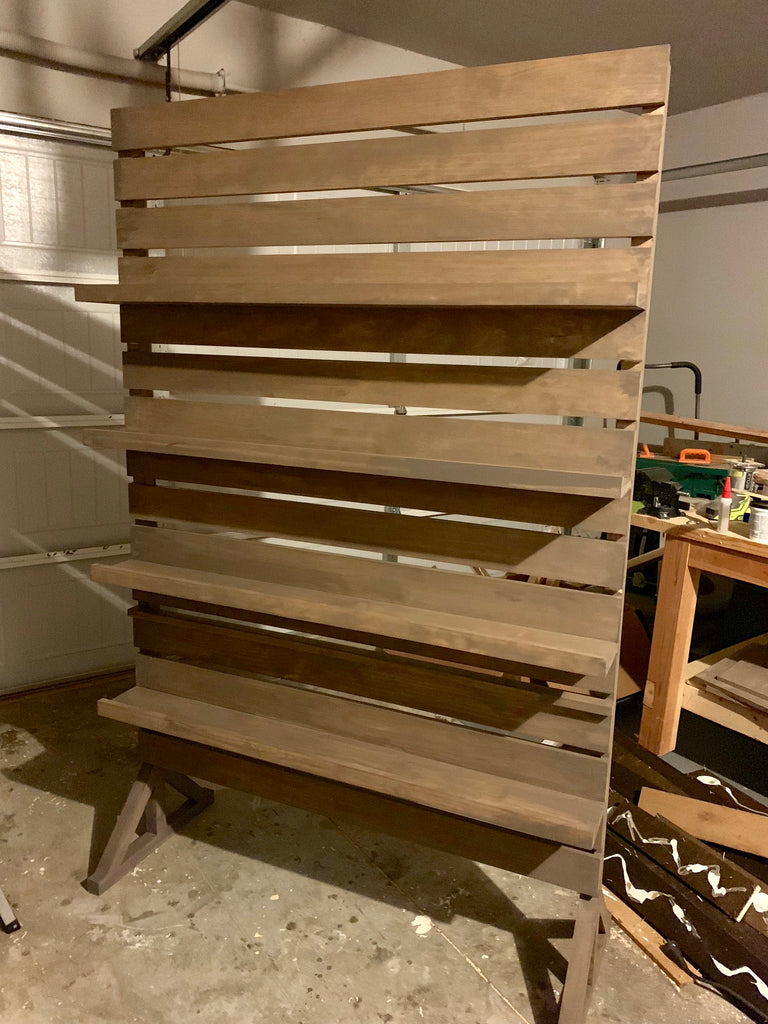
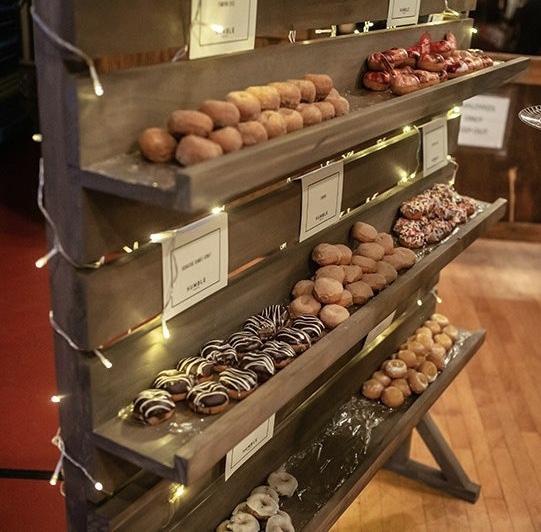
Donut walls seem to be pretty popular these days, so when I got contacted about building one I was very excited to create one. I have seen similar styles for donut walls but I wanted to switch it up and come up with a design that I hadn't seen before for donuts. I decided on a design I thought would look great and I must say, I'm in love.
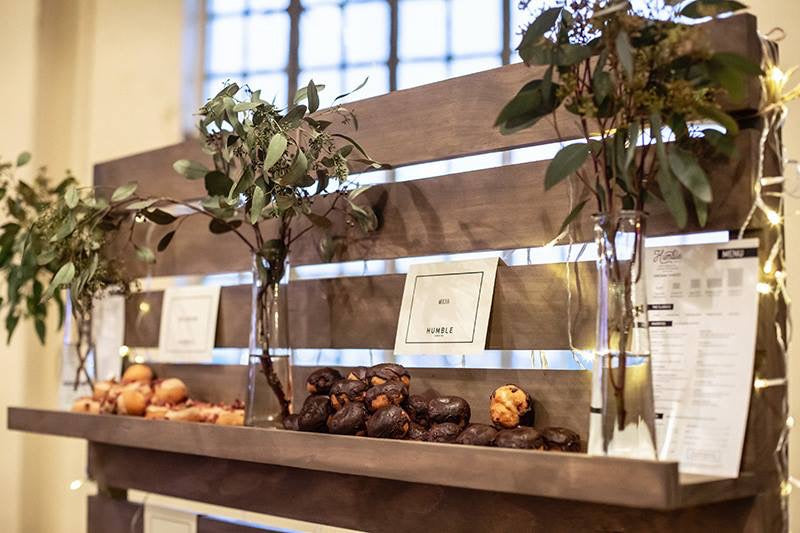
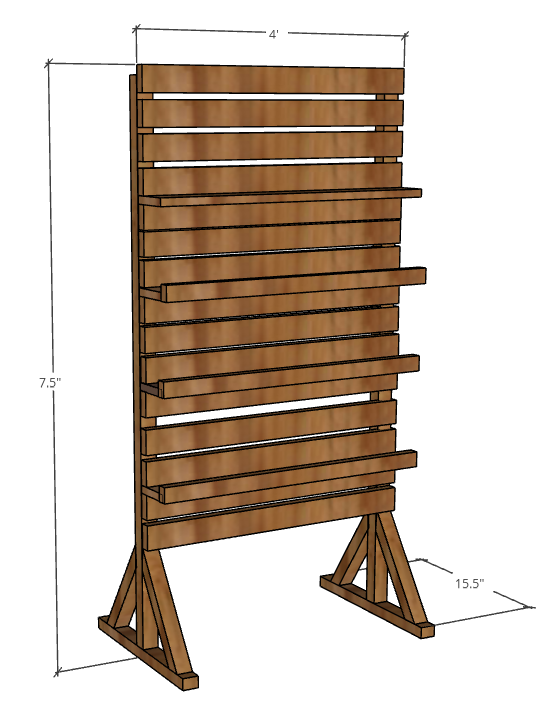
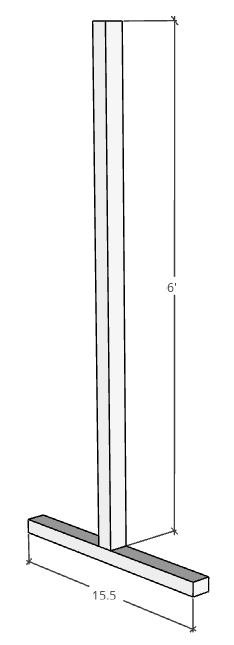
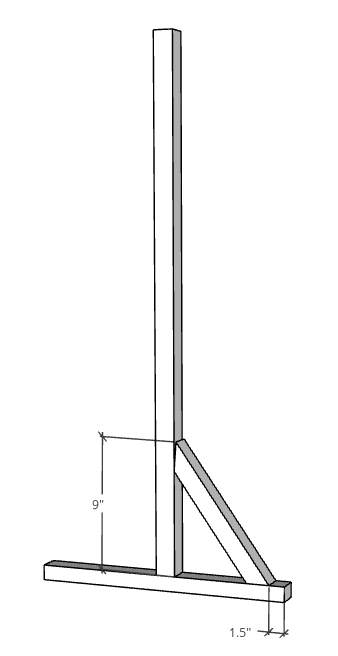 The assembled side legs for the donut wall should look like this:
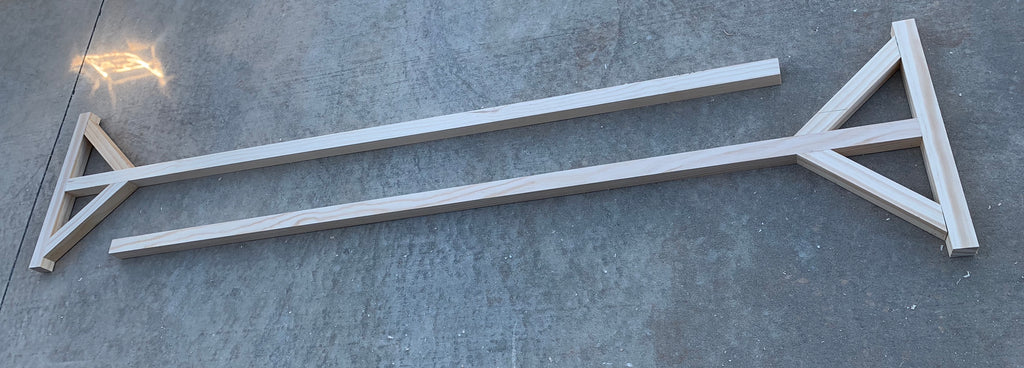


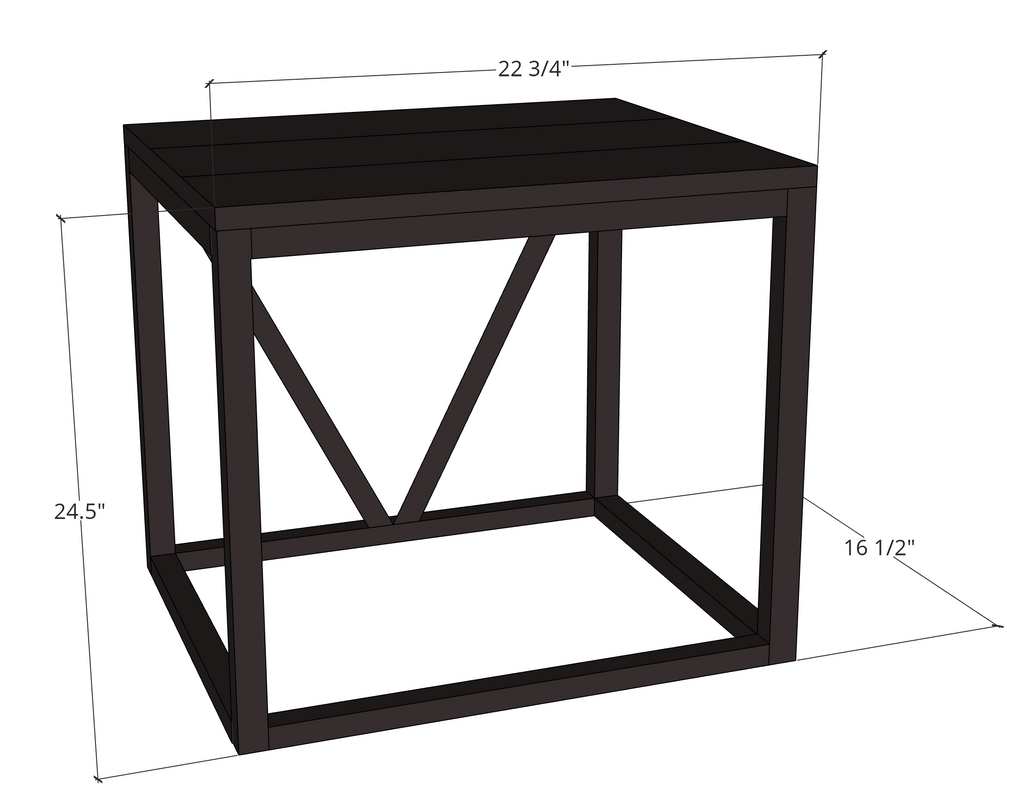
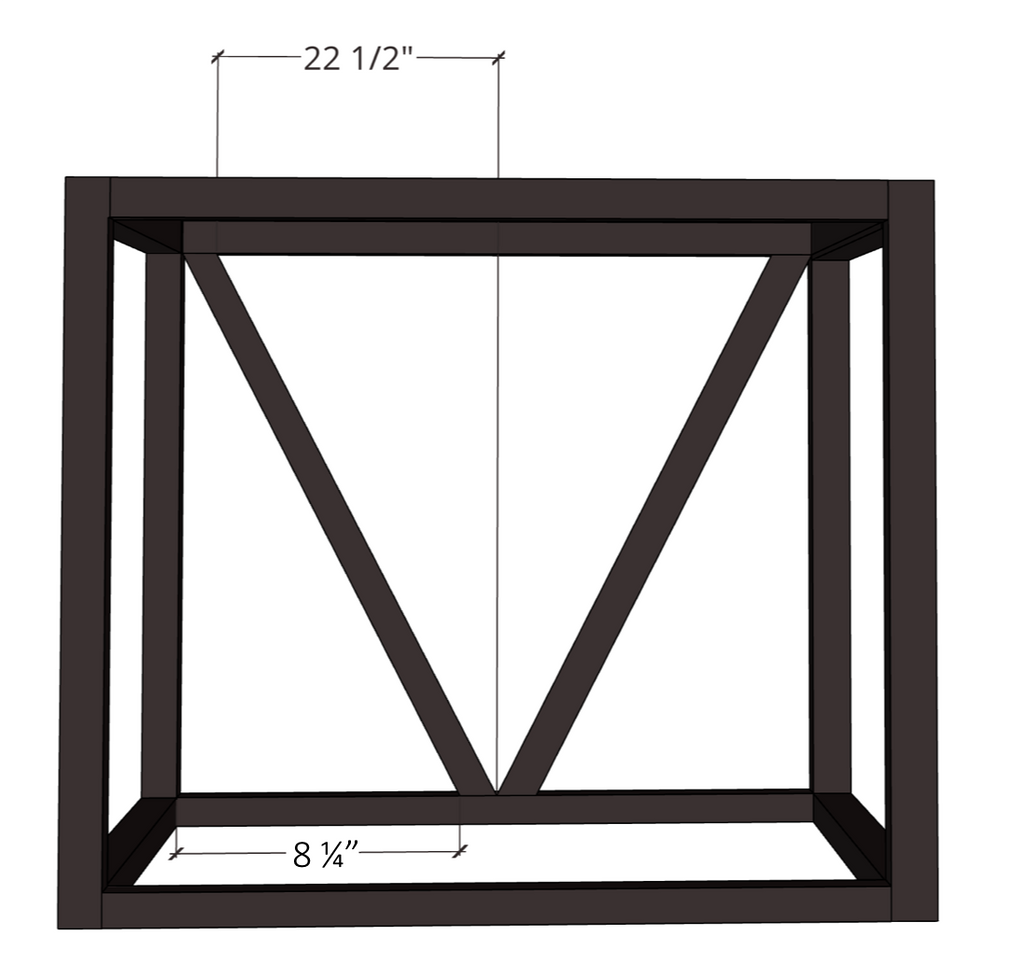
DIY Farmhouse V Side Table
"A simplistic DIY side table with a farmhouse feel"
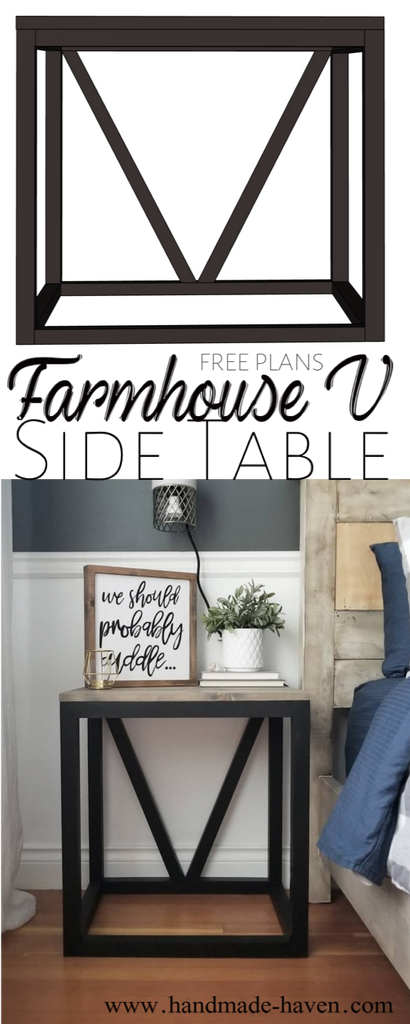
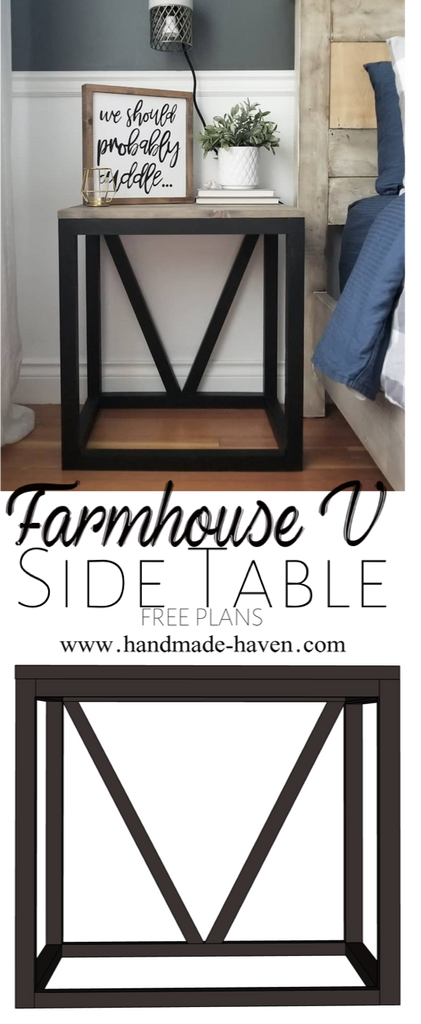
Who new simplistic could look so good? This DIY V Side table is to die for and I am super excited to be partnering up with Kelly again from paisleyandwilliam to bring you the free plans.
 A few months back Kelly and I partnered together to bring you plans for this amazing Double V Console. Click Here to check it out.
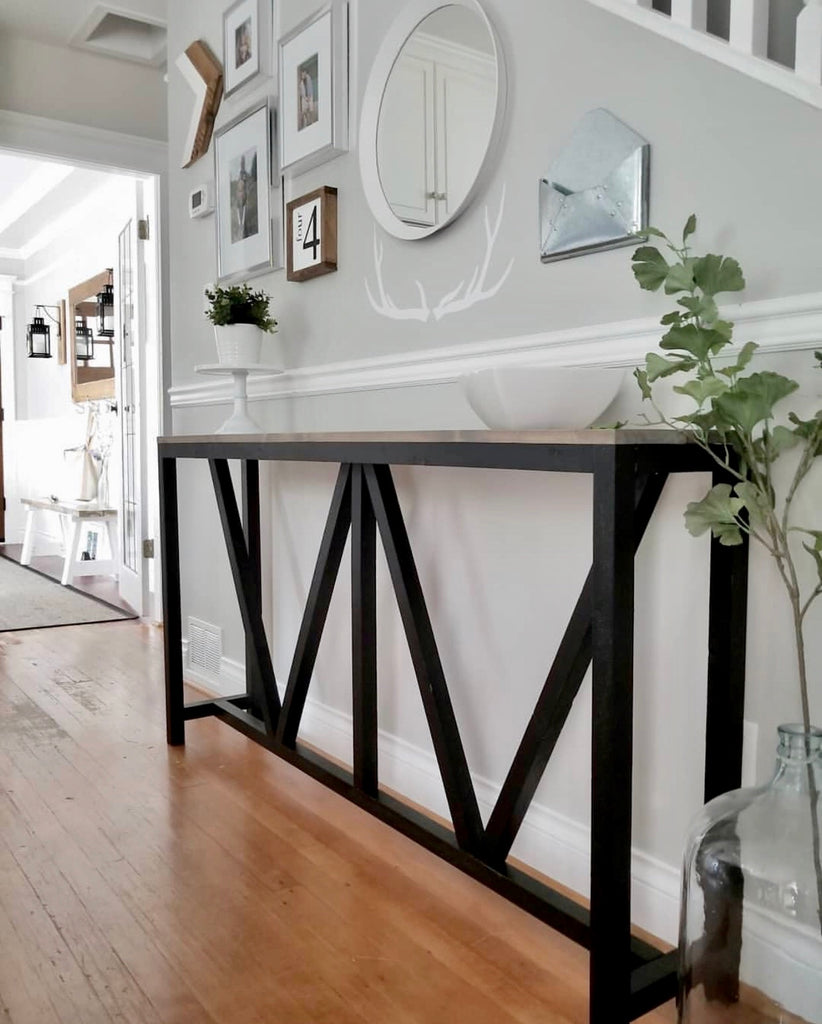
Now we are back to bring the plans for this simplistic DIY side table. Be sure to check out her amazing work on Instagram.
There are some affiliate links in this post, meaning I get a small commission if you purchase through these links, at no cost to you. Click Here to read my full disclosure.
Dimensions
Materials
- 1 - 1x6 @ 8ft
- 4 - 2x2 @ 8ft
Cut List
- 4 - 2 x 2 @ 24" (legs)
- 4 - 2 x 2 @ 19 3/4" (front/back supports)
- 4- 2 x 2 @ 13 1/2" (side supports)
- 2 - 2 x 2 @ 22 1/2" (V Pieces) cut @ 21 degree angle
- 3 - 1 x 6 @ 22 3/4" (top)
Let's get building!
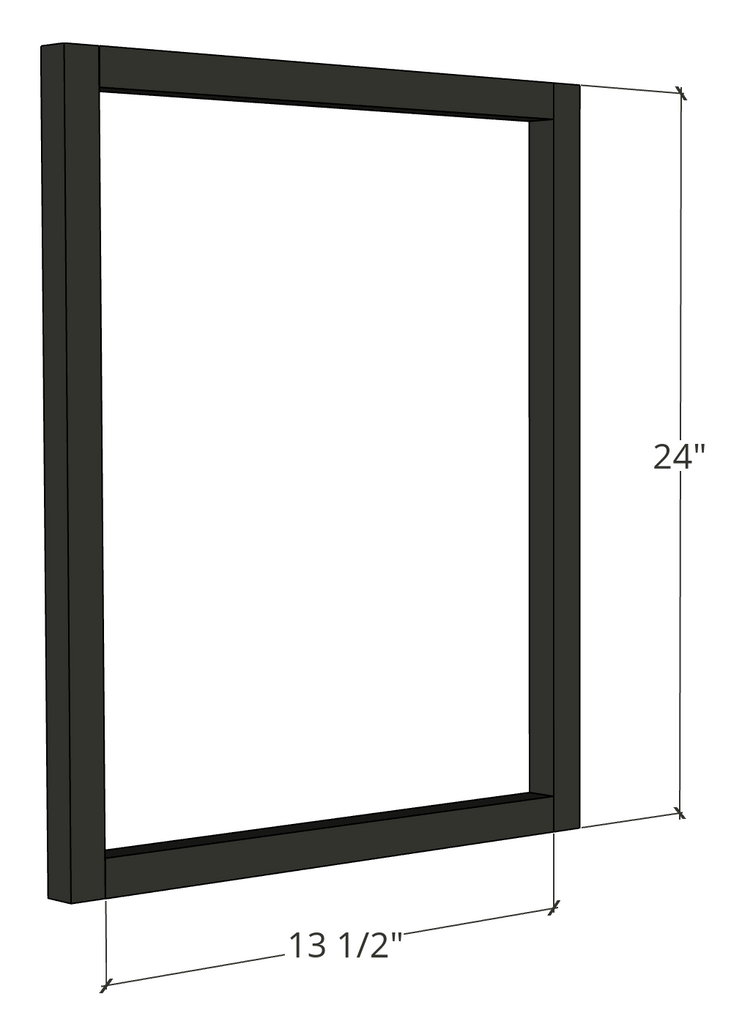
Step 1: Attach the 2x2 supports (24") to the 2x2s (13 1/2") using a Kreg Jig K4 Pocket Hole System on a 1 1/2" setting, with 2 1/2" pocket hole screws to attach along with wood glue. Repeat step for the other side of the farmhouse V side table. Note: The pocket holes on the supports should be placed on the bottom of the (13 1/2") 2x2s.
Step 2: Attach the assembled sides to the 2x2 supports (19 3/4") using a Kreg Jig K4 Pocket Hole System on a 1 1/2" setting, with 2 1/2" pocket hole screws to attach along with wood glue. Note: The pocket holes on the supports should be placed on the bottom of the (19 3/4") 2x2s.
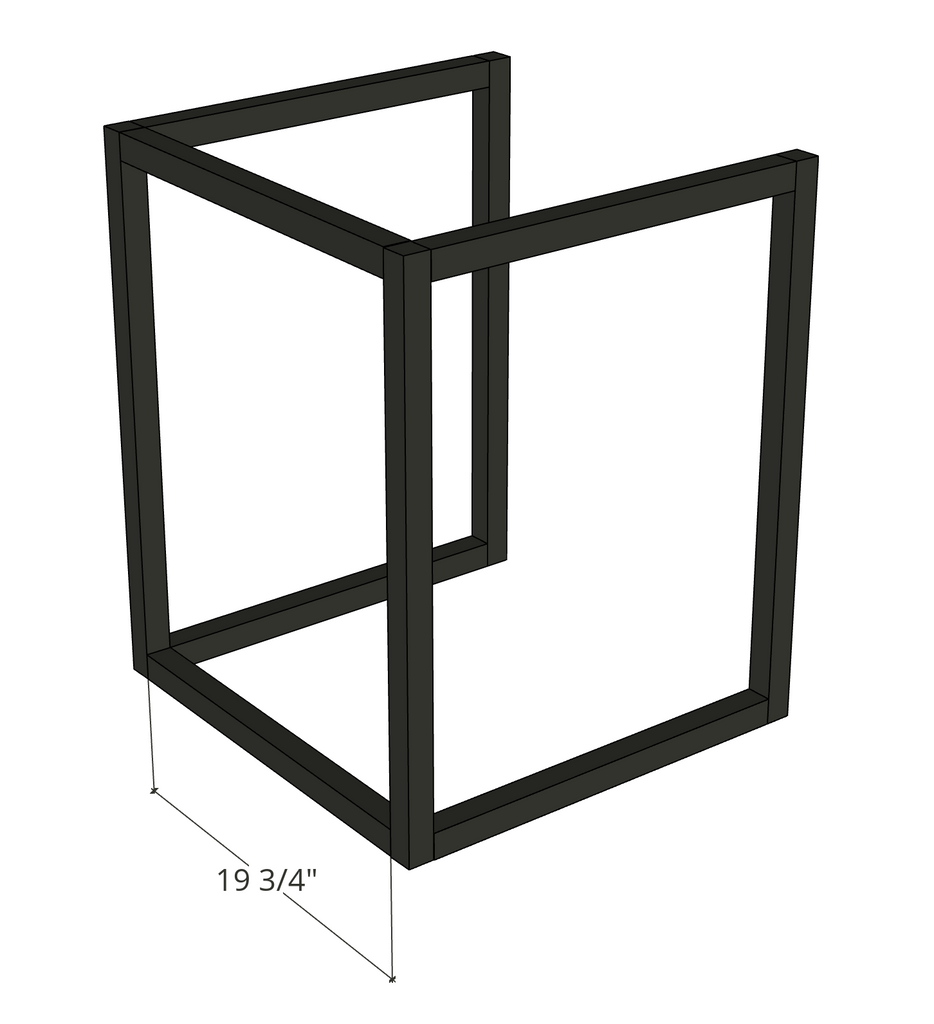
Step 3: Repeat step 2 for the other side of the side table to finish the side table base.
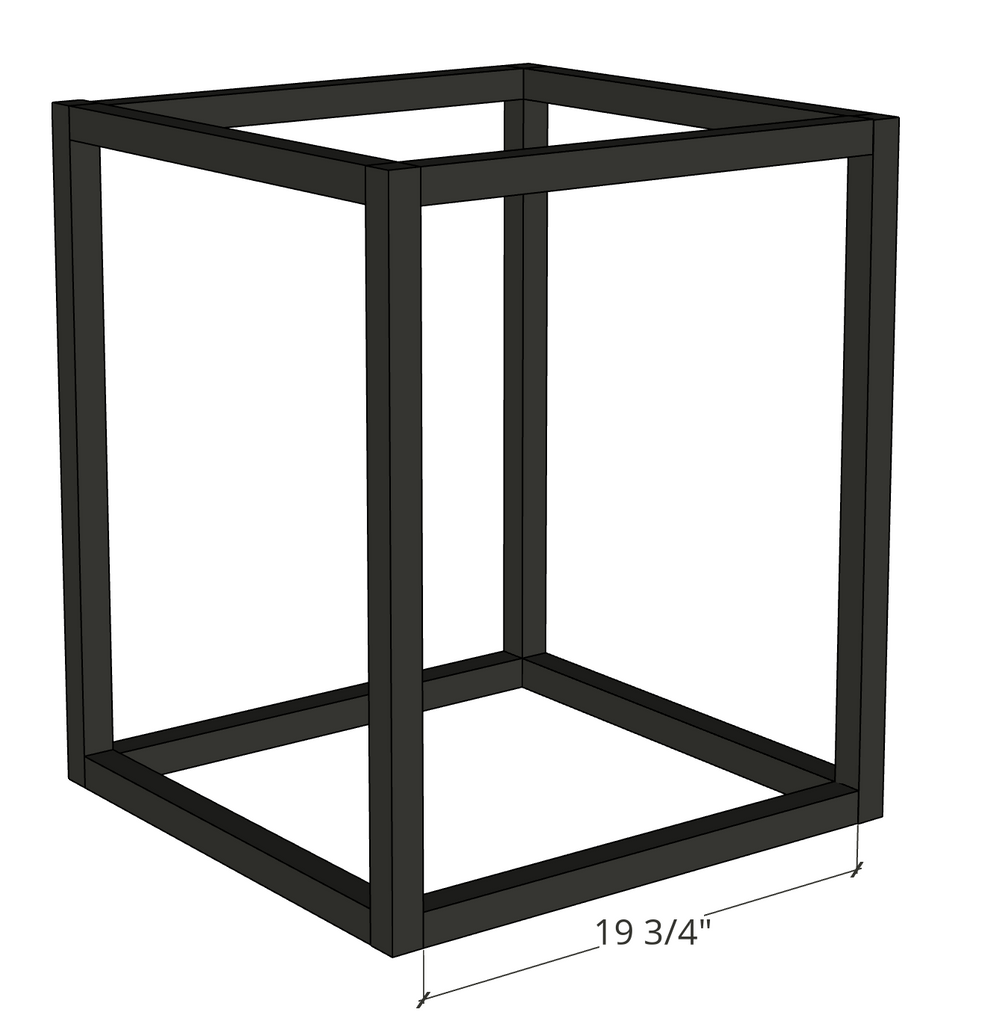
Step 4: Attach the V pieces to the assembled side table using a brad nailer and brad nails. V Pieces should be cut at a 21 degree angle.
Step 5: Assemble the (22 3/4") 1x6s together using a Kreg Jig K4 Pocket Hole System on a 1 1/2" setting, with 2 1/2" pocket hole screws to attach along with wood glue and then attach to assembled base using wood screws from underneath the base.

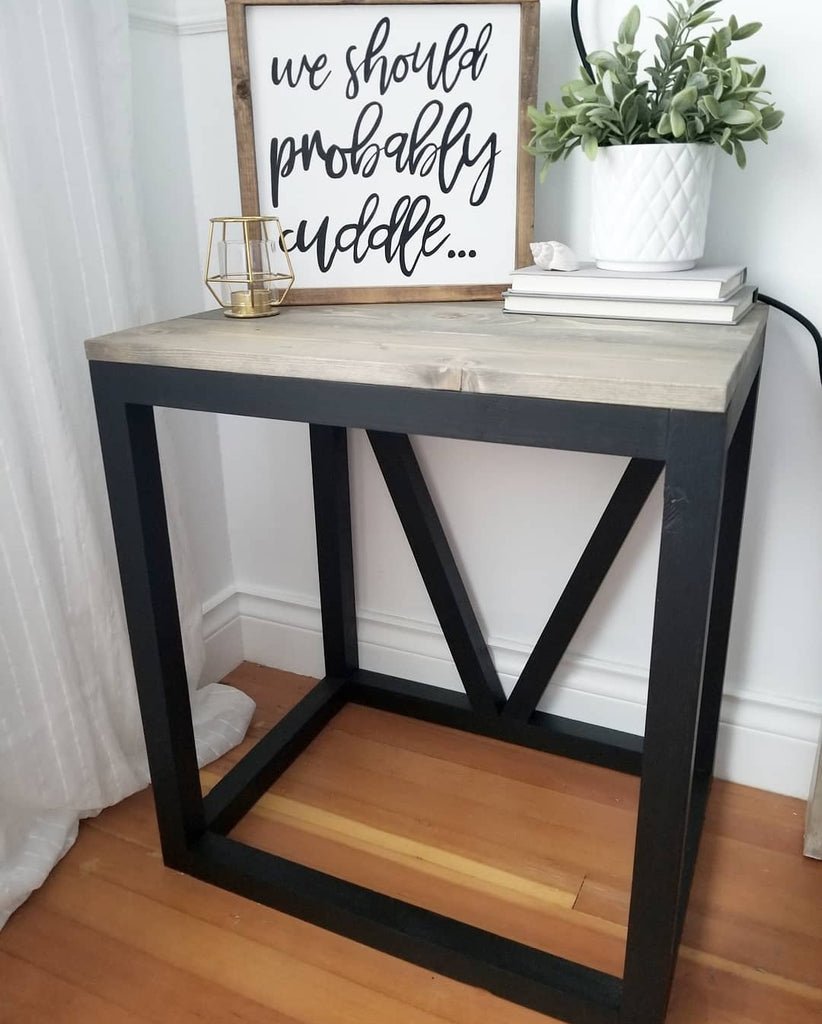
Let's take another look a this beauty.
For the finish Kelly used Rustoleum Ultra Cover Black paint for the bottom of the base and a mix of Minwax stains for the top (Minwax Gray and Minwax Special Walnut)
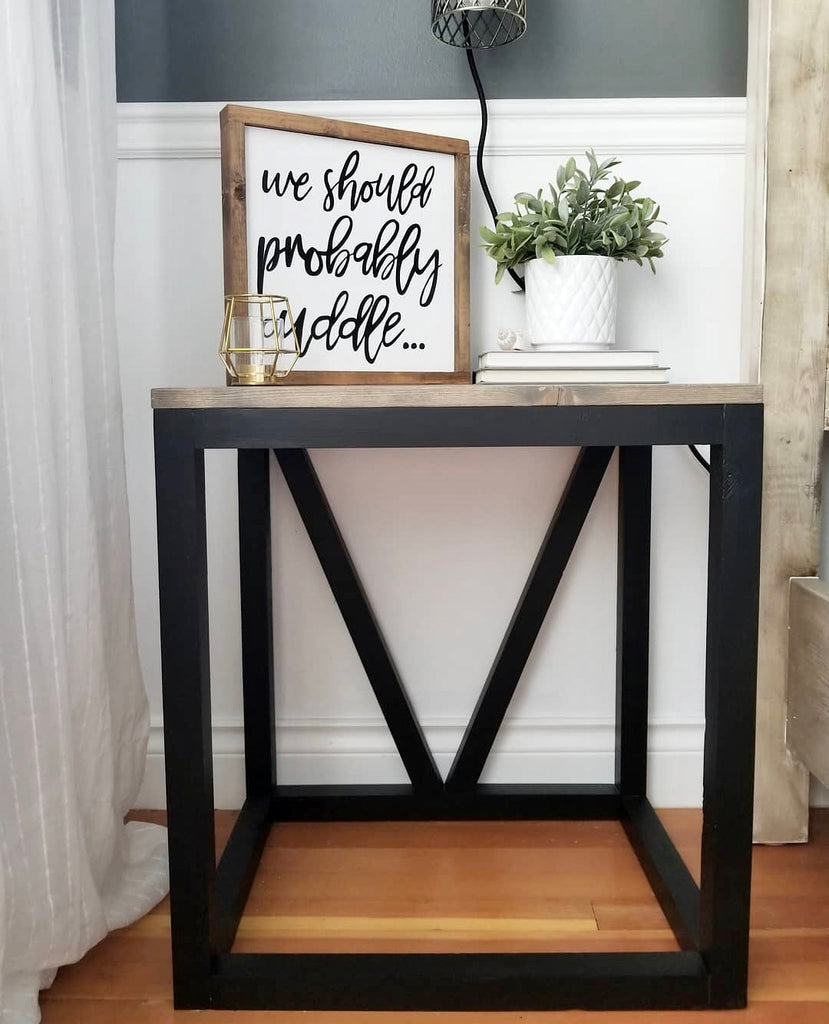 I love this simplistic side table and the best part is that you can recreate it for less than $50 bucks. This is definitely a must have.
Thanks for reading guys! XOXO, Ashley

Thanks for reading guys, XOXO Ashley

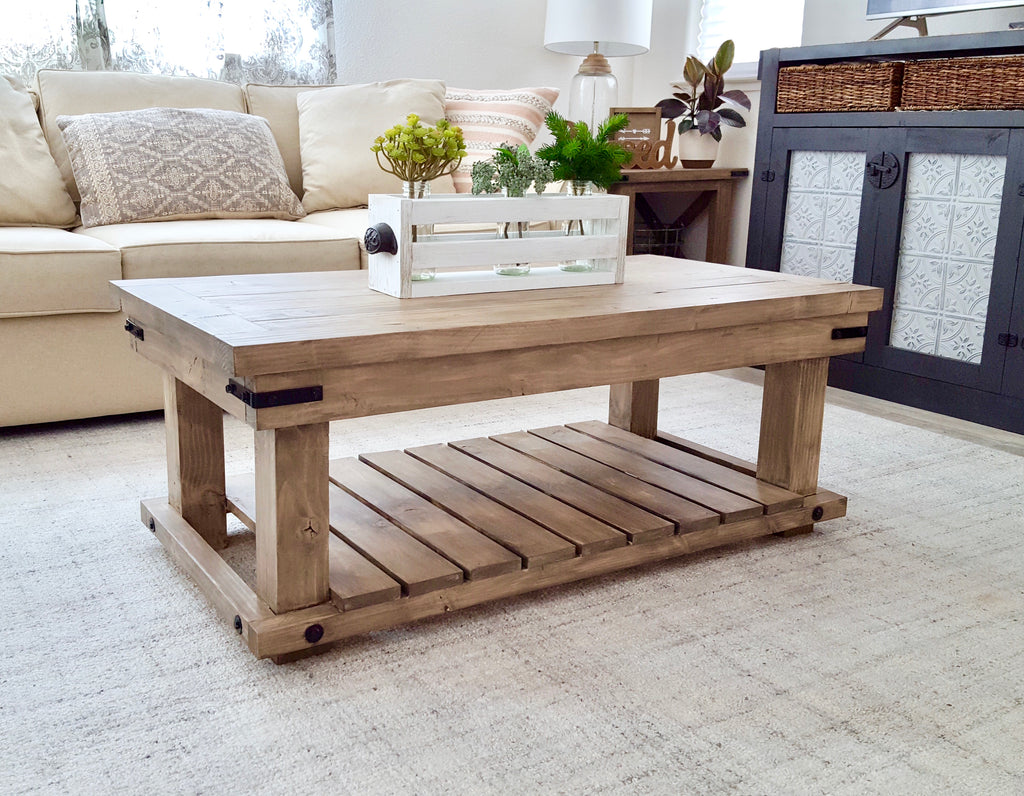
DIY Industrial Coffee Table
"A DIY Industrial Coffee Table that will knock your socks off"
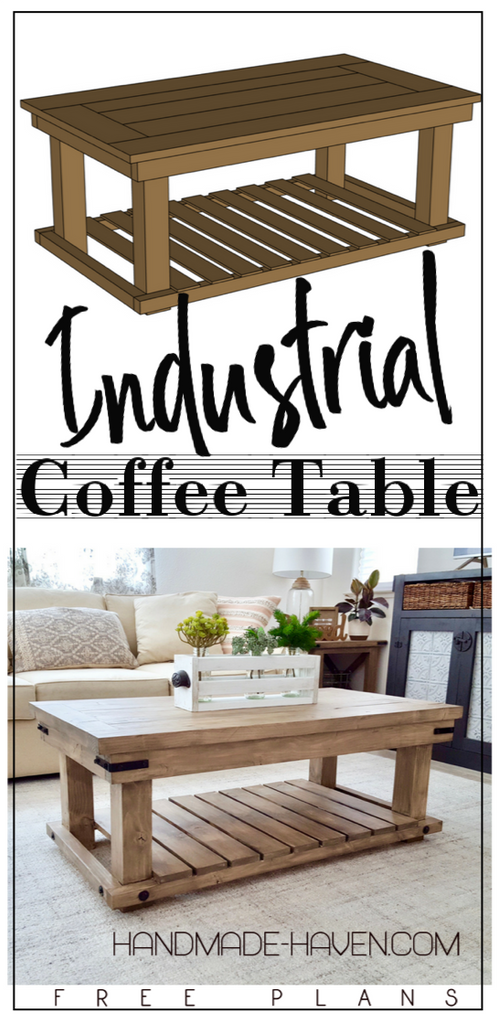
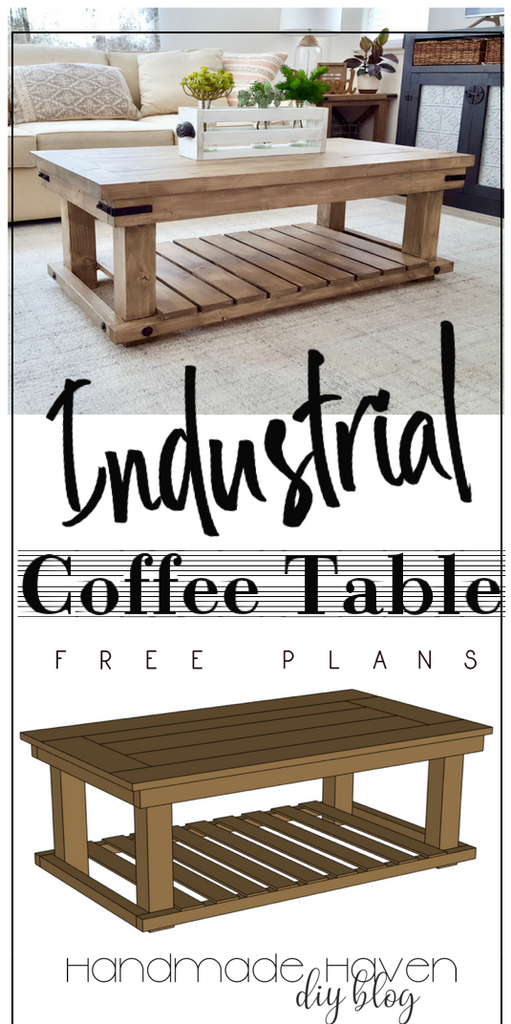
I've seen this industrial styled coffee table over and over online at World Market and have always wanted to create some plans for it. Thanks to my good friend and fellow builder Linda, you can now build this stylish farmhouse coffee table.
But before you read on, be sure to go check out my friend Linda on Instagram. She is a new builder that has created some awesome pieces and I'm super excited to be partnering up with her to bring you the free plans for this DIY Industrial Coffee Table she built. Isn't it stunning?
Now Lets get to it!
There are some affiliate links in this post, meaning I get a small commission if you purchase through these links, at no cost to you. Click Here to read my full disclosure.
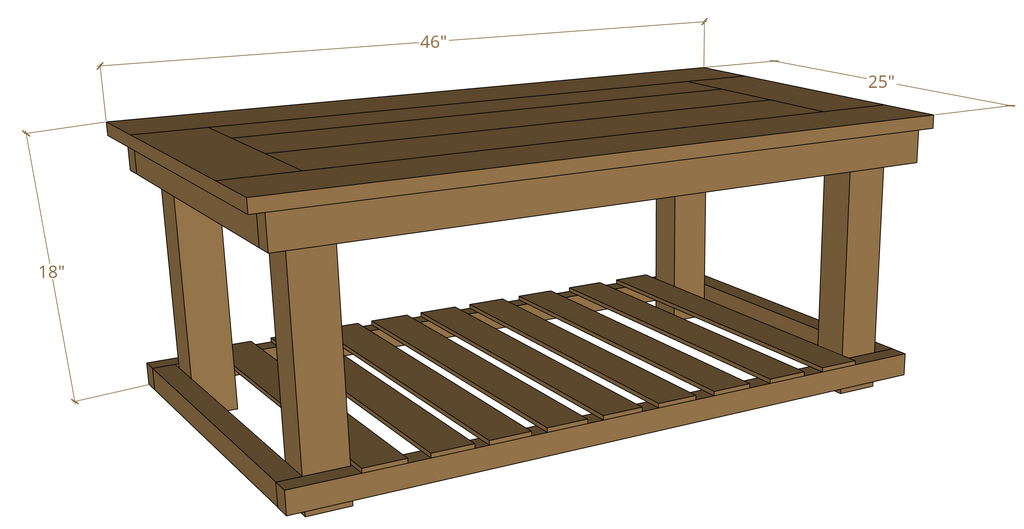
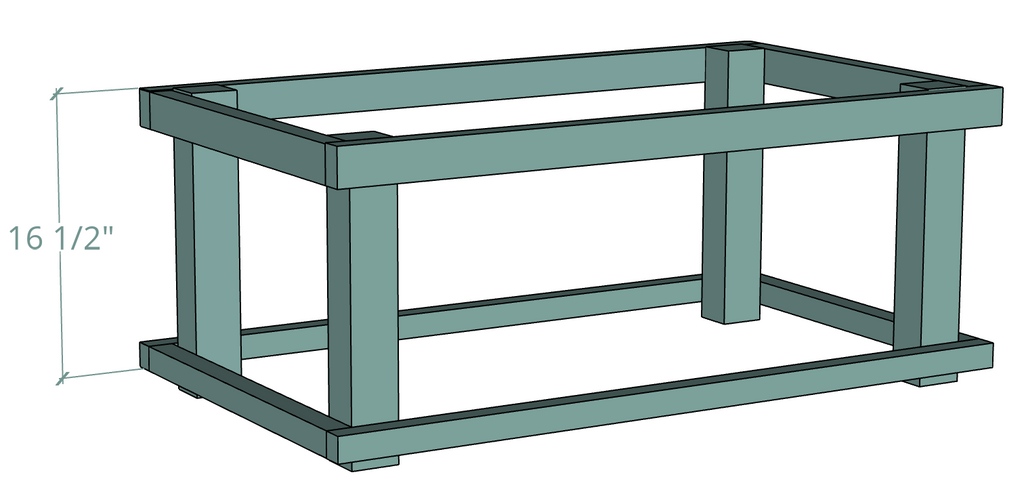
Dimensions
Materials
(3) 2 x 6 x 8ft
Cut List
Step 1: Assemble the bottom rectangle by attaching the 2x2 (19") stretcher to the 2x2 (43") stretcher piece using a Kreg Jig K4 Pocket Hole System on a 1 1/2" setting, with 2 1/2" Pocket Hole Screws to attach along with wood glue.
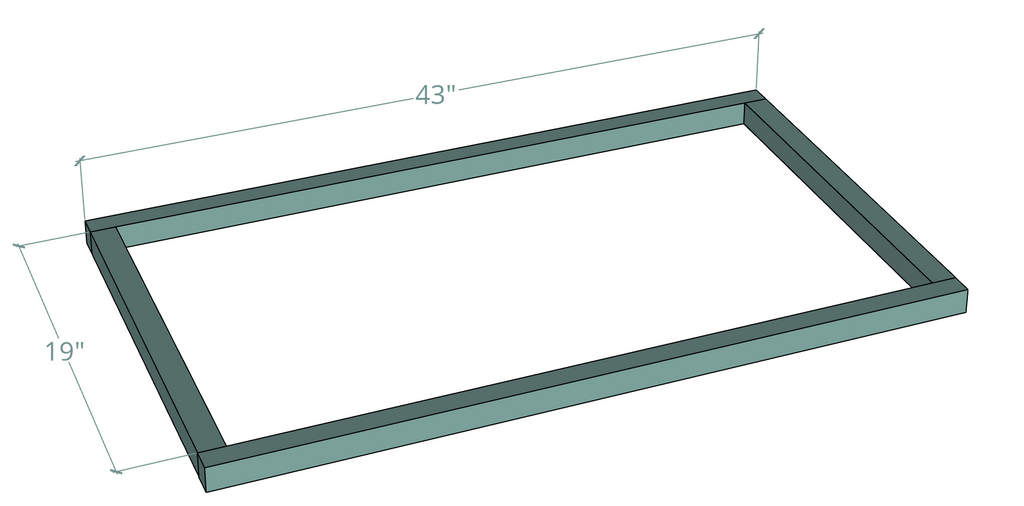
Step 2: Attach the assembled rectangle to the bottom of the four (16.5") 4x4s using washers and 2" Hex head cap screws. The assembled rectangle should be 1 1/2" above the bottom of the 4x4s.

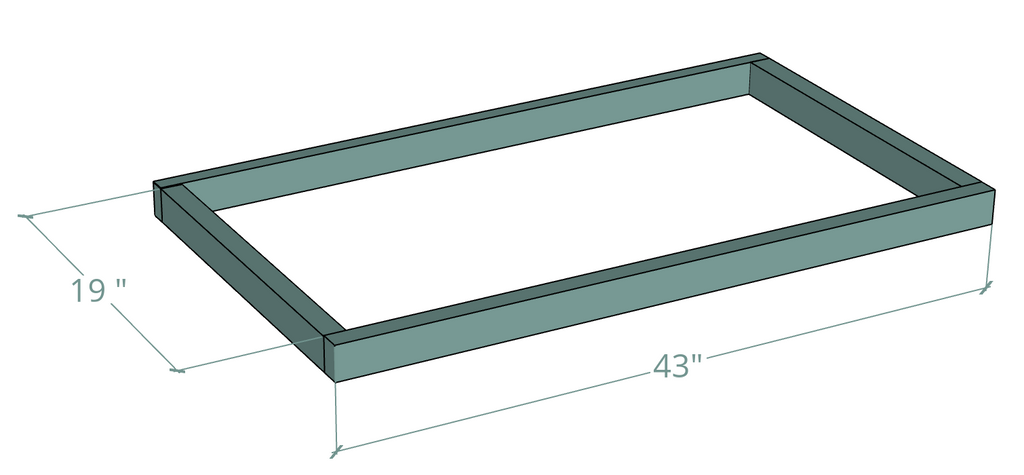
Step 3: Assemble the top rectangle by attaching the 2x4 (19") stretcher to the 2x4 (43") stretcher piece using a Kreg Jig K4 Pocket Hole System on a 1 1/2" setting, with 2 1/2" Pocket Hole Screws to attach along with wood glue.
Note: Pre-drill pocket holes into the sides of the rectangle facing upwards for attachment to the tabletop later.
Step 4: Attach the assembled rectangle to the top of the four (16.5") 4x4s by using wood screws (Hardware will be added after the coffee table is built). Note: The assembled rectangle should be flush with the top of the 4x4s.
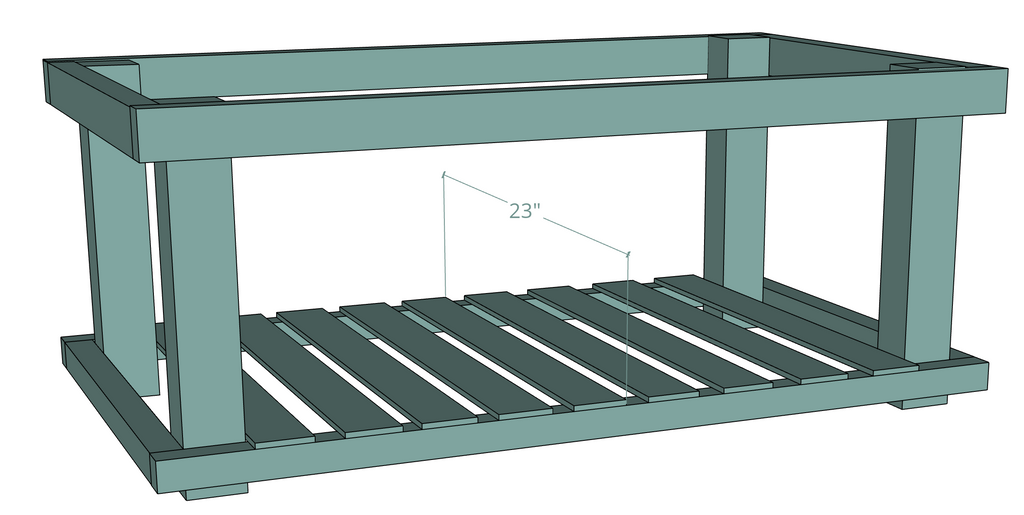
Step 5: Add the 9 1x4 (23") slates the to the bottom of the coffee table using a brad nailer and brad nails. The spaces between the slates should be approximately 1x4". Note: Do not nail down slates until all slates are in place.
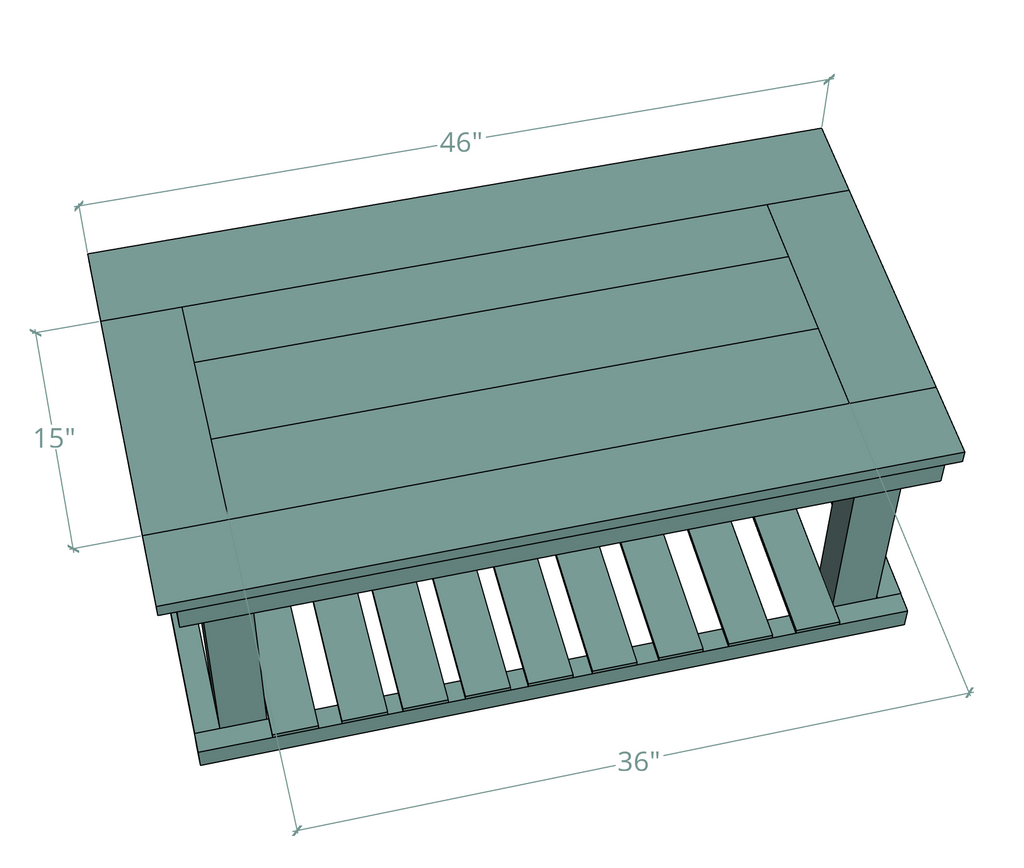
Step 6: Assemble the tabletop by first attaching the three (36") 2x6s together using a Kreg Jig K4 Pocket Hole System on a 1 1/2" setting, with 2 1/2" Pocket Hole Screws to attach along with wood glue. Then attach the breadboard ends the same way. Once that is assembled, attach the two (46") 2x6s to the middle of the table top using a Kreg Jig K4 Pocket Hole System
on a 1 1/2" setting, with 2 1/2" pocket hole screws to attach along with wood glue.
To attach the tabletop to the DIY coffee table, use the predrilled holes on the 2x4s with 2 1/2" pocket hole screws to attach along with wood glue.
The finished product should look something like this.
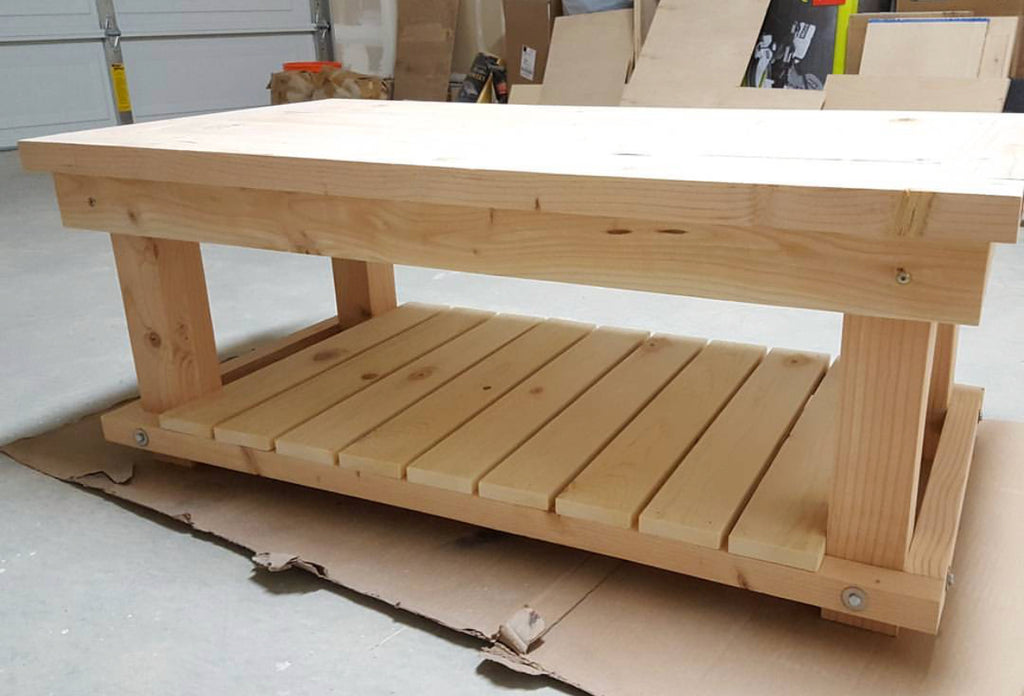
Let's take one last look at this beauty!
Thanks for reading guys! XOXO, Ashley

Patio Deck Makeover : A Family Transformation
A Fresh Deck Patio with a whole new look.
This post is sponsored by The Home Depot!
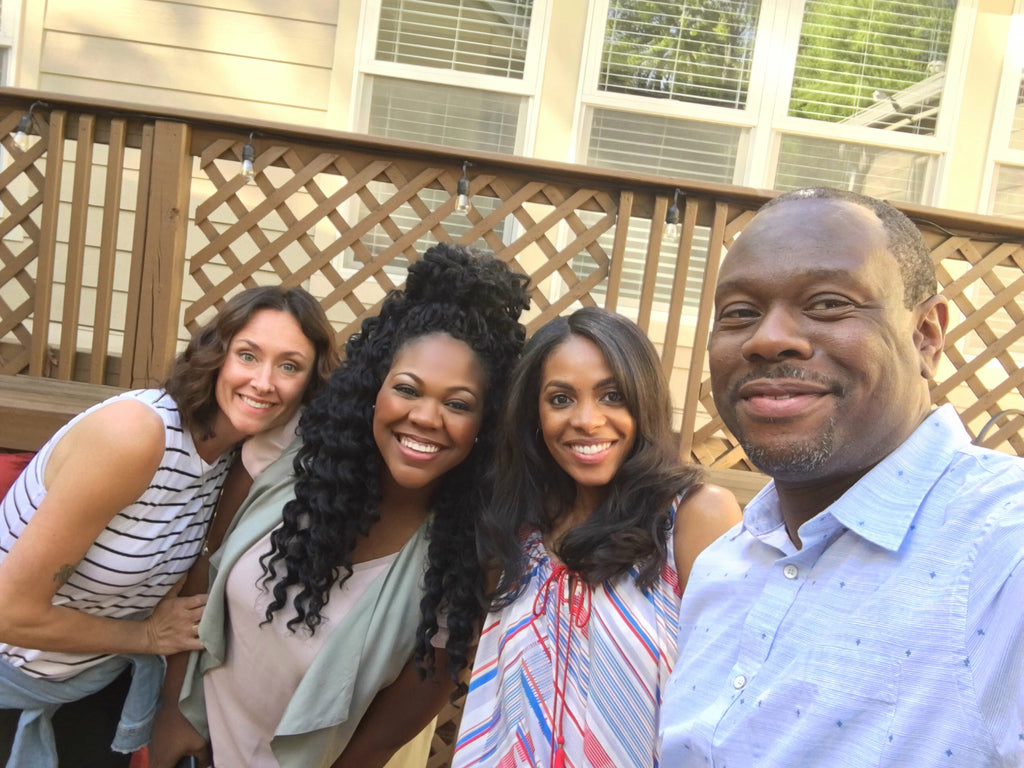
When I found out The Home Depot wanted to use me as a designer to help a family transform their patio deck, I was overjoyed and excited, but not as excited as I was when I found out that it would all be caught on camera! I have been waiting in excitement to share the deck patio space with you guys and today is the day that I finally get to spill all of the details.
Planning out the Design
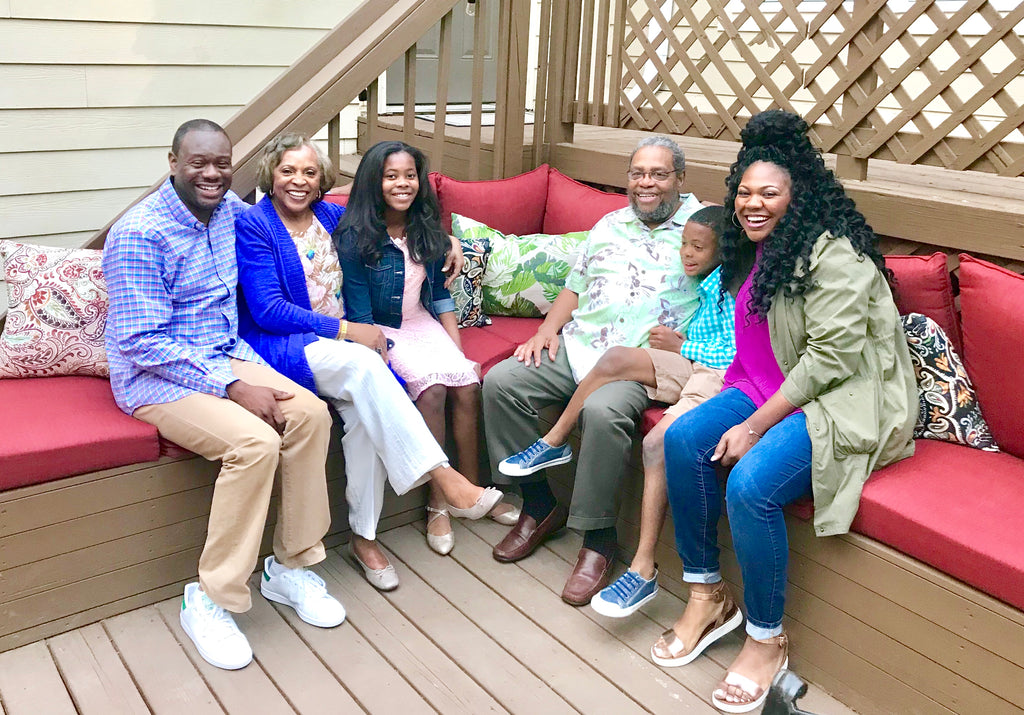
A few weeks before filming, I was given all of the details for the patio deck makeover and a little bit of what was expected for production day. I got to hear a little bit about the Lisbon family, some pictures of their space and got to hear how they utilize it. I was tasked to come up with a design that would both transform their space and make it more functional for them as a family.
When I originally saw their patio deck in pictures, I had ideas just running through my head, and after hours of sifting through products I finally narrowed it down to a final design. The Lisbon’s family already had a great patio deck; it just needed a little lovin’. One of the products I chose was this Hampton Bay Patio Umbrella. I have one on my backyard deck (pictured below) and absolutely love it!
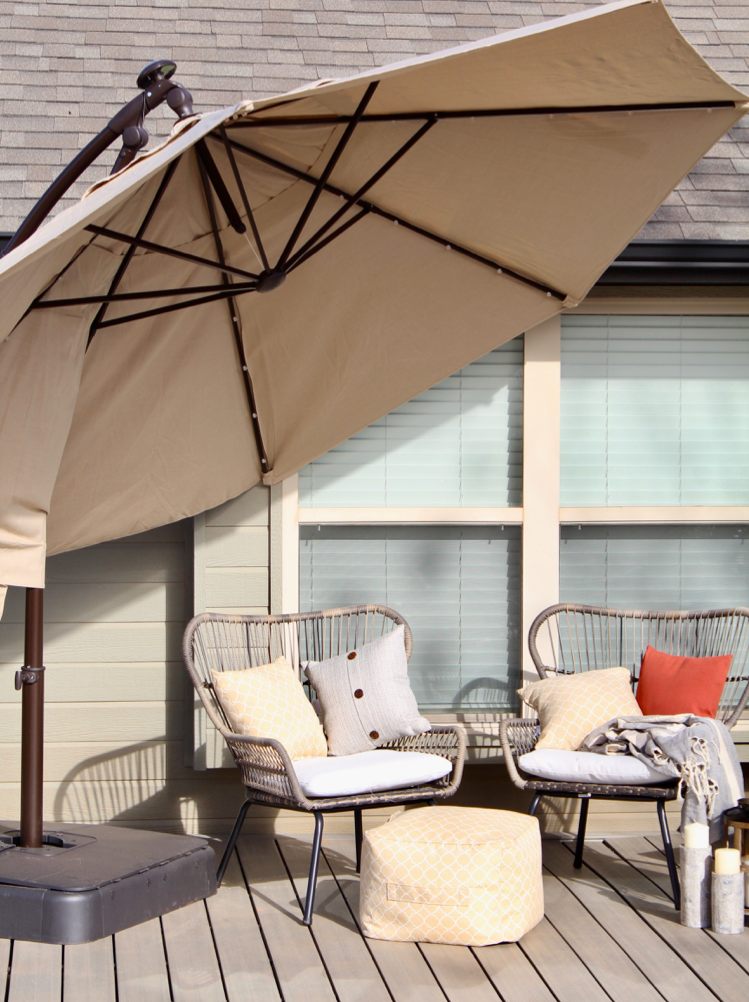
I was originally a little worried about some of the design ideas (including the umbrella) because I wasn’t able to actually see the space in person and even with measurements. there's just something different about actually being in the space, but I still had some great ideas that I knew would work.
The Walk-Through
Fast forward to a week or so and it was time to implement the design and start production. The Lisbon family is located in Atlanta, Georgia, so when production day came near, I got to fly out there and finally check out the patio deck. When I got there I immediately realized that my eyes were way too big for the actual space and some of my designs weren’t going to make the cut (like the umbrella, womp, womp), so I quickly started thinking of other ideas that could take the place of some of my other designs. Like I mentioned before, the deck looked really great, but the Lisbon's needed a little help bringing it to life. The first thing I was ready to take down was the wooden board they nailed across the top terrace to hang a bird feeder. I couldn't wait to take that thing down. Luckily, I was able to transform that corner and give them a brand new bird feeder.
 Initially, we were supposed to start production four days from the walk-through, so I thought I had time to plan some other ideas but of course, the only day that showed rain was the day we were supposed to start production. After the production company discussed which day would work best, shoot day quickly got changed to the day after the walk-through and everyone kicked into high gear. We started planning store trips to get all of the products ready, the production crew started setting up what they needed and a chill day became a fast-paced one quickly.
 I was able to think of some designs quickly that could replace some of my original designs but I was excited to search Home Depot to see what else I could find.
Product Pick-Up
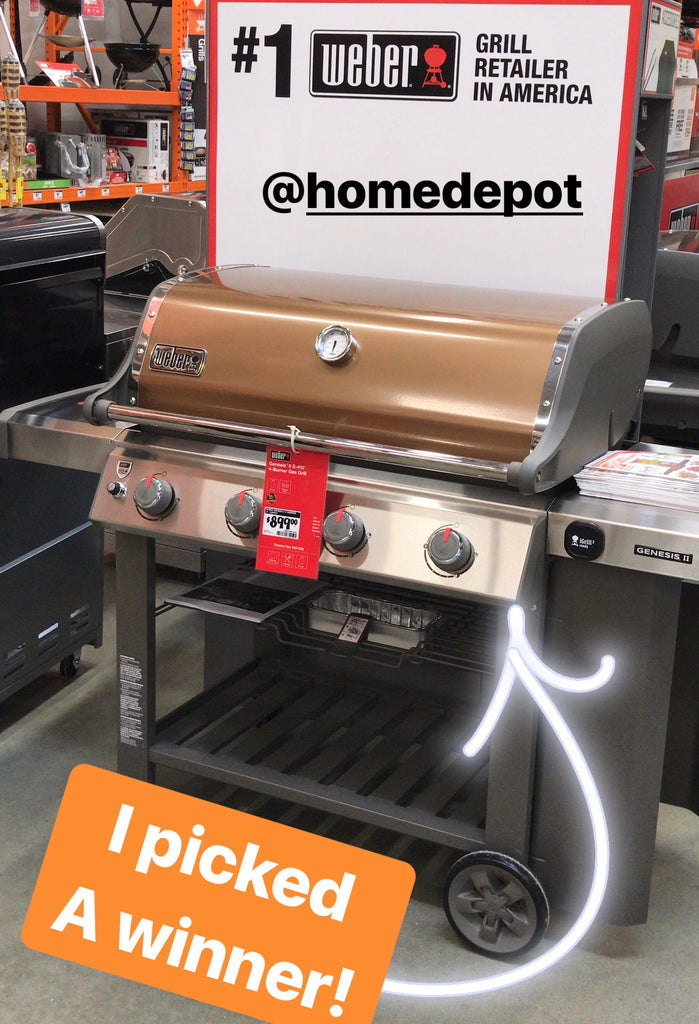 Most of the items I picked out for the Lisbon’s space had been ordered already, but there were several items I purposely left off the list so that I could see them in person and kind of play it by ear. We headed to the closest Home Depot and shopped until we dropped. That Home Depot trip had to be my favorite Home Depot Trip to date, hands down. I had some great shoppers with me and we had an absolute ball.To my surprise, when we walked into Home Depot, the grill I had picked out for the Lisbon Family was front and center in the Outdoor Living area. It was then I knew that I had picked a winner. It looked way better in person and everyone else thought so. We spent five minutes just looking at it and talking about how great it looked.Eventually after drooling over the grill we picked out some other cool items. I was able to find a cool tabletop firepit for the outdoor dining set and we picked out TONS of plants. The Art Department Team helped us get it all loaded up in the truck. I knew at that point that this patio deck makeover was going to look totally different from what the Lisbon's had and probably a lot more than what they were expecting.
Production Day
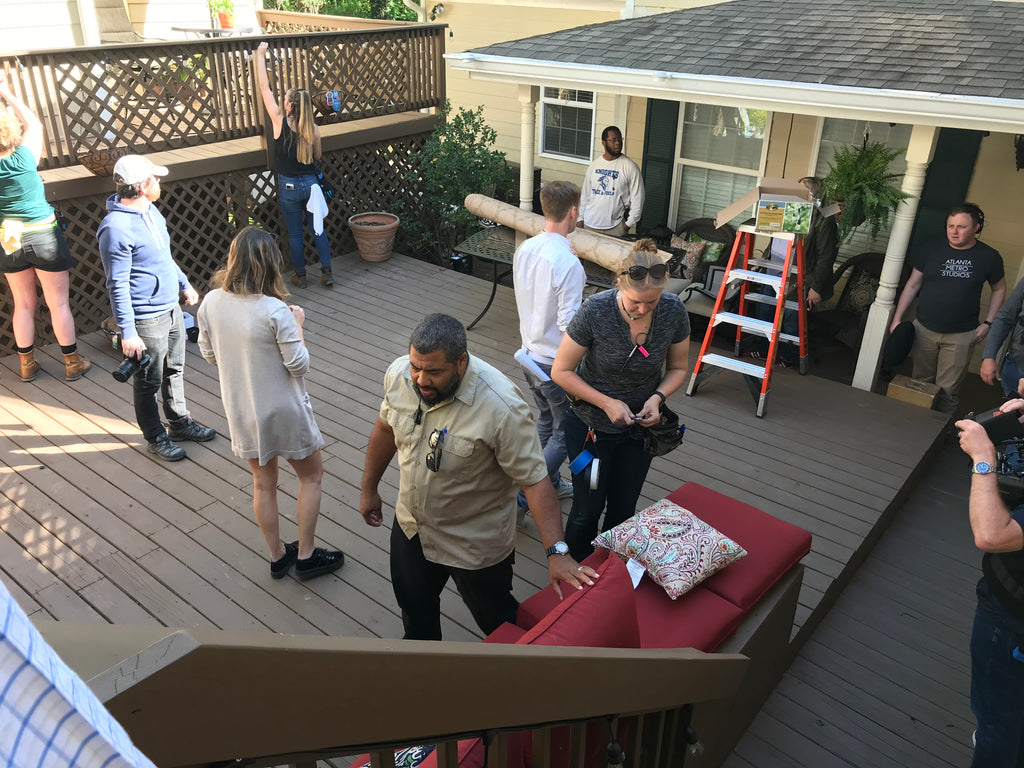
Production day had arrived and man was it a long fun day. This was my first experience being filmed by a production company and I was like a kid in a candy store. I arrived to the Lisbon's house around 9:00 am and the whole process became surreal when I saw everything that was happening.

They would ask me where things should go and I would point it out and they would get to work. Part of me wanted to get my hands dirty (the builder in me) but I couldn't get too down in the trenches since I was being filmed. But I had a rock star crew to help me bring my design to life.
One of the fun parts about production was getting to present Grandpa Lisbon and Jamila with these monogrammed aprons. Grandpa Lisbon was know to be the "Grillmaster" of the house and Jamila was the "Grillmaster in Training," so we wanted everyone to know. They looked great on them.


After we presented the aprons, we got to enjoy the patio deck makeover a little and just chill out. This day was such a great experience and tons of fun. I was happy that I could come up with a patio deck design that they loved and I also was grateful for the opportunity to meet such a great family.
Now I know you may be thinking "What does the patio deck look like now?" Well don't worry I am spilling all the details over on the Home Depot Blog here. So be sure to go check it out.
Head over to the Home Depot Blog to Check out how I Designed the Lisbons space.
Thanks for reading guys! XOXO, Ashley
I am receiving compensation for the purposes of promoting The Home Depot. All expressed opinions and experiences are my own. My post complies with the Word of Mouth Marketing Association (WOMMA) Ethics Code and applicable Federal Trade Commission guidelines.

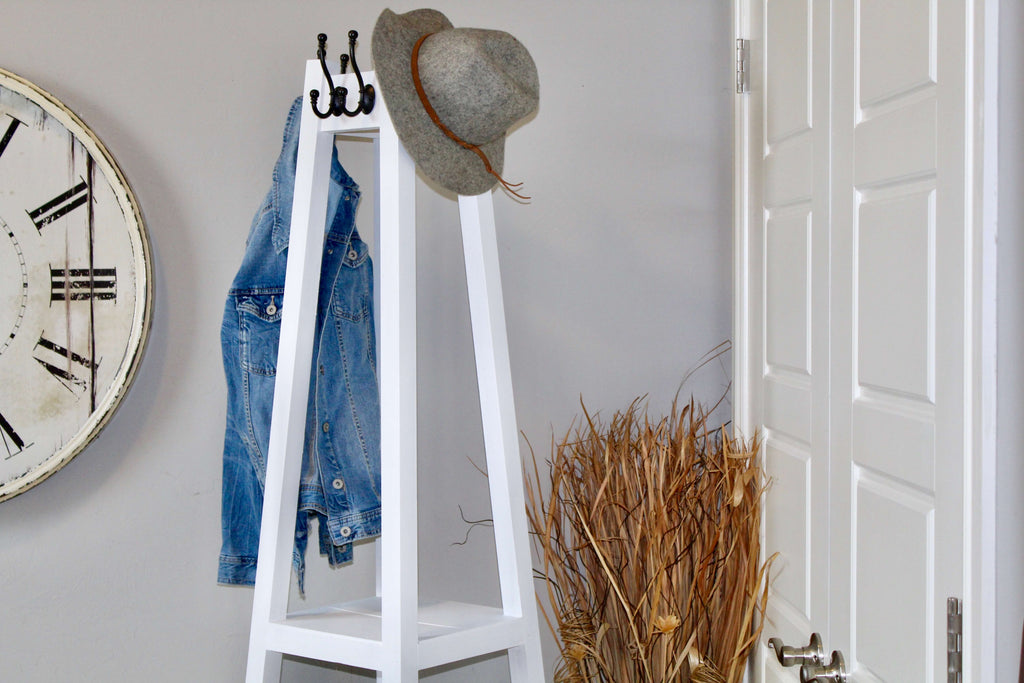
DIY Coat Rack
A DIY Coat Rack never looked so sweet!
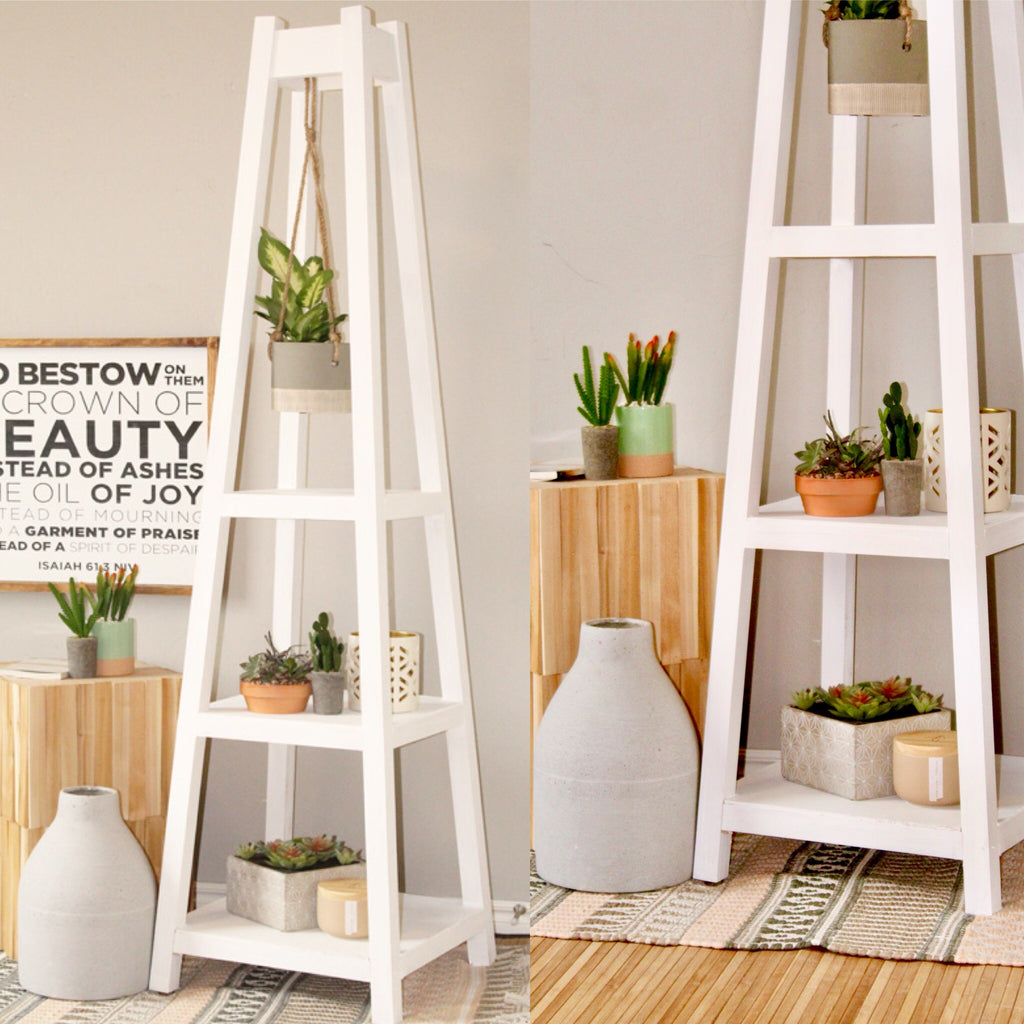
A few weeks ago I created a DIY Plant Stand that was originally supposed to be a coat rack, so I figured I would show you guys what it was really intended to be.
This review is sponsored by the Home Depot as a part of The Home Depot's Pro-Spective Campaign.
This project was really simple because I already had the frame build from my plant stand project. Check it out Here. When I posted the unfinished frame on Instagram everyone liked the idea of a plant stand and I loved it too, but I also wanted to see how it would look as the coat rack that it was originally intended for. But here is a quick look at the plant stand!
 There are some affiliate links in this post, meaning I get a small commission if you purchase through these links, at no cost to you. Click Here to read my full disclosure.
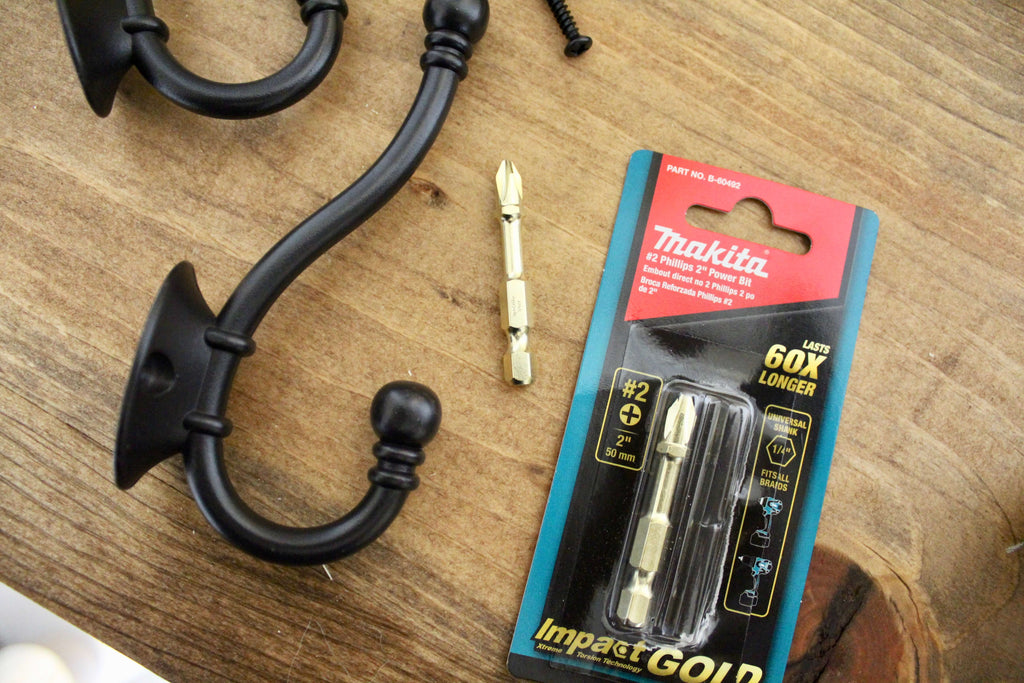
To transform the project I used my Makita Impact Gold #2 Phillips 2 in. Power Bit (2 Per Pack) set to add on my Coat Rack Hooks. These Makita gold bits last up to 60 times longer than a regular bit and are designed for high-torque impact drivers. It also flexes to help decrease tip pressure and increase durability.
 Check out my build video below.
Tools Used:
Makita Impact Gold #2 Phillips 2 in. Power Bit (2 Per Pack)Materials:
Cut List:
Dimensions:
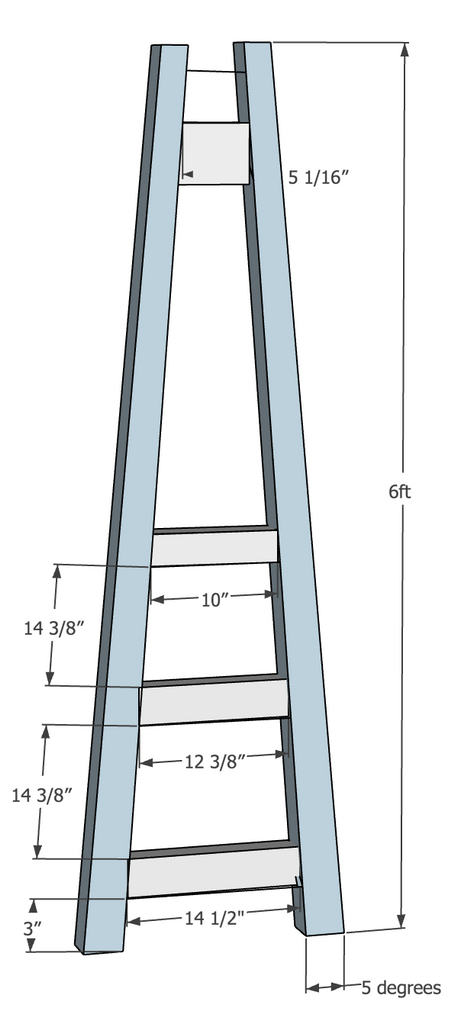
For more detailed steps on how to build the frame, check out my DIY plant stand post here.
The thing I love most about this build is the fact that it can be used for two things, I mean what more could you ask for. One plan, two projects! Let's take one final look!
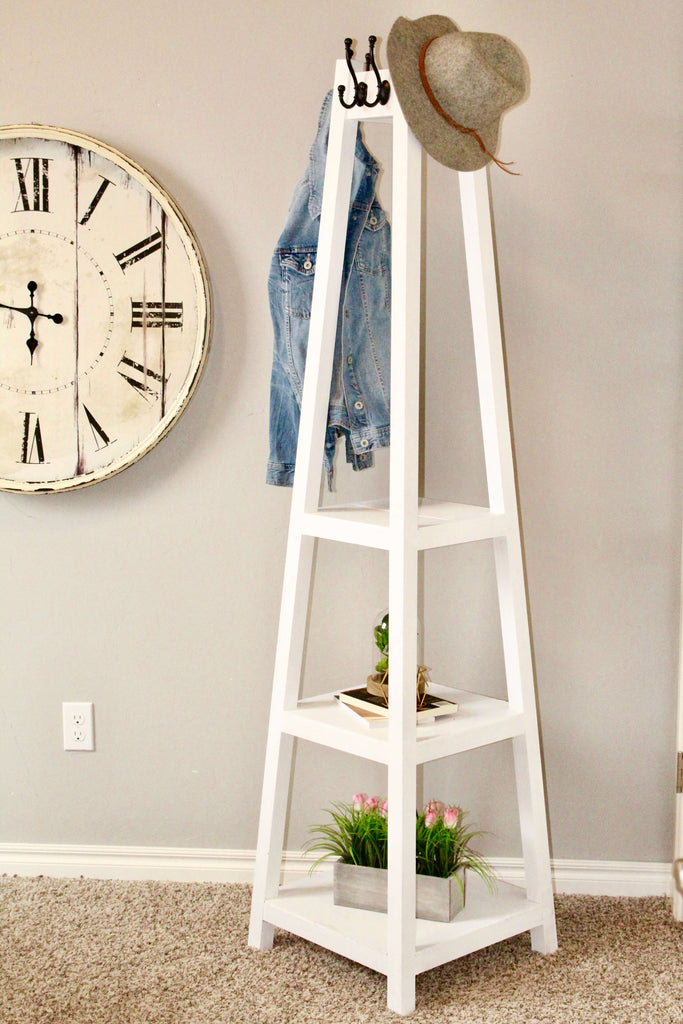
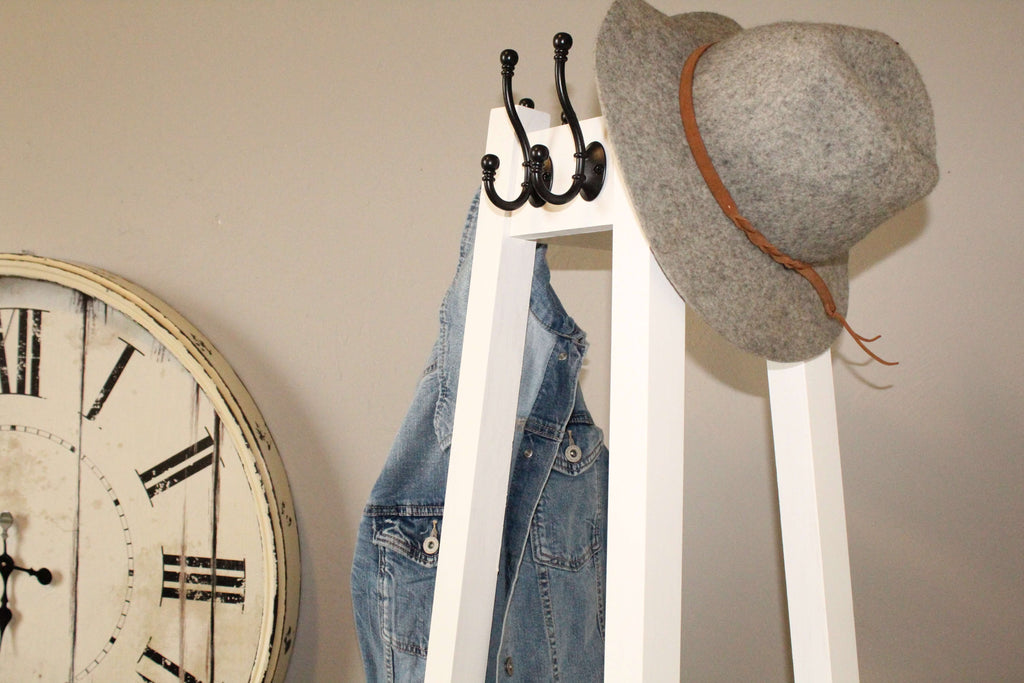
This will be perfect for my small entryway. The hooks were a nice touch.
Thanks for reading guys! XOXO Ashley
I acknowledge that the Home Depot is partnering with me to participate in the The Home Depot Pro-Spective Campaign. As a part of the program, I am receiving compensation in the form of products and services, for the purposes of promoting The Home Depot. All expressed opinions and experiences are my own. My post complies with the Word of Mouth Marketing Association (WOMMA) Ethics Code and applicable Federal Trade Commission guidelines.

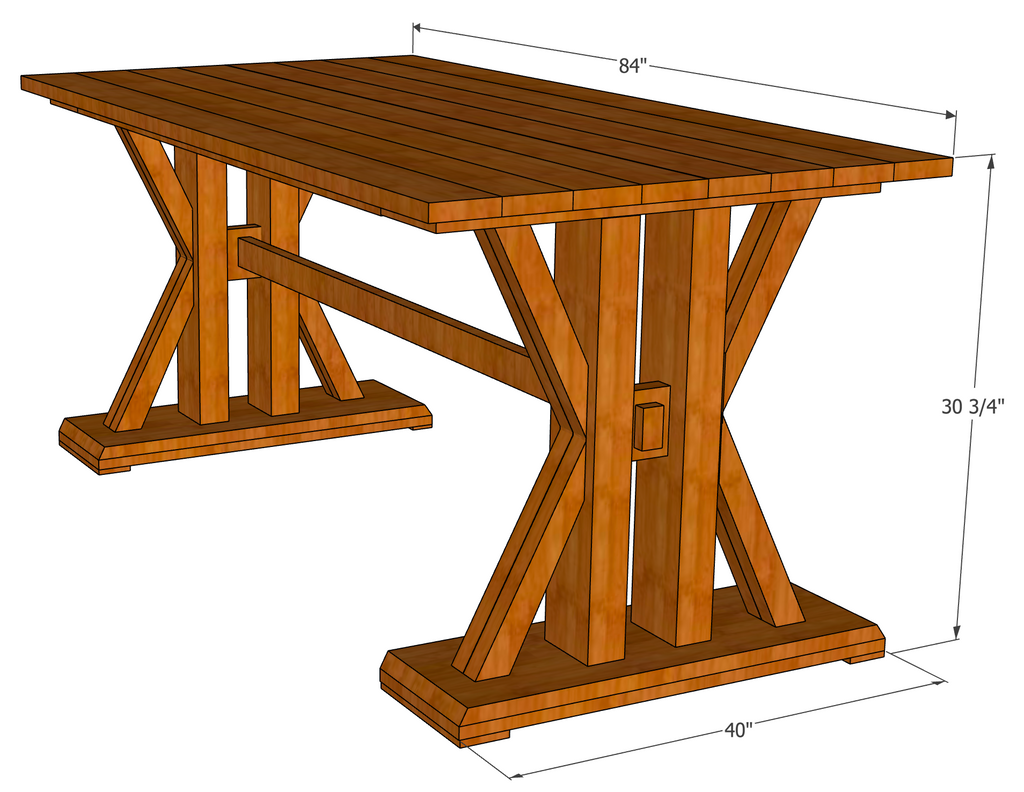
French Farmhouse Dining Table
This dining table is giving French Farmhouse a whole new meaning.
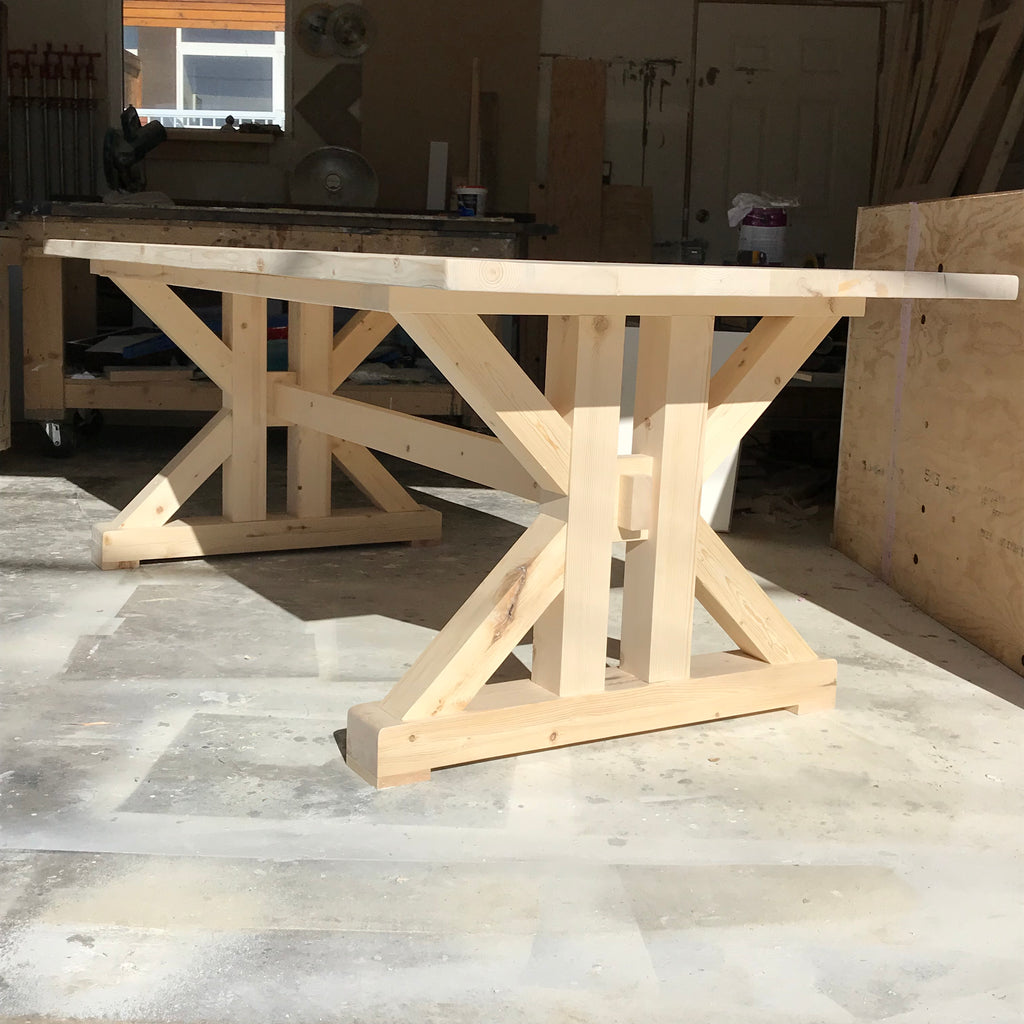
 Today is an exciting day because I get to feature another group of great builders. Eddie Sheppard and Phil Armstrong of BowRiverRustic have built this B-E-A-UTIFUL French Farmhouse Dining table and today's your lucky day because we have partnered up so that you too can build your own table with my 3D plans. Be sure to go check these guys out and give them a follow on Instagram. I mean they look cool enough to follow, right? I sure think so. Today's post is to provide plans for the dining table but don't freight...plans for the bench are available here, I mean what's the peanut butter without the jelly right? HAHA! OK, I know you're probably thinking, enough blabbing, give me the good stuff. Well, I'd hate to disappoint you, so lets get to it!
Dimensions
Materials List:
10 - 2x6 @ 8ft
1 - 4x4 @ 8ft
7 - 2x4 @8ft
1 - 1x4 @ 6ft
See Printable Plans for Cut List
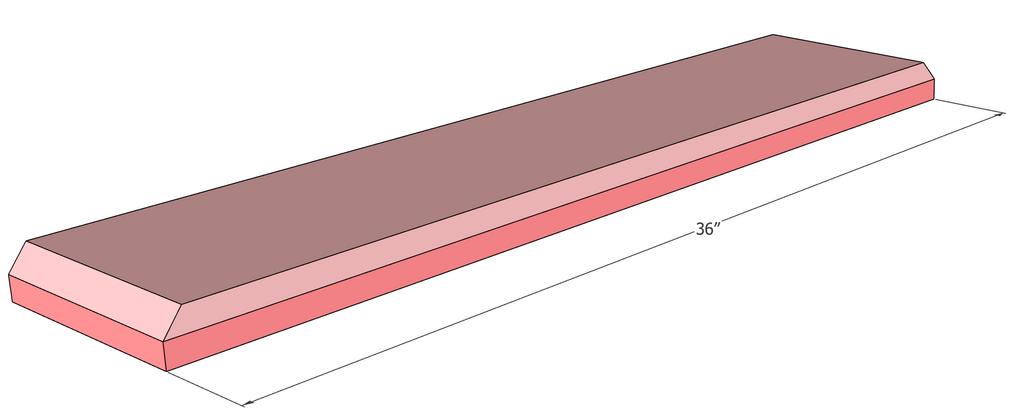
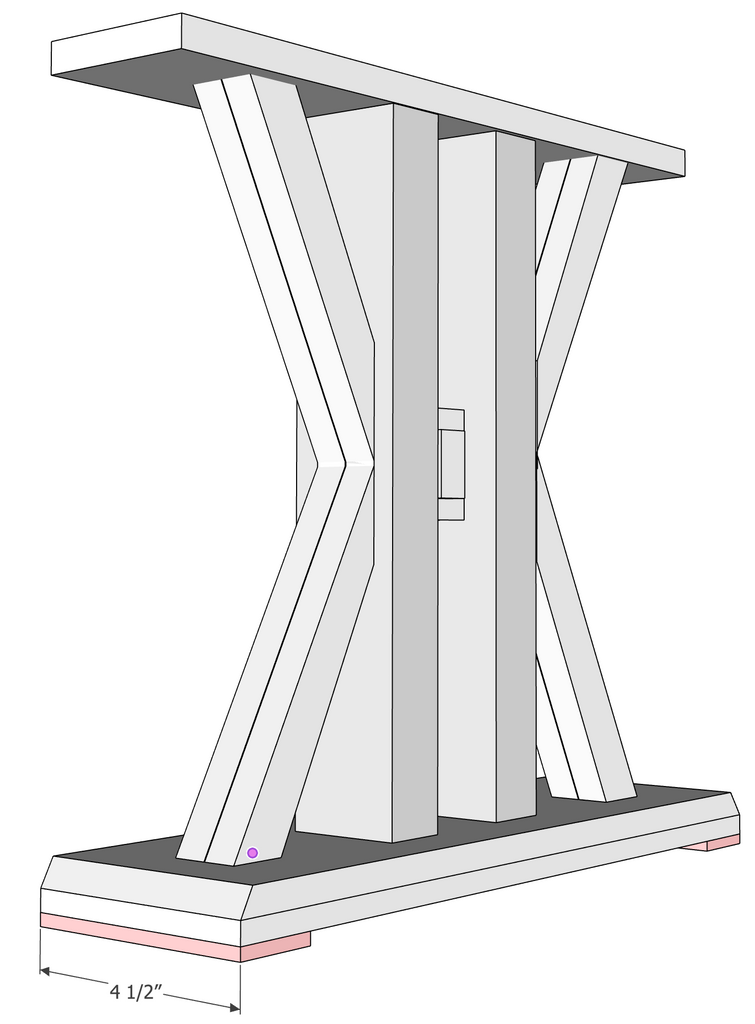
Step 1: Rip the four (36") 2x6 boards to 4 1/2" and glue two pieces together and secure with 2 1/2" wood screws. You should have two completed foot bases. To round edges, use a palm sander or cut at a 45 degree angle as an alternative. Note: Screw the boards on the side that will face the ground.
Step 2: Center and biscuit the 2x6 divider (3 1/2" piece) to the two (24") 4x4 legs. Crate the biscuit holes using a Biscuit Joiner along with biscuits and use wood glue to secure it in place.
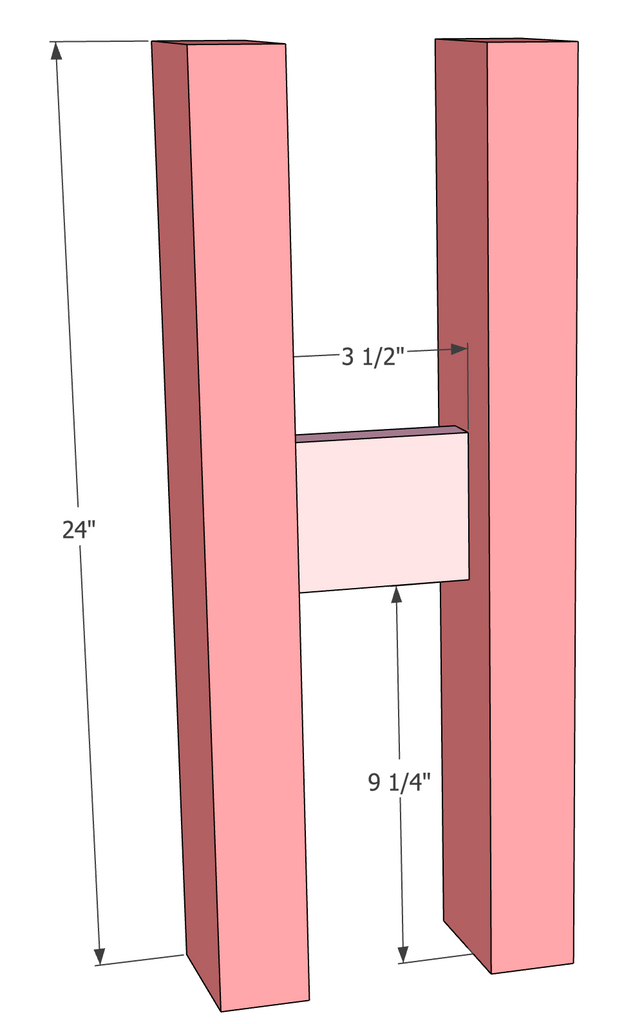
Repeat for the other side of the table.
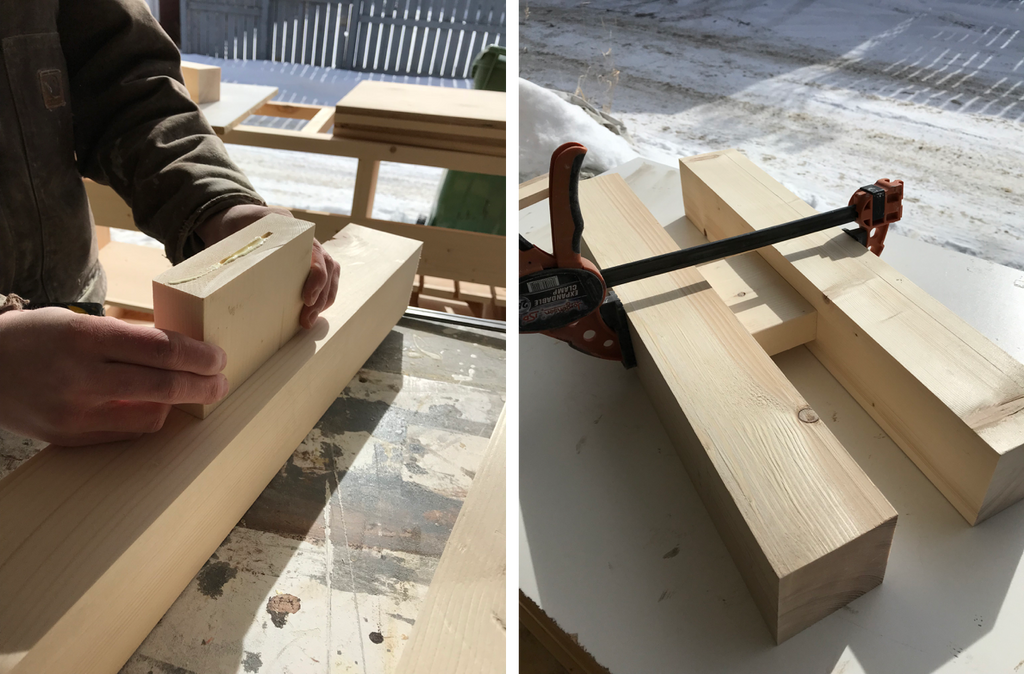
Step 3: Once the middle section is assembled, center the 2x6 base on top of it and drill into the 4x4 legs using 4" wood screws and wood glue.
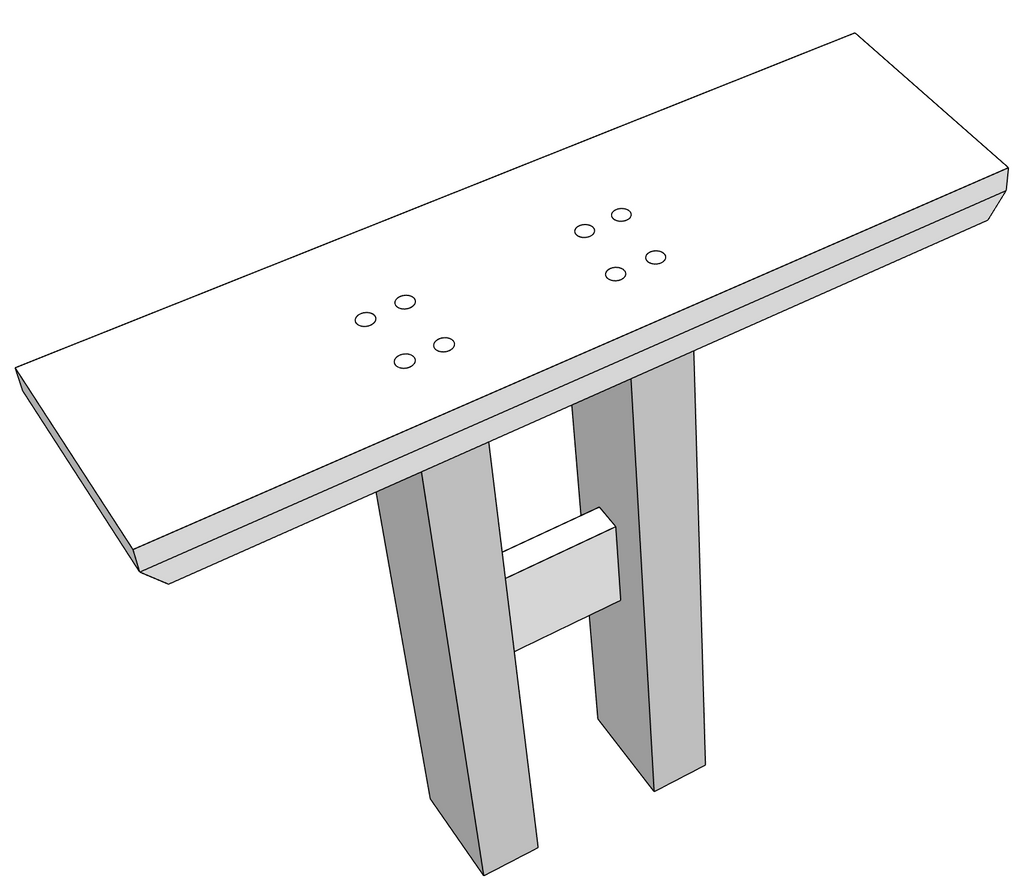
Step 4: Attach the 2x4 decorative using a brad nailer and 2" brad nails. It should be centered on the 2x6 piece between the 4x4 legs , this will face out when the table is completed.
Step 5: Add the (36") 2x4 top valence to the assembled base using 2 1/2" screws. Screw from the top into the 4x4 legs.
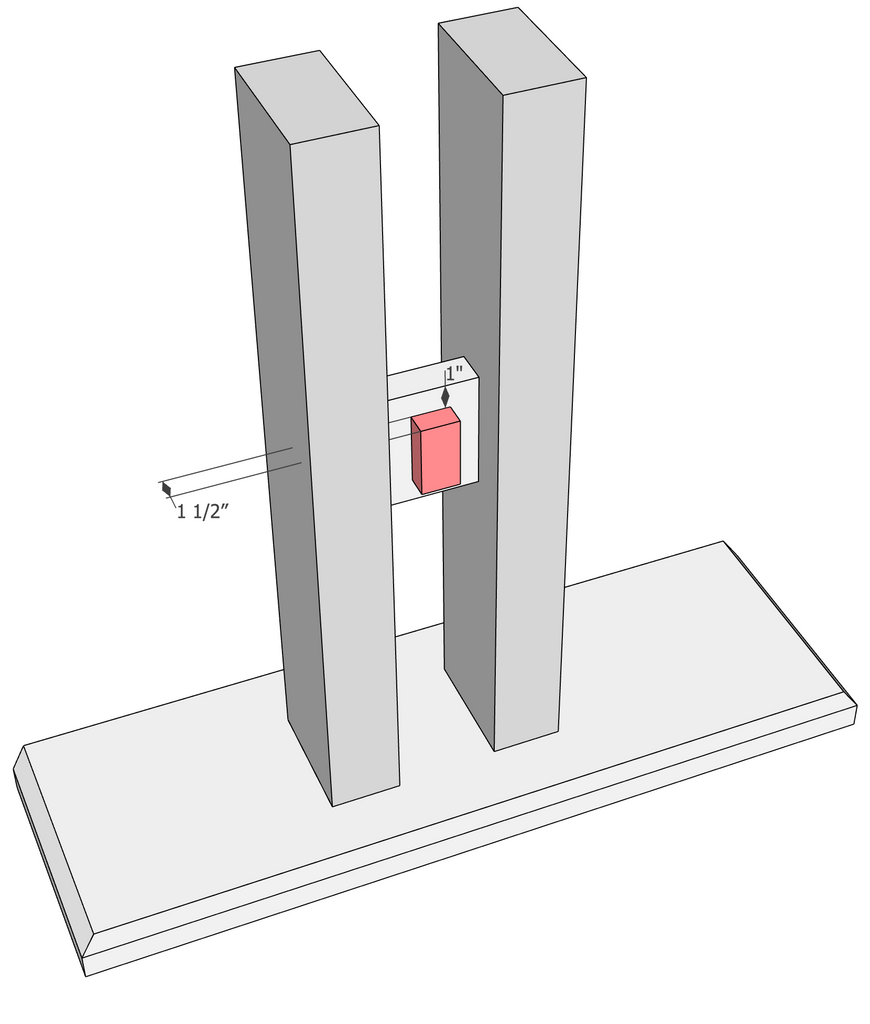
Step 6: Assemble the 8 angled legs. Cut 16 2x4's to 18" ( longer to allow for any minor adjustments when cutting the angles). Rip each 2x4 to 3" and then attach two pieces together using 2" brad nails and wood glue.
Once dried, cut both ends at 45 degrees off square. From long-to-long it should be 15".
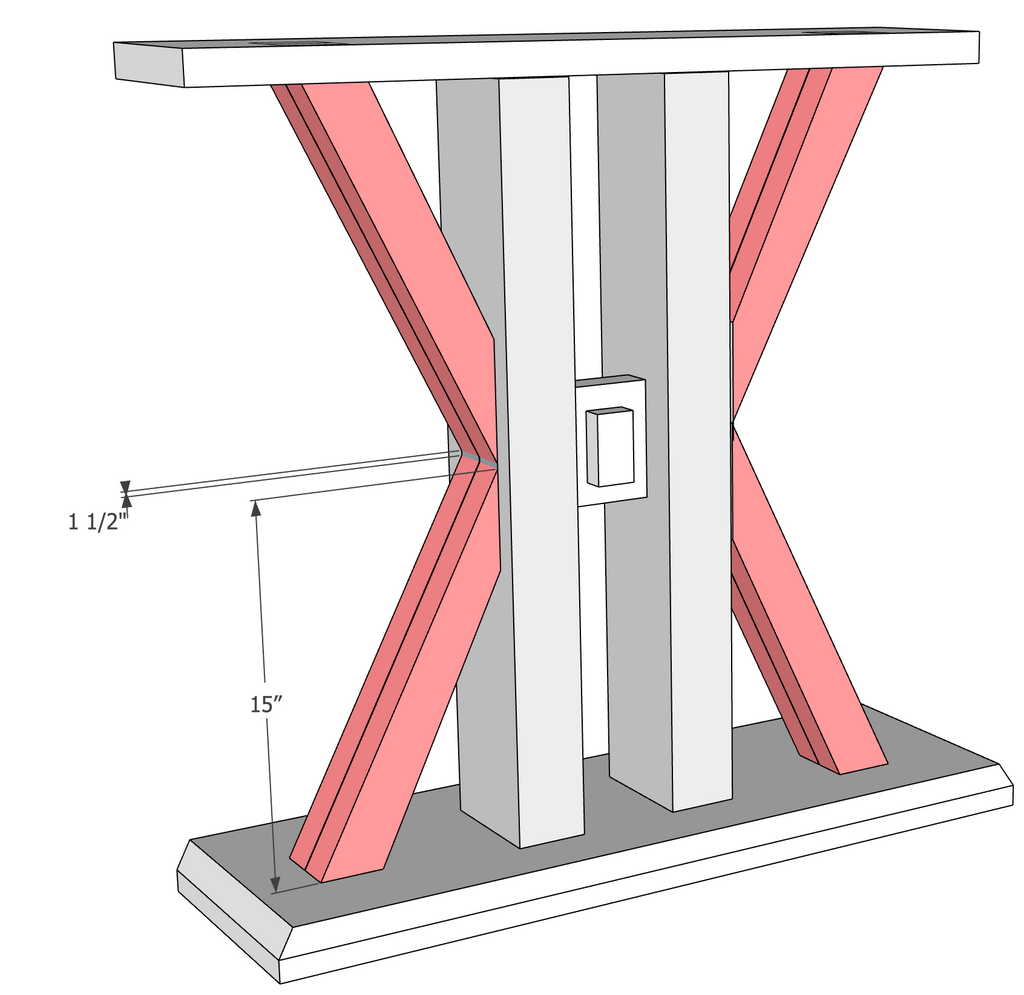
There will be a 1 1/2" gap between the angled pieces on each side of the leg. Then attach legs to the assembled base using 2" brad nails or 2" wood screws and plug holes. Note: Measure before each cut for best fit.
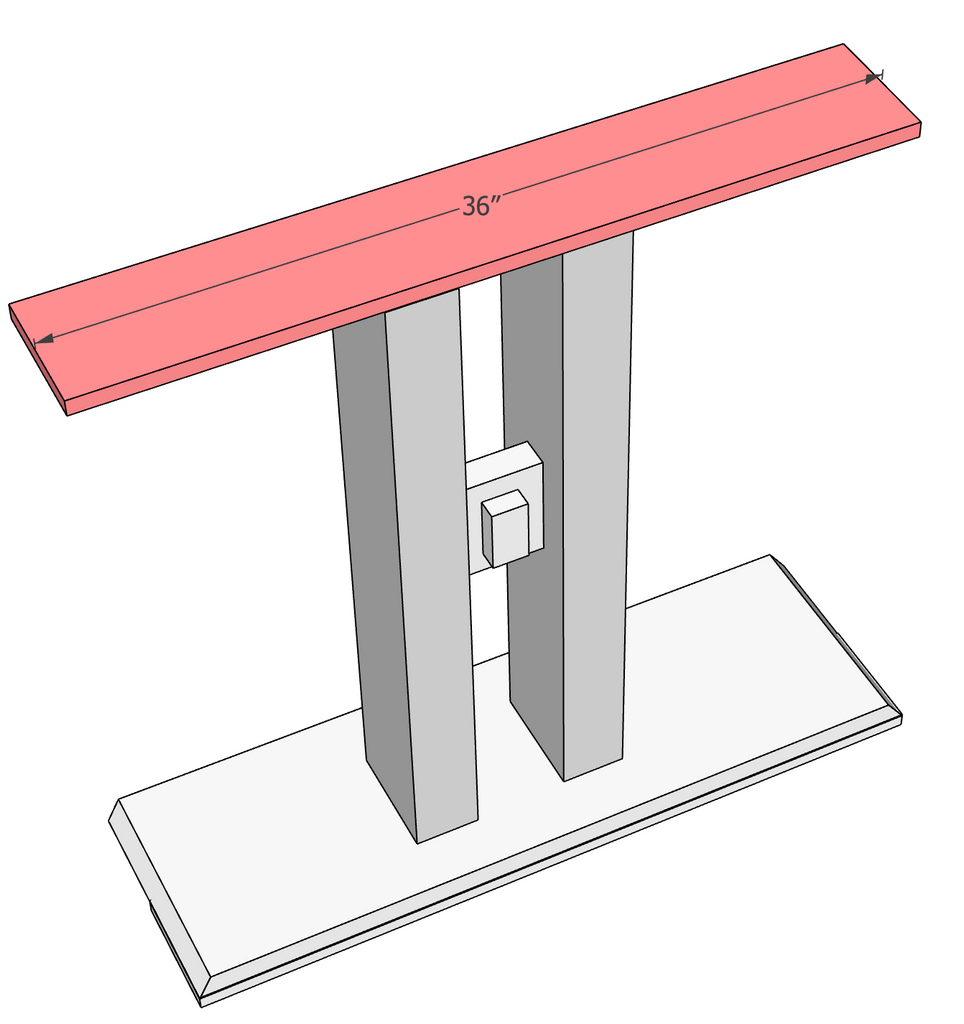
Step 7: Attach the 1x4 feet to the bottom of the table base using 2" brad nails and wood glue.
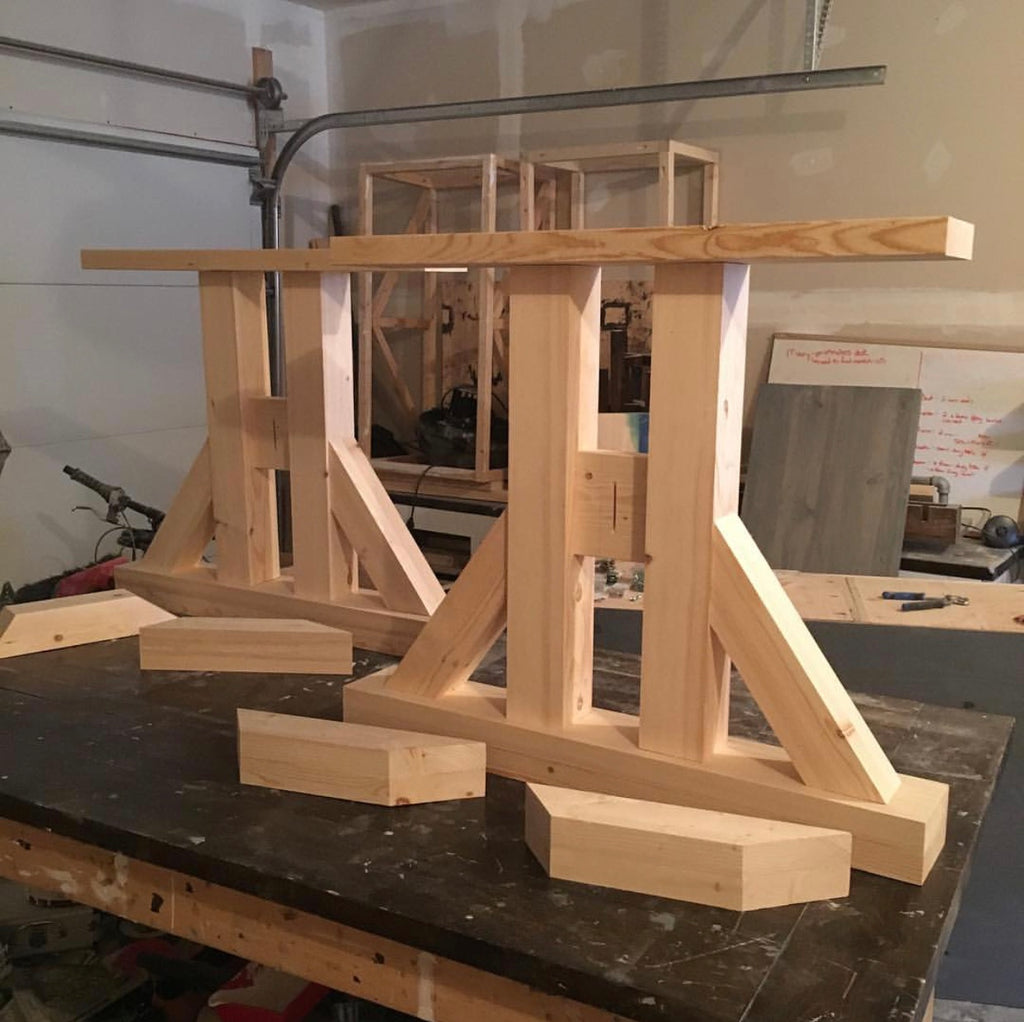
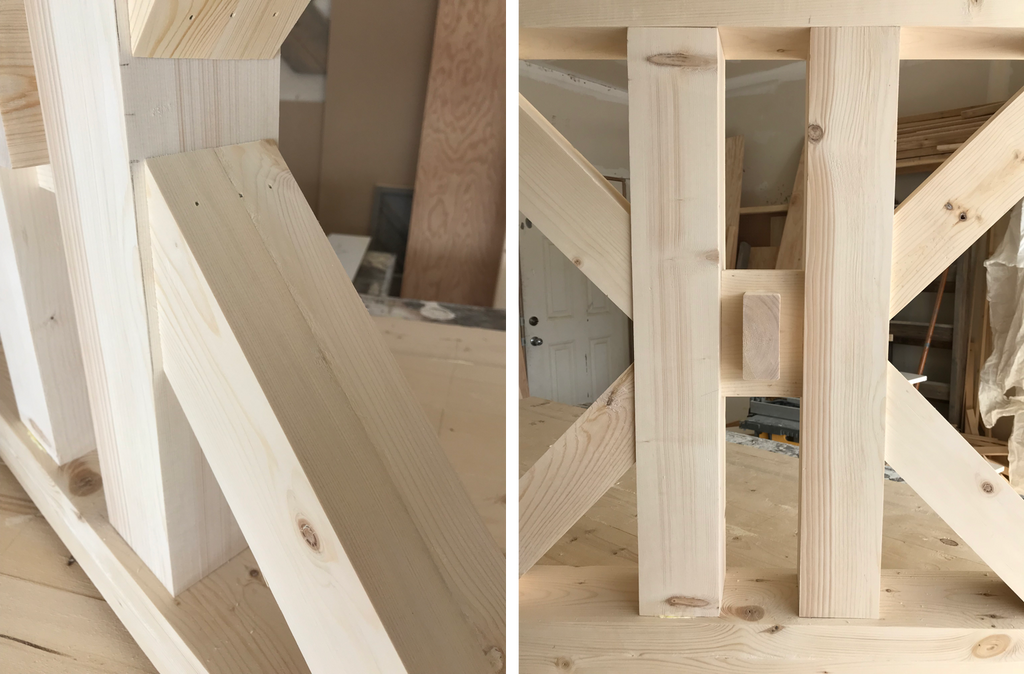
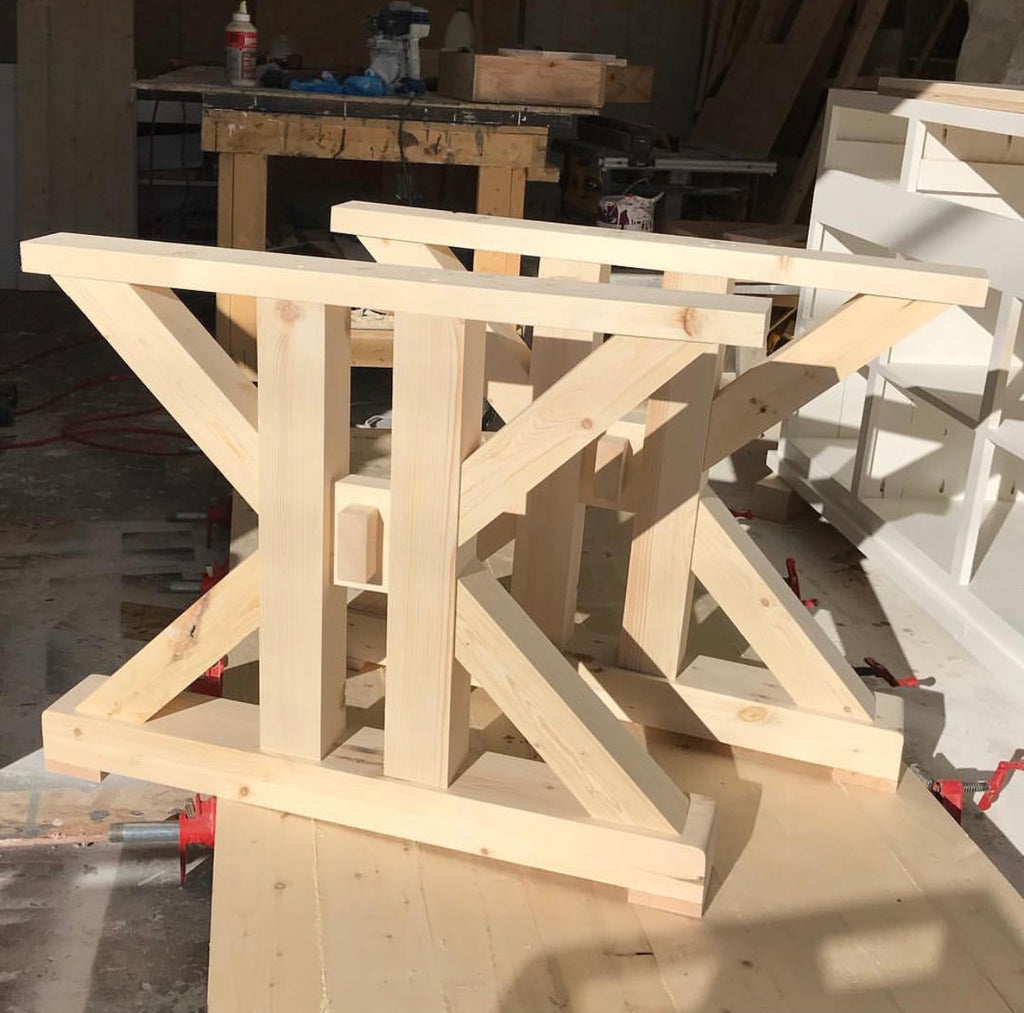
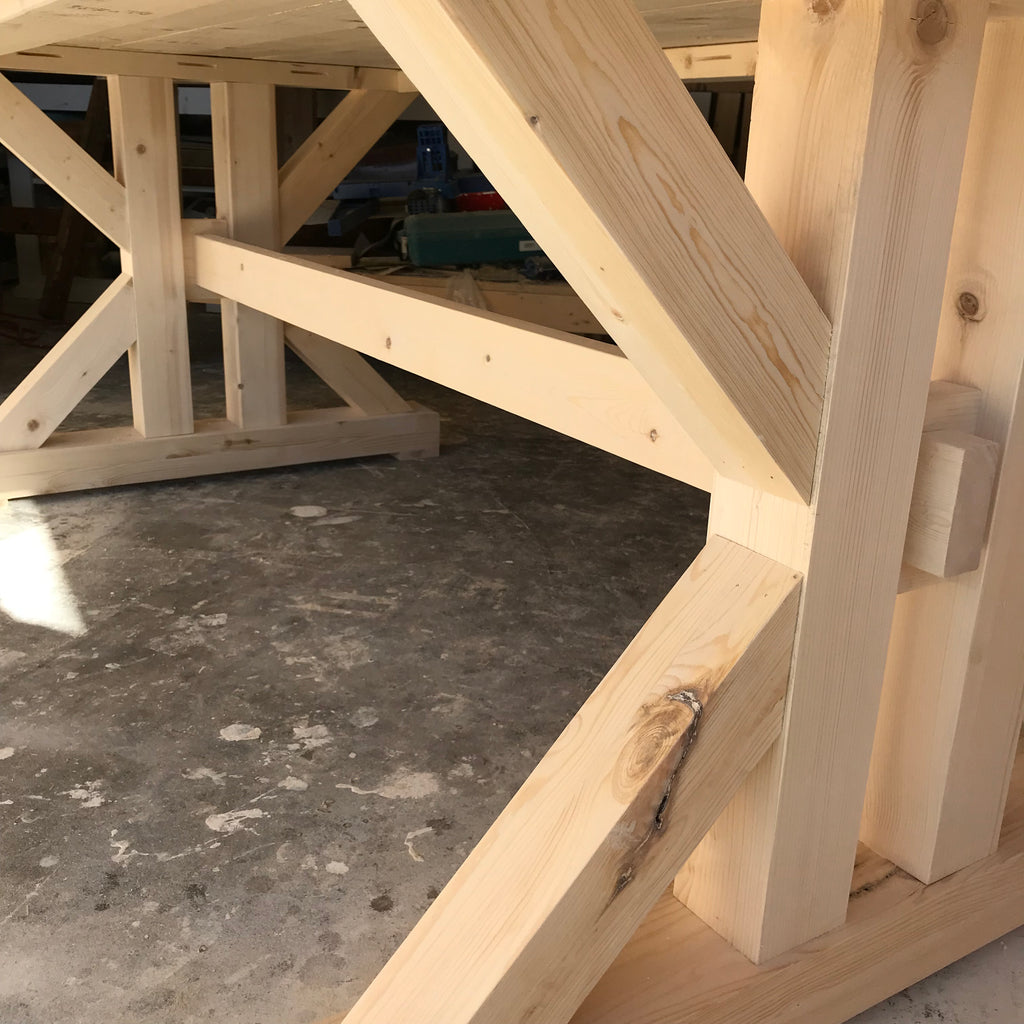
You should now have two assembled table legs that look like this.
Step 8: Attach the middle 2x4 (72") runner using a Kreg Jig K4 Pocket Hole System on a 1 1/2" setting, with 2 1/2" Pocket Hole Screws to attach along with wood Glue. This piece will be placed in the middle of the 2x6 divider between the legs (the same as the outer 2x4 decorative piece).
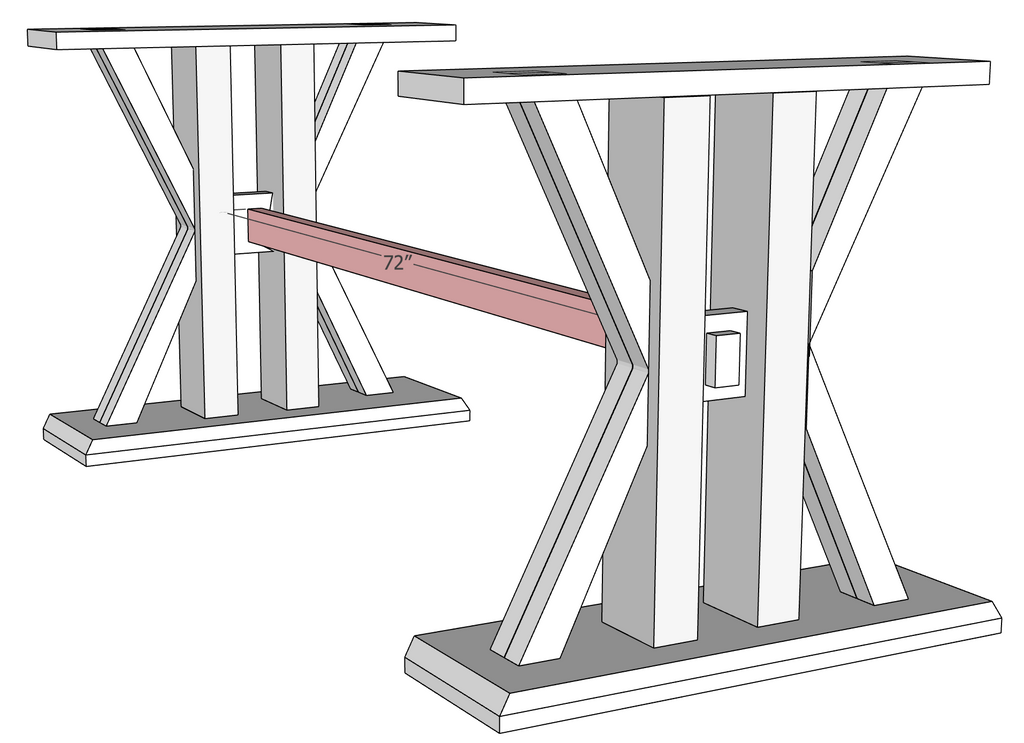
This will give the illusion of the runner going through the legs. Use pocket hole fillers to hide the kreg jig holes once screwed into place.
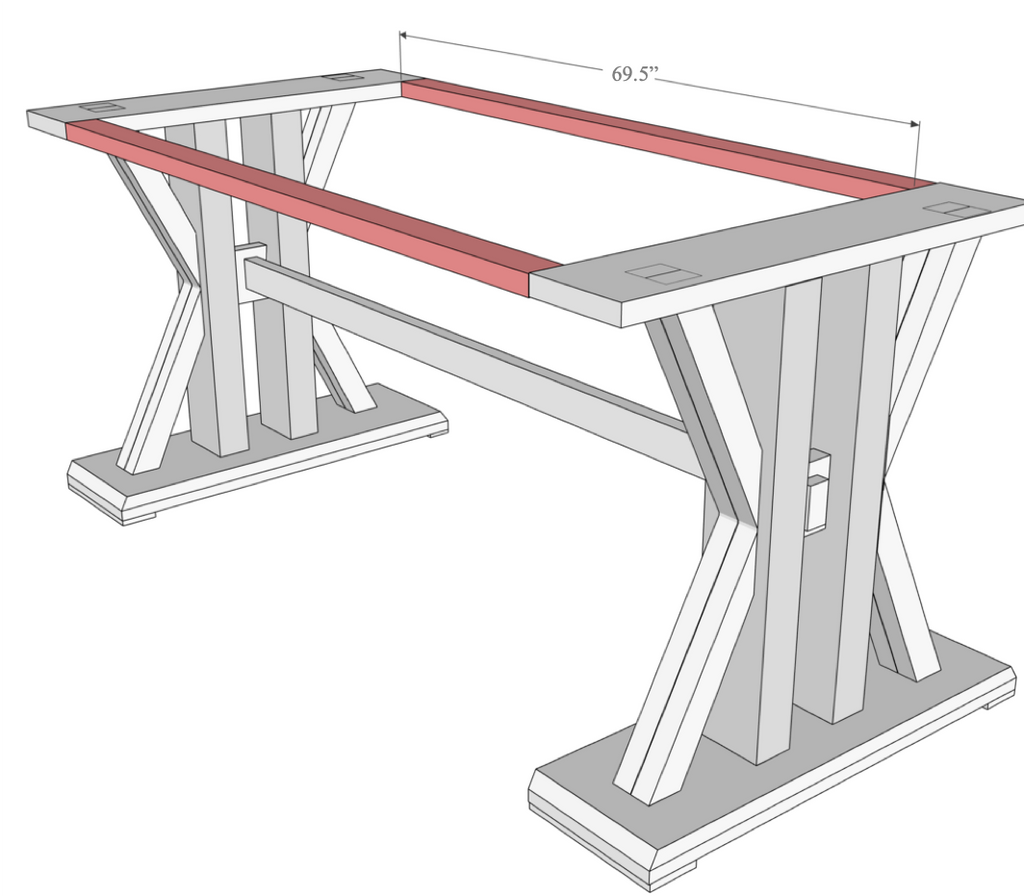
Step 9: Add the top 2x4 (69.5') side braces that runs the length of the table. Using a Kreg Jig K4 Pocket Hole System on a 1 1/2" setting, with 2 1/2" Pocket Hole Screws to attach along with wood glue to the side leg top valences.
Step 10: - Rip 8 2x6 (84") 2x6 boards and attach together using biscuits/ pocket holes and wood glue.
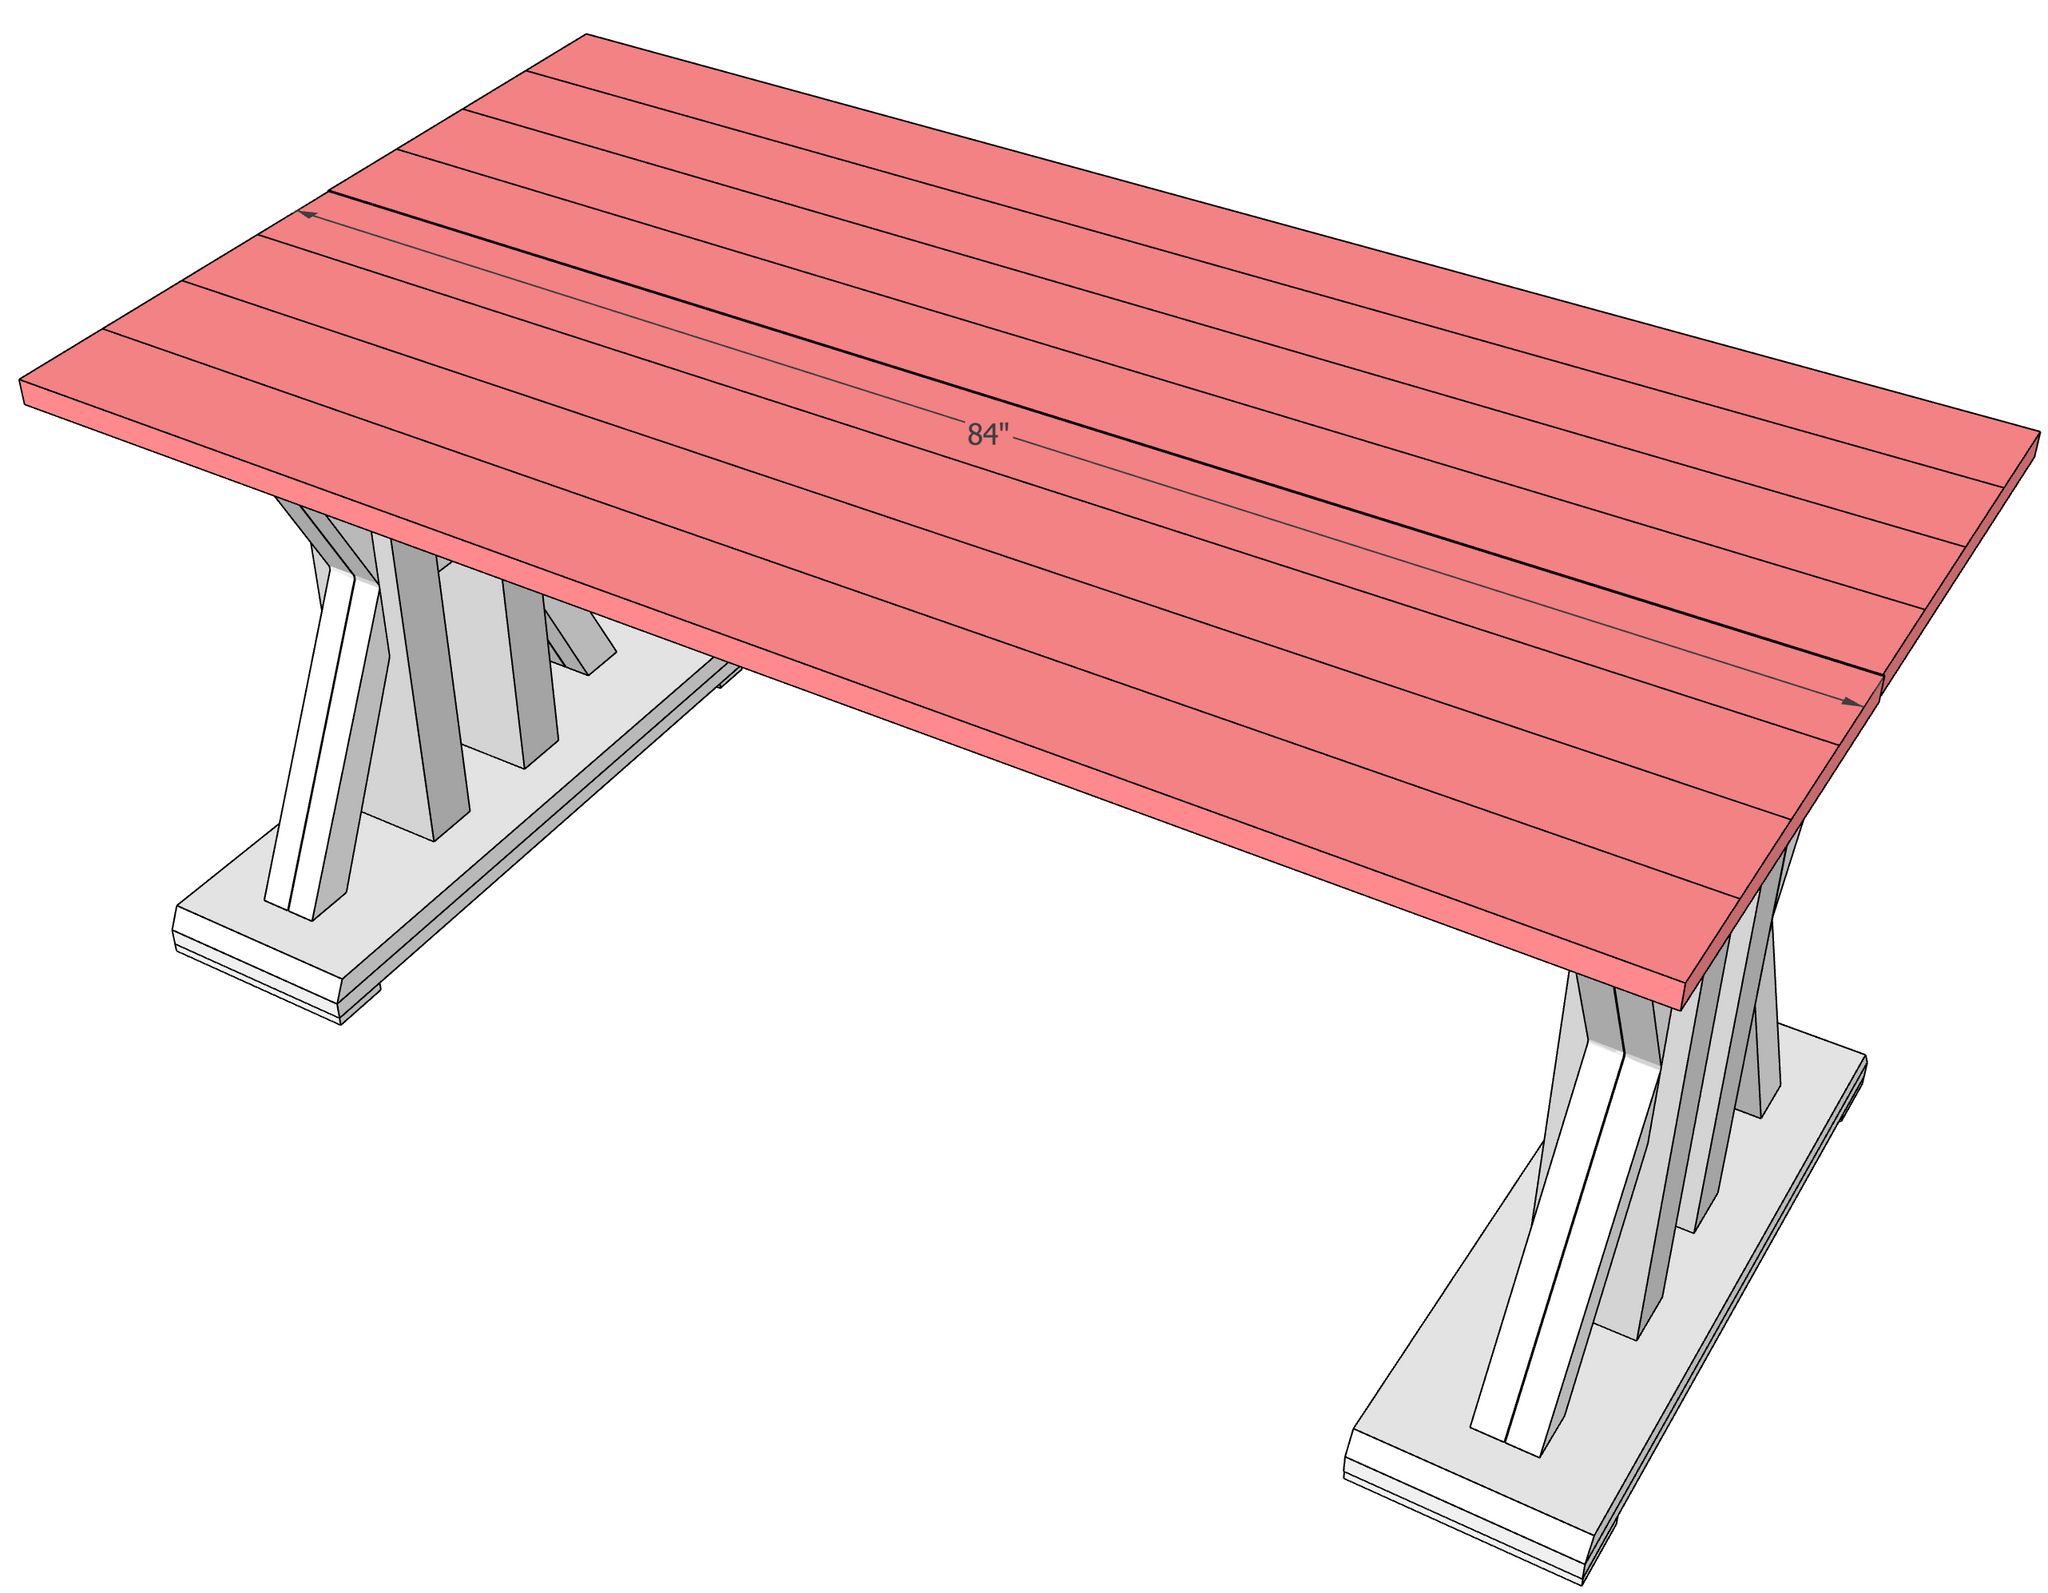
Attach the tabletop using Tabletop Z clips fasteners and finish the table off with Rustoleum Weatherd Grey or Minwax Classic Grey.
and Waaa-Laahhh! You are finished! Let's take another look at BowRiverRustic's Final Build again!!
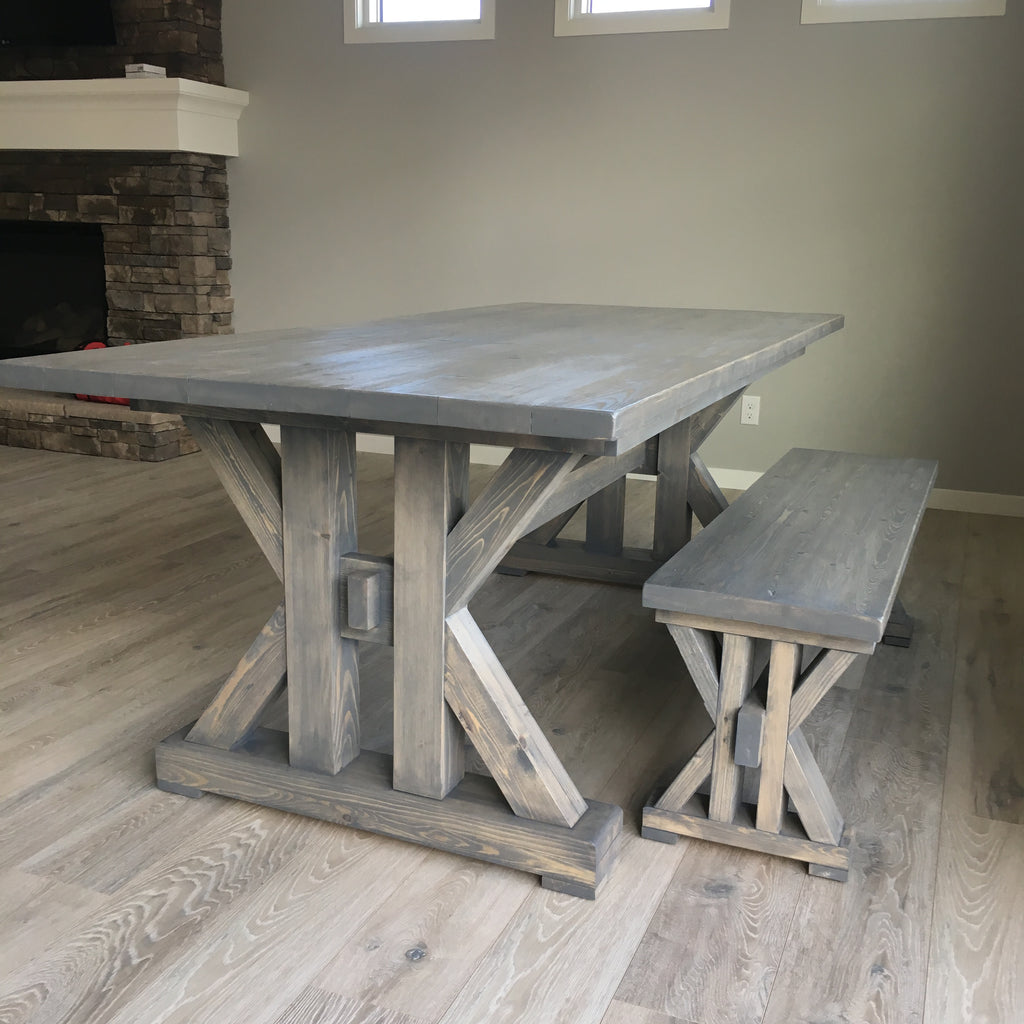
Thanks for reading guys! XOXO, Ashley.

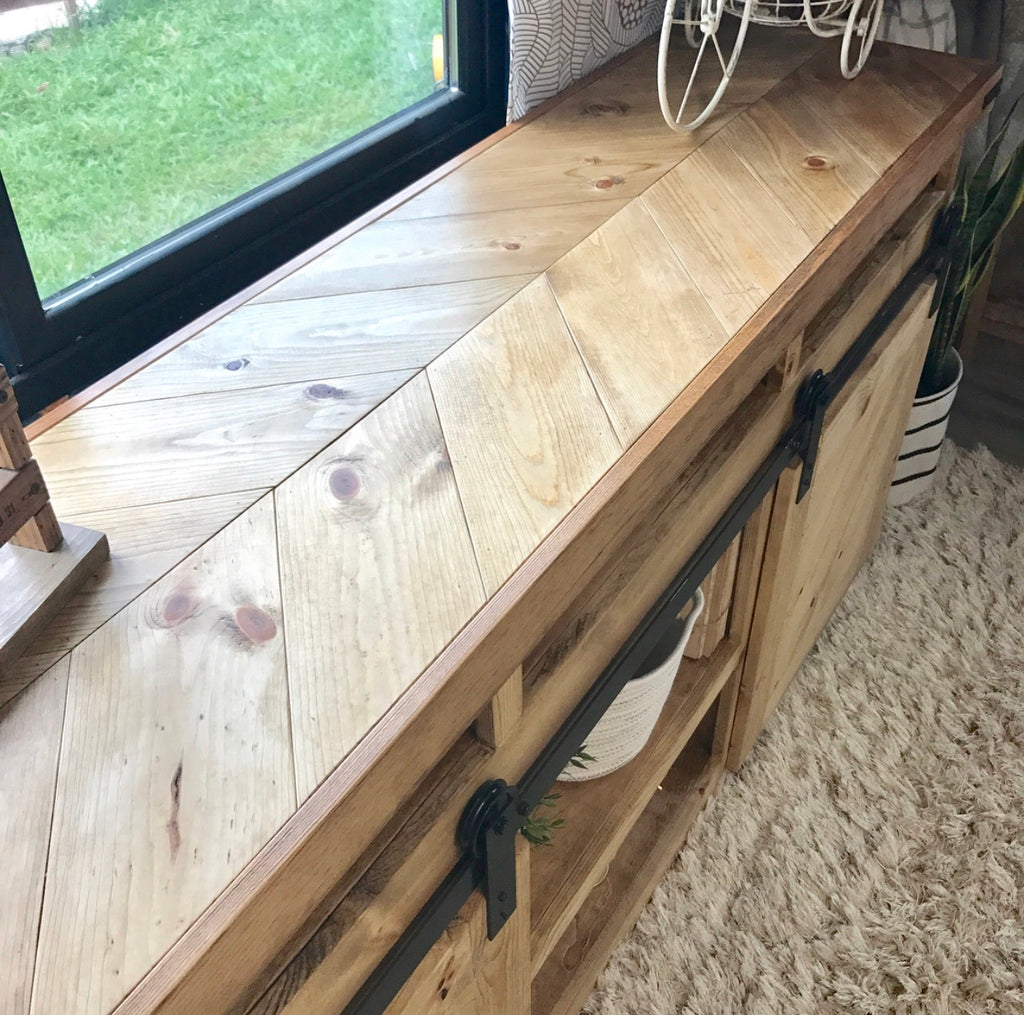
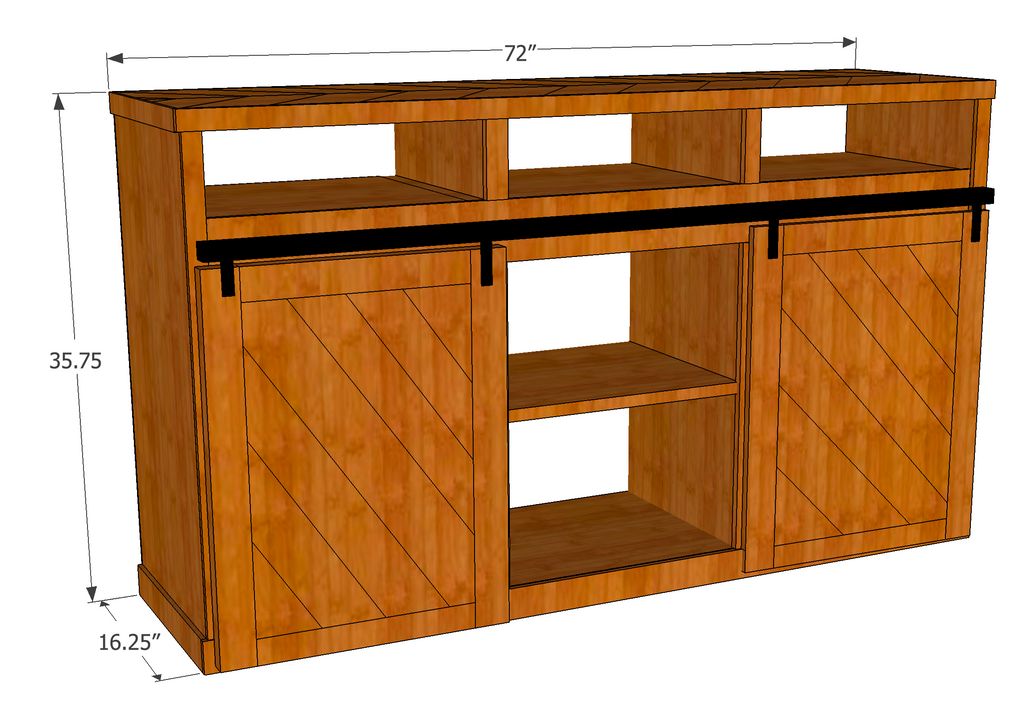
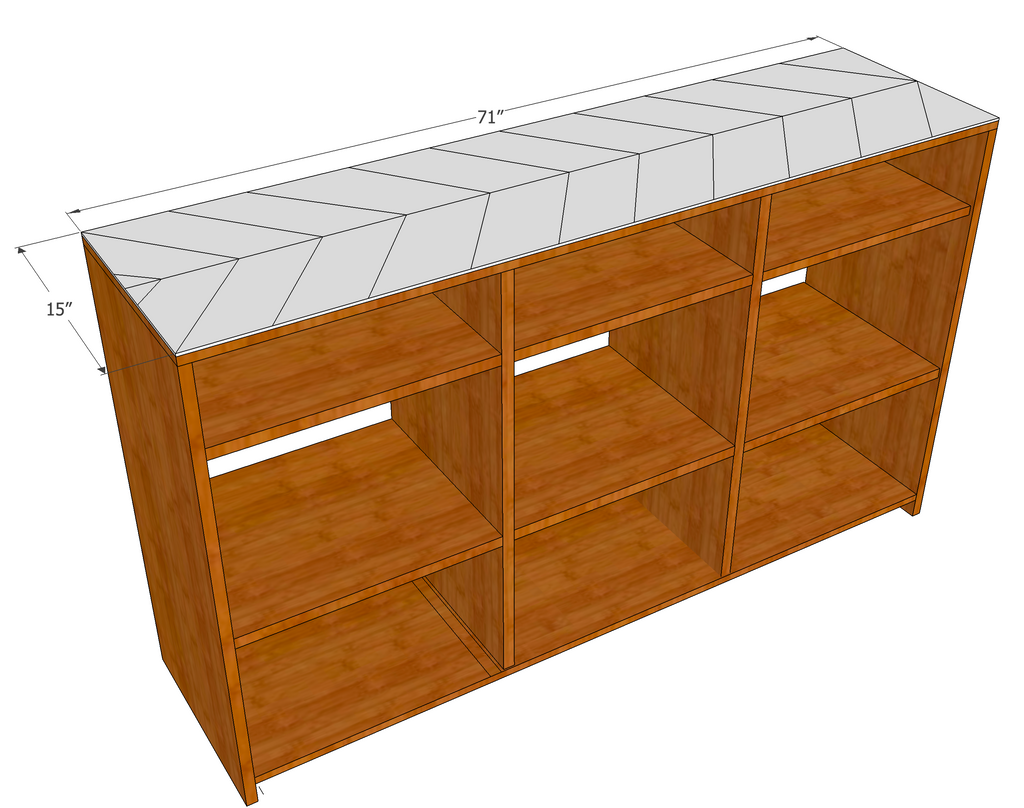
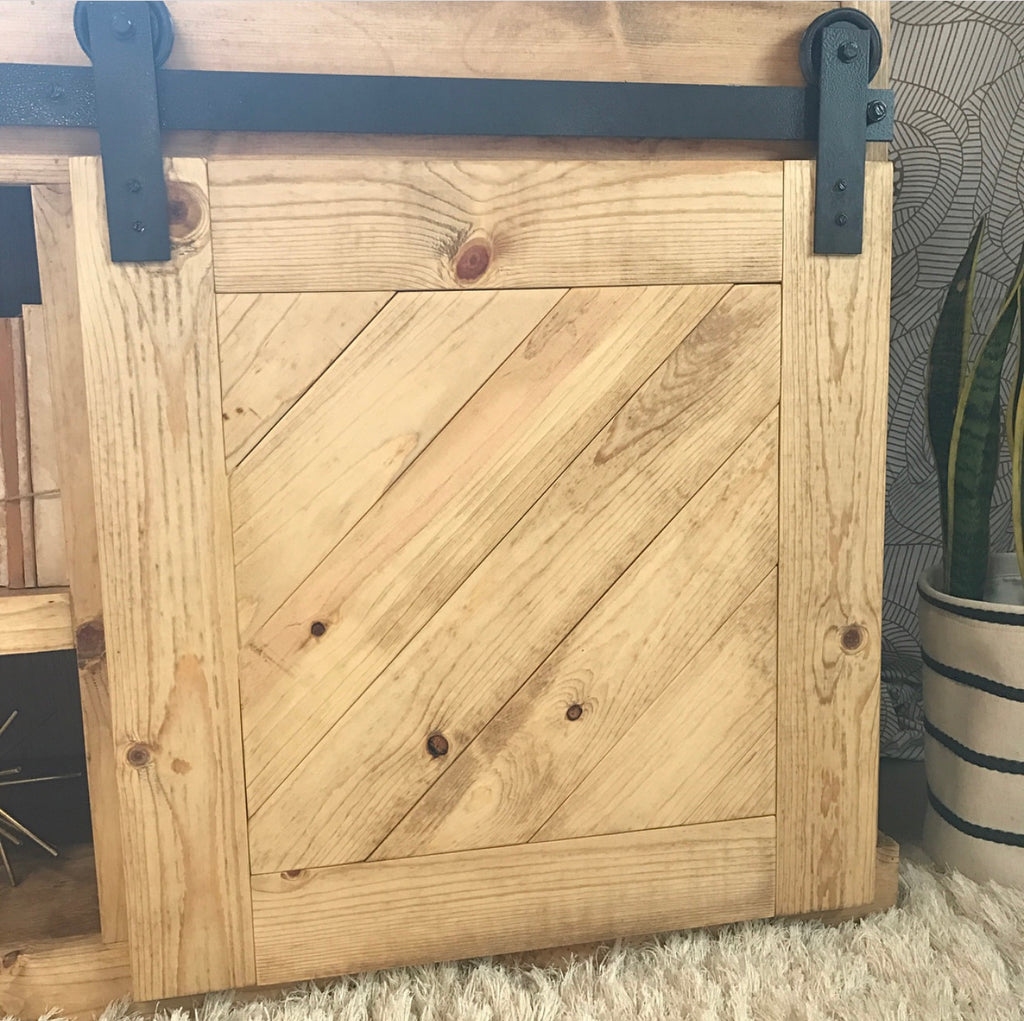
Barn Door TV Console
"A barn door tv console that will keep you glued to the TV"
I am here to present another build made by an awesome fellow builder. Charlee over at Build and Create Home. She has created this amazing barn door tv console that puts all other tv stands to rest. YES! Im bragging on her :) Lucky for you, we have partnered up so you too can build this baby. Enjoy! Be sure to check her out on Instagram to keep up with her latest projects!
Be sure to check out Charlee's post here for all the details on finish and hardware.
There are some affiliate links in this post, meaning I get a small commission if you purchase through these links, at no cost to you. Click Here to read my full disclosure.
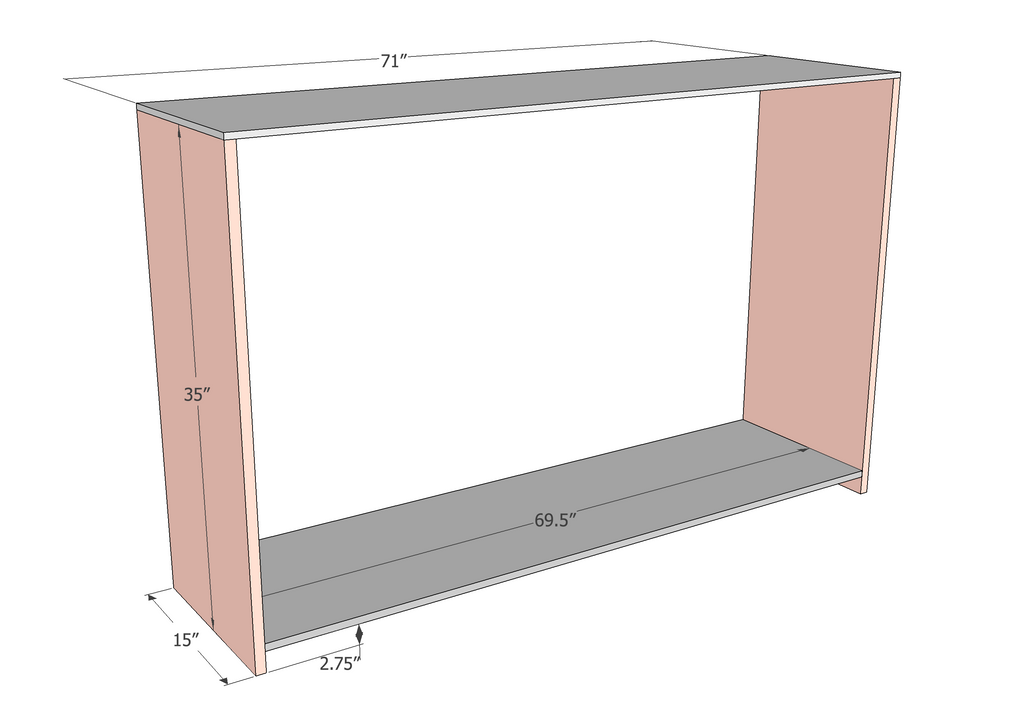
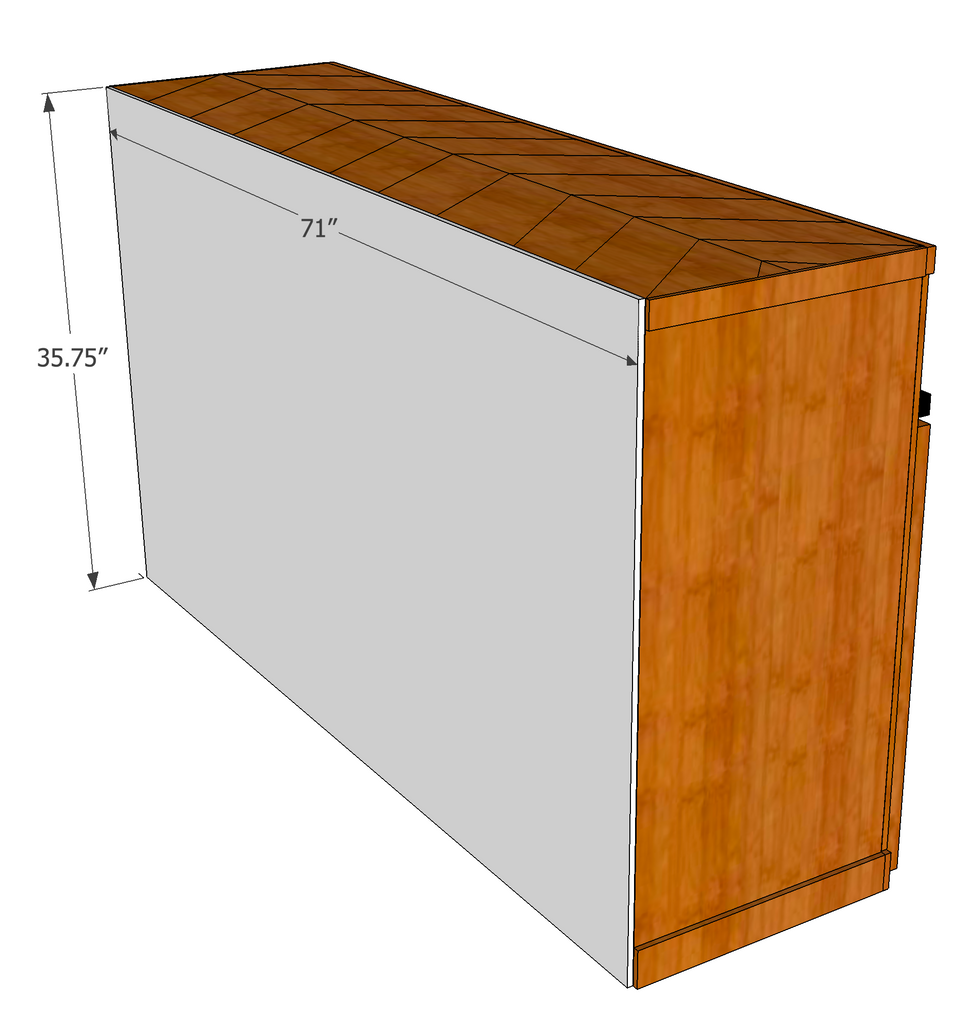
Dimensions:
Materials List:
- 7 - 1x4 @ 8ft
- 3 - 1x2 @ 8ft
- 1- 1x3 @ 8ft
- 1 - 1x3 @ 6ft
- 3 - 1x6 @ 8ft
- 2 - 3/4" sheet of plywood @ 4'x8'
- 1 - 1/4" sheet of plywood @ 4'x8'
Cut List:
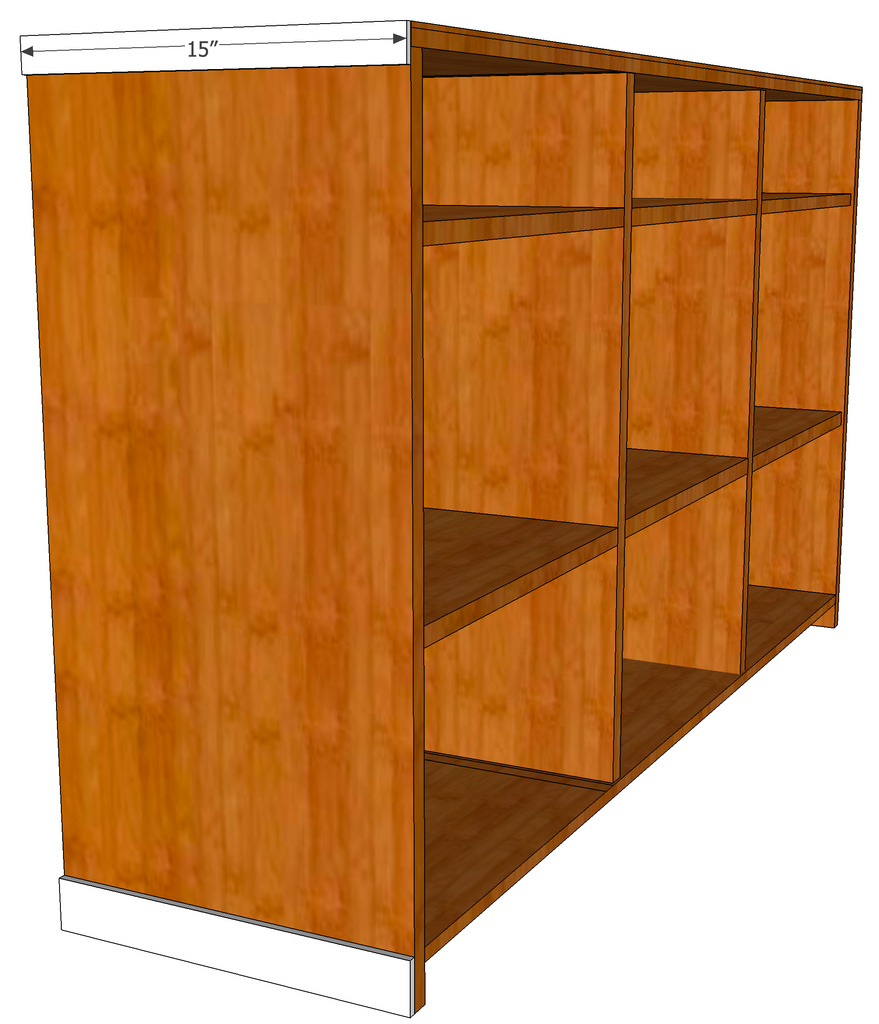
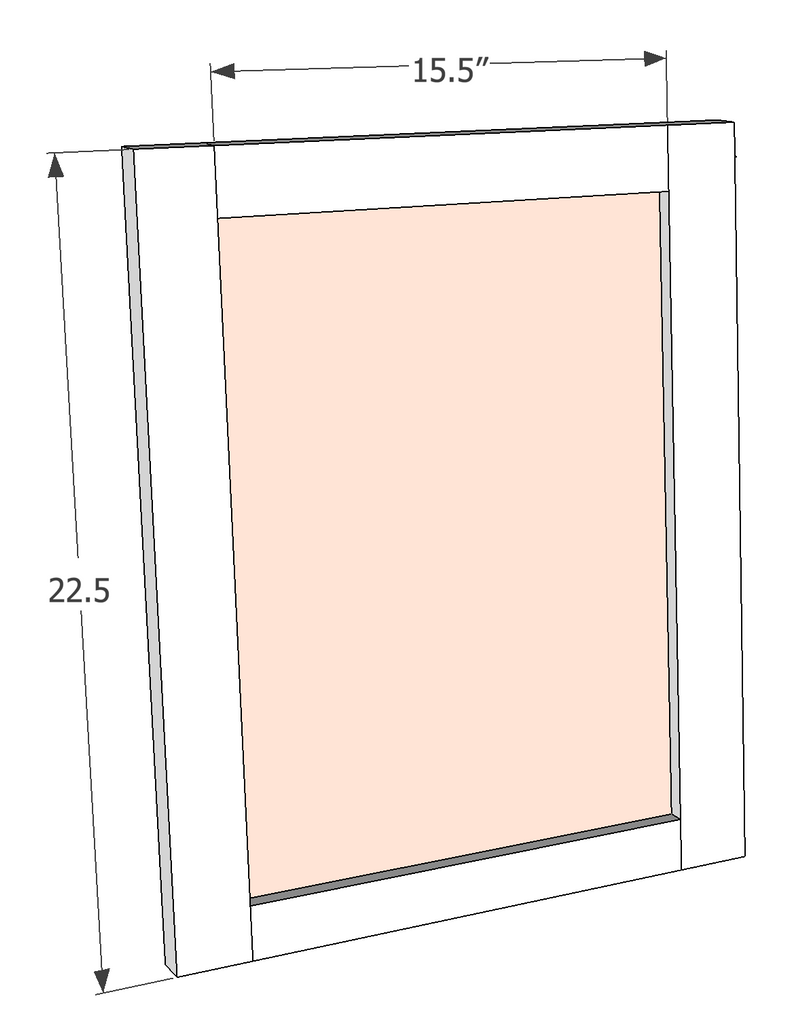
- 2 - 3/4" plywood @ 15 x 35"
- 1 - 3/4" plywood @ 15 x 71"
- 1 - 3/4" plywood @ 15 x 69.5"
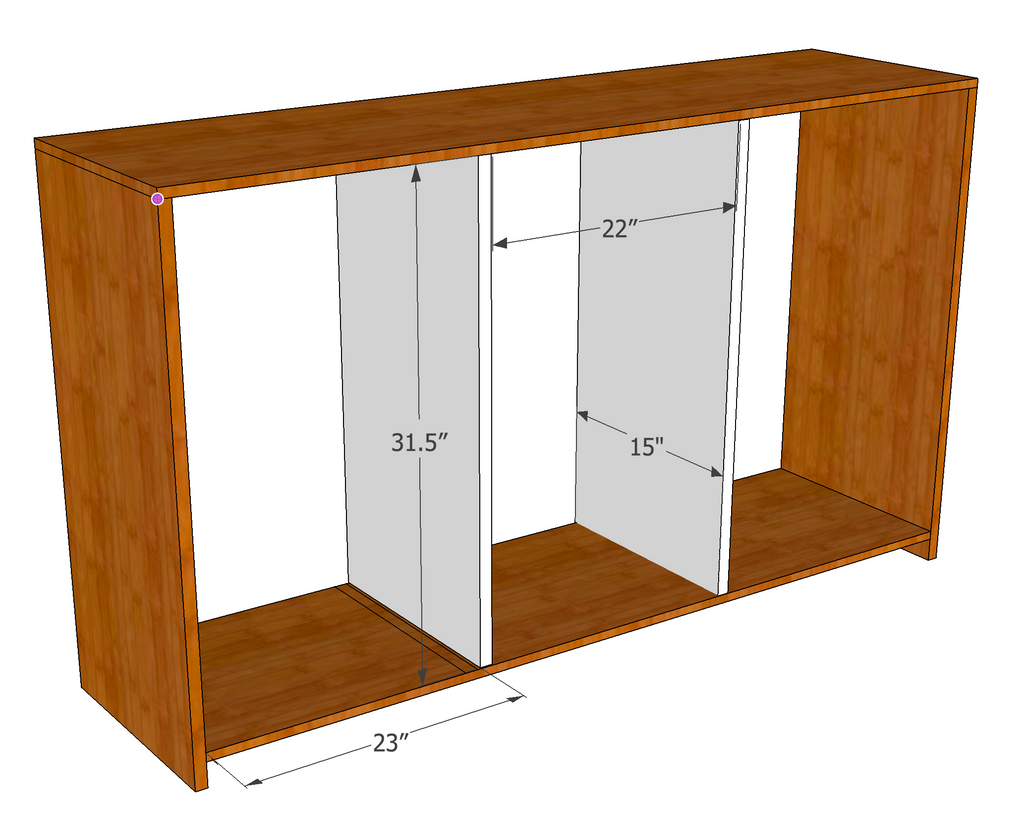
- 2 - 3/4" plywood @ 15 x 31.5"
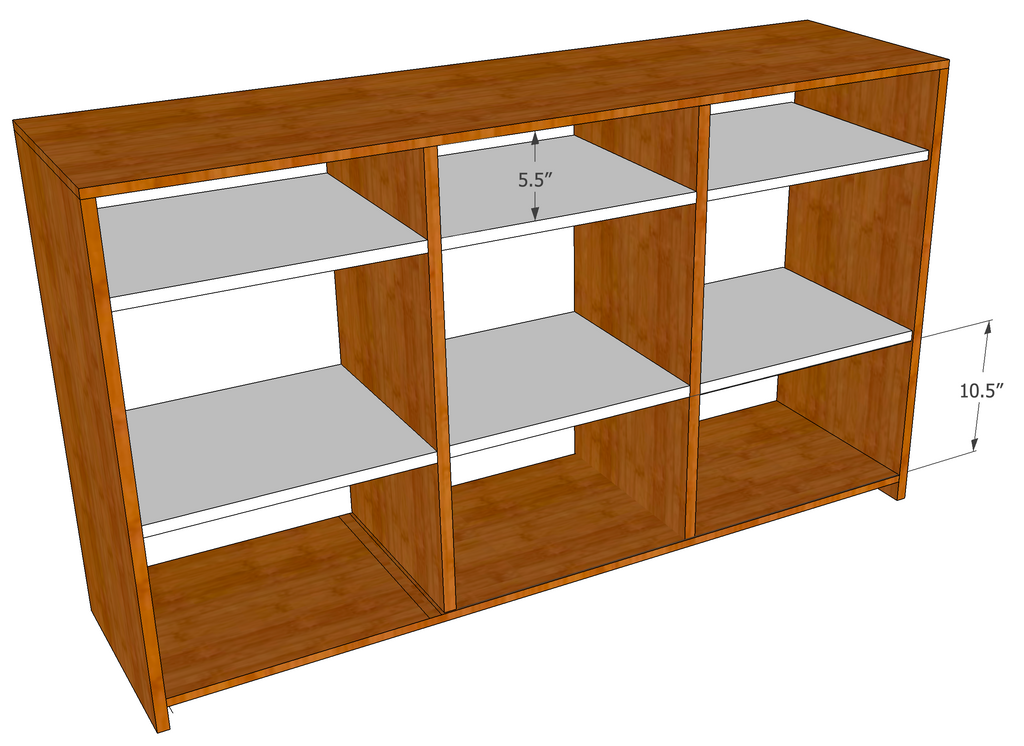
- 4 - 3/4" plywood @ 15 x 23"
- 2 - 3/4" plywood @ 15 x 22"
- 2 - 3/4” plywood @ 22.5” x 22.5”
- 2 - 1x4 @ 15"
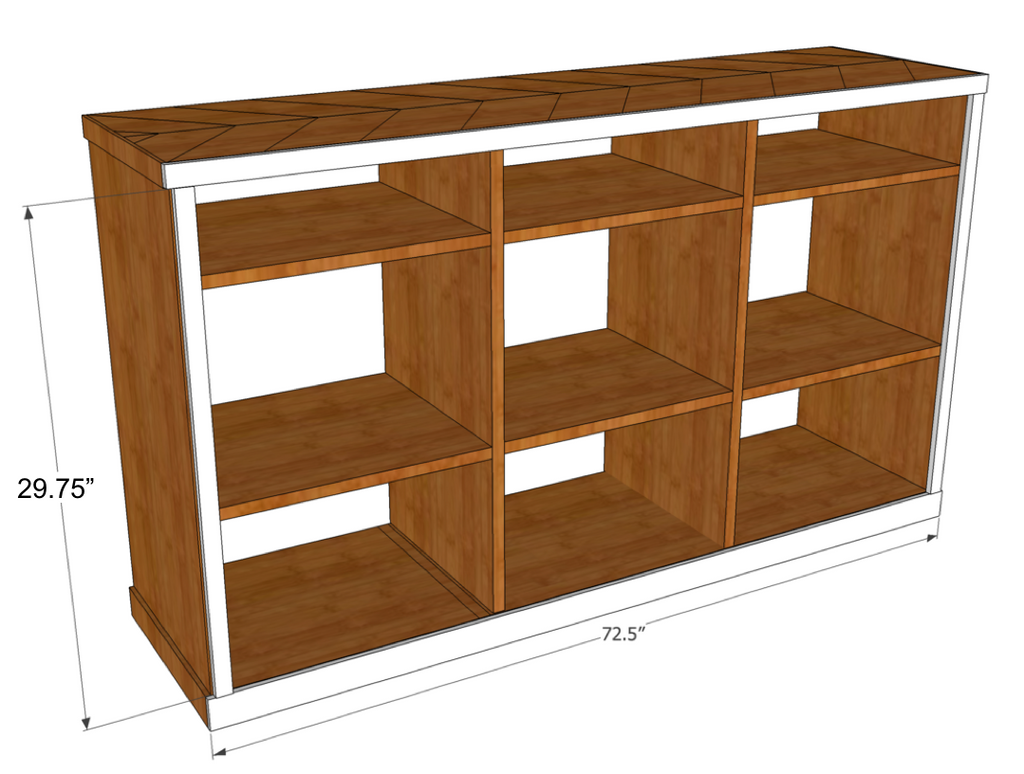
- 1 - 1x4 72.5"
- 2 - 1x3 @ 15"
- 2 - 1x2 @ 29.75"
- 1 - 1x6 @ 68"
- 2 - 1x2 @ 21.25"
- 2 - 1x2 @ 2"
Note: Please be sure to measure before making any and all cuts for best fit.
Step 1: Attach the two (15"x35") 3/4" side pieces to the top (15"x 71") and bottom(15"x 69.5") pieces using a Kreg Jig K4 Pocket Hole System on a 3/4" setting, with 1 1/4" Pocket Hole Screws to attach along with wood glue.
Step 2: Attach the two (15"x 31.5") center dividers using a Kreg Jig K4 Pocket Hole System on a 3/4" setting, with 1 1/4" Pocket Hole Screws to attach along with wood glue.
Step 3: Attach the four outer (15"x 23") shelves to the assembled console and the two (15"x 22") center shelves using a Kreg Jig K4 Pocket Hole System on a 3/4" setting, with 1 1/4" Pocket Hole Screws to attach along with wood glue.
Step 4: Create a chevron pattern on the top of the console using 1x6s, wood glue and brad nails.
Note: Chevron pattern on the build pictured extended out 3/4" on the front for overhang.
Step 5: Attach the top 1x3 and bottom 1x4 (15") trim , to the top and bottom of the console on both sides using wood glue, a brad nailer and finish nails.
Step 6: Attach the top 1x3 and bottom 1x4 top and bottom trim and 1x2 side trim to the tv console using wood glue, a brad nailer and finish nails. The bottom 1x4 trim should be flush to the bottom of the tv console.
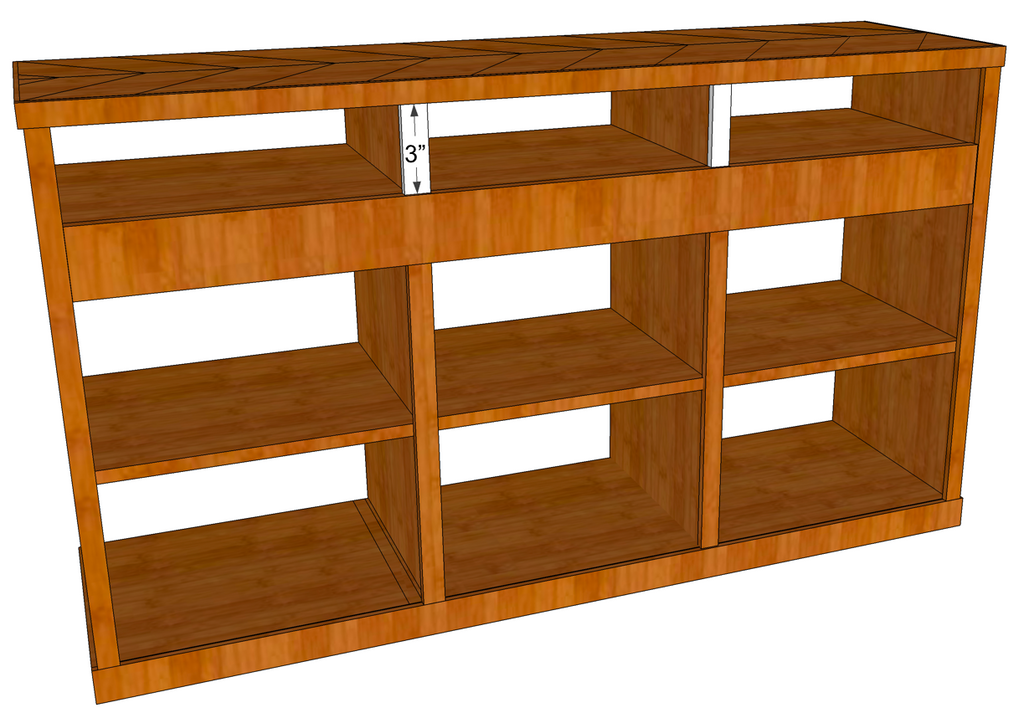
Step 7: Add the middle 1x6 trim to the console using wood glue and a brad nailer. The 1x6 should be flush with the first console row. Then add the remaining 1x2 trim to the console. The trim should sit directly on the center of the vertical plywood.

Step 8: Add the top vertical 1x2 trim to the console using wood glue and a brad nailer. The trim should sit directly on the center of the vertical plywood.
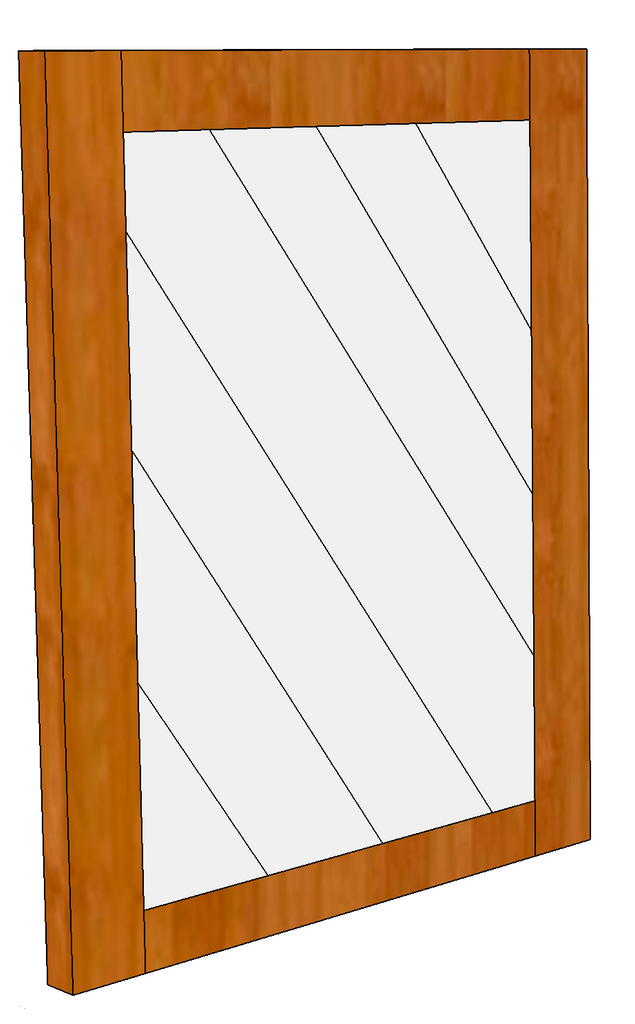
Step 9: Assemble Barn doors by attaching 1x4 trim to 1/4" plywood with wood glue and a brad nailer.
Step 10: Using 1x4 trim create a chevron pattern using wood glue and a brad nailer for both doors and attach doors to console using barn door hardware.
Step 11: Add the 1/4" (71"x 35.75") plywood backing using wood glue and a brad nailer.
Let's take another look at this amazing build!
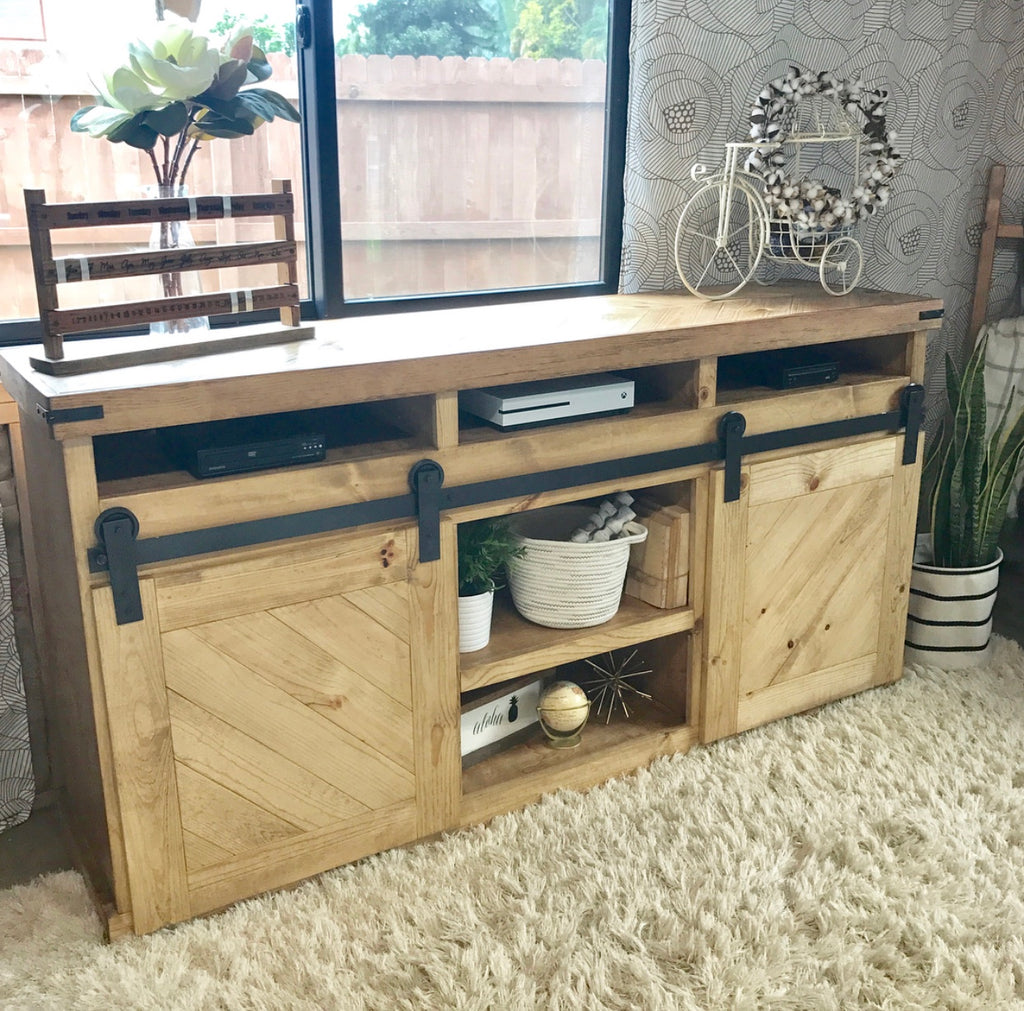 I've never seen a wood project look so sheek. The chevron pattern on the top really gives it character.
 I also really love the subtle detail of the sliding doors. Charlee did such an awesome job on this one. Be sure to check out her post for all the details on the finish and hardware.

Thanks for reading guys! XOXO Ashley

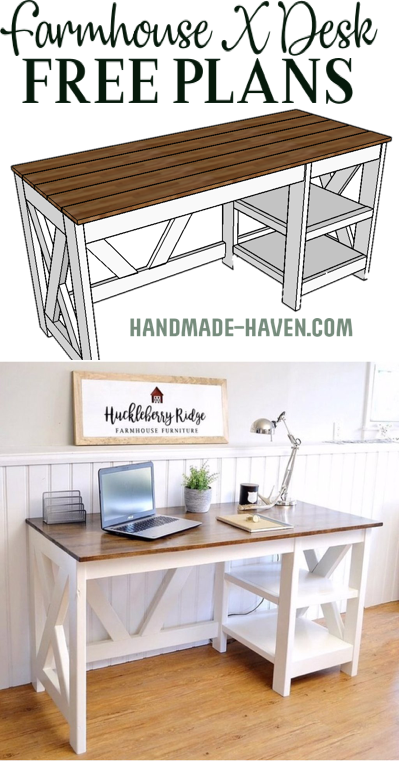
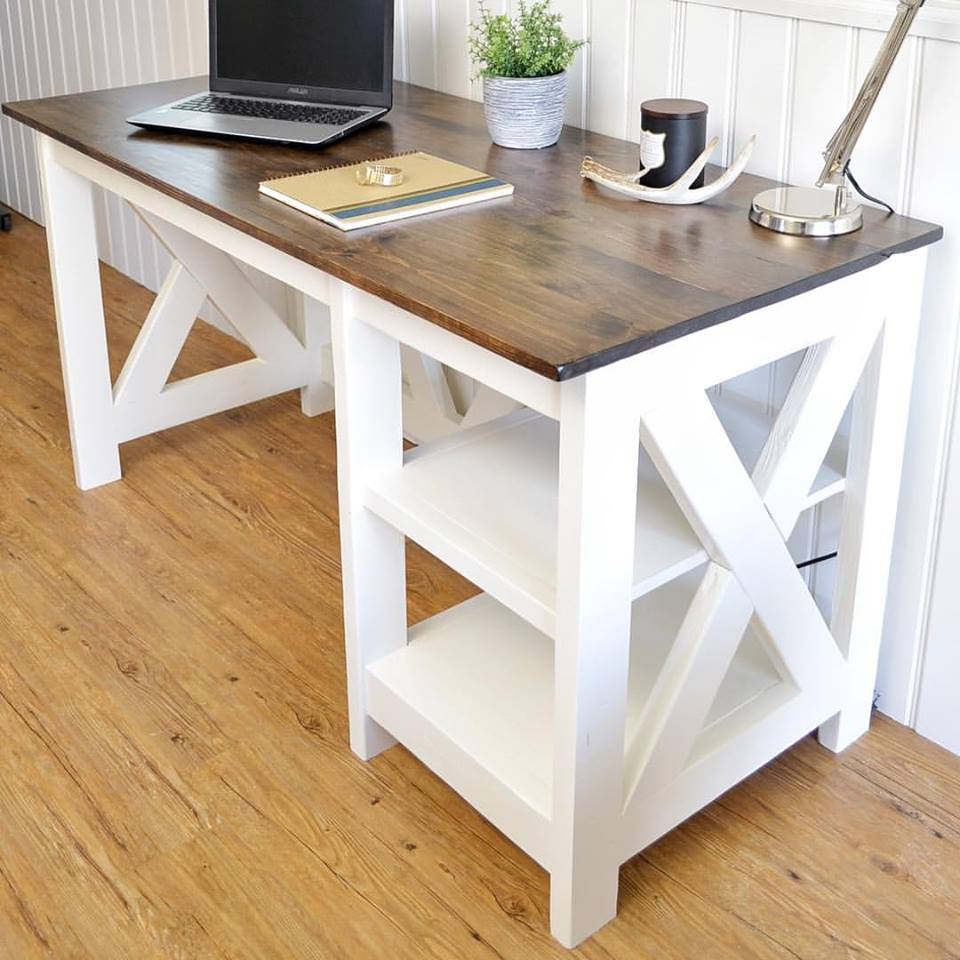
Farmhouse X Office Desk
A farmhouse desk perfect for the home office!
Need an office desk with a farmhouse feel? These farmhouse desk plans just may be what you're searching for.
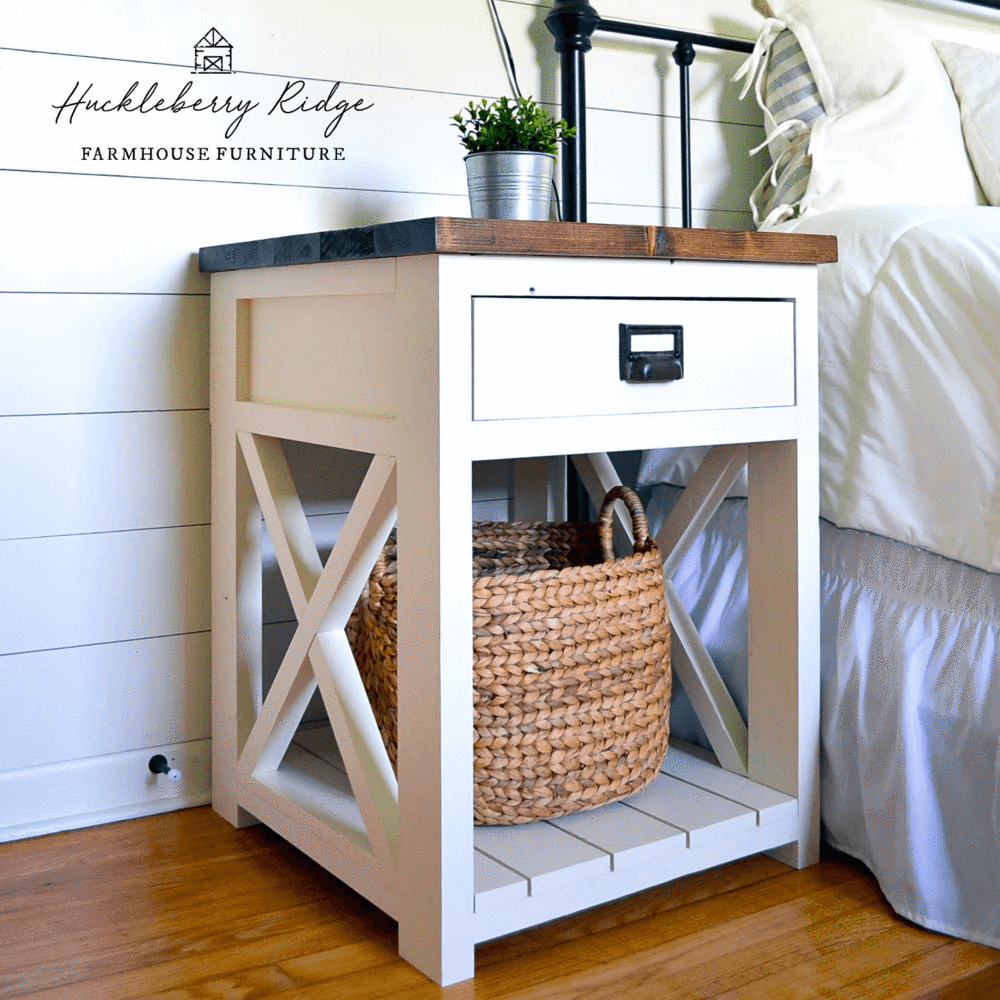
I love partnering with other talented builders and these guys are nothing less than amazing! Today I am presenting this lovely build by Michael and Sara with Huckle Berry Ridge Furniture. Be sure to go check these guys out on Instagram and Facebook to check out more of their great work.
But wait!? We also partnered together for this awesome farmhouse nightstand, and she’s a beauty so be sure to check that out next here.
Michael, Sara, and I are excited to bring you these farmhouse desk plans, so that you too can recreate this office desk to spice up your home office. So lets get to it!
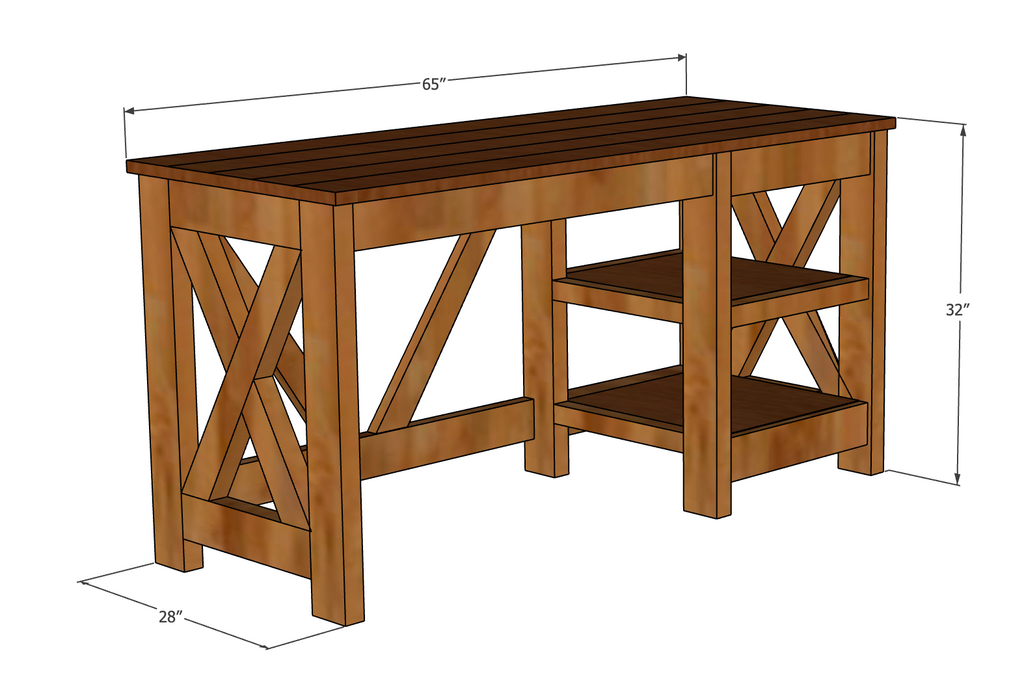
Dimensions
Materials List
- 8 – 2x4s @ 8ft
- 1 – 2x2 @ 8ft
- 5 – 1x6 @ 6ft
- 1 – ¾” sheet of plywood (2'x4')
Cut List Here in Printable Plans
Tools List
- Kreg Jig K4 Pocket Hole System
- Drill
- Miter Saw
- 2 1/2" Pocket Hole Screws
- 1 1/4" Pocket Hole Screws
- Wood Glue
- Kreg Right Angle Clamp
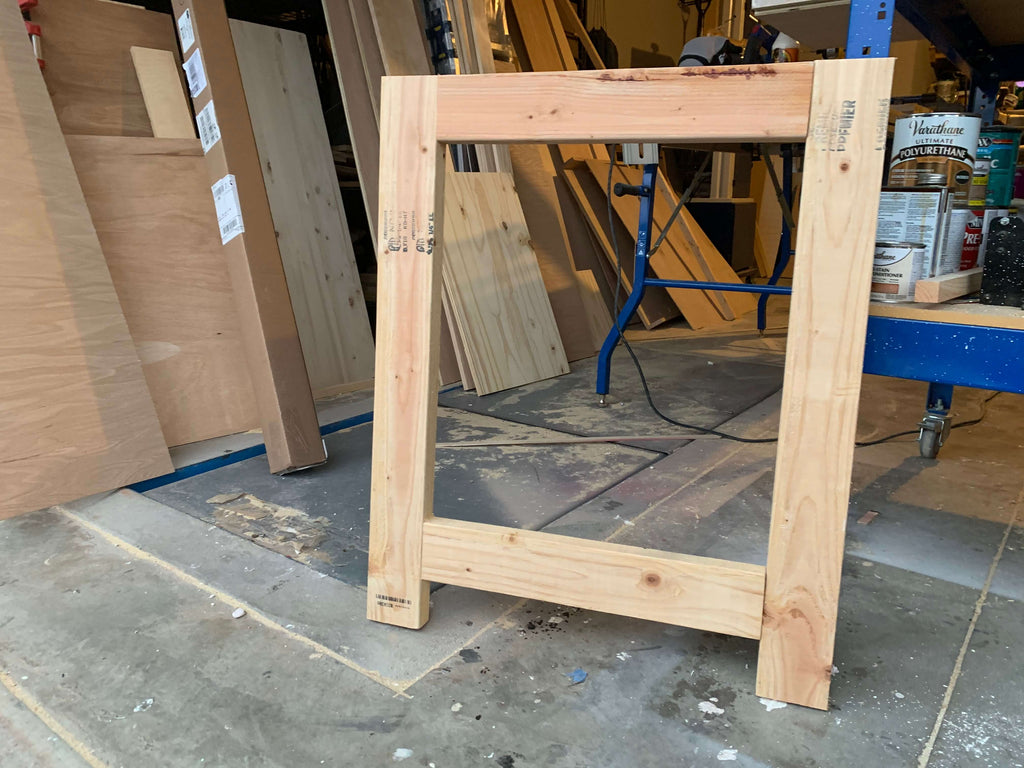
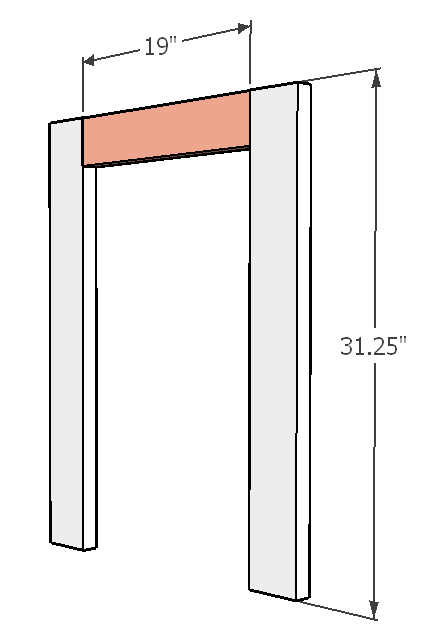
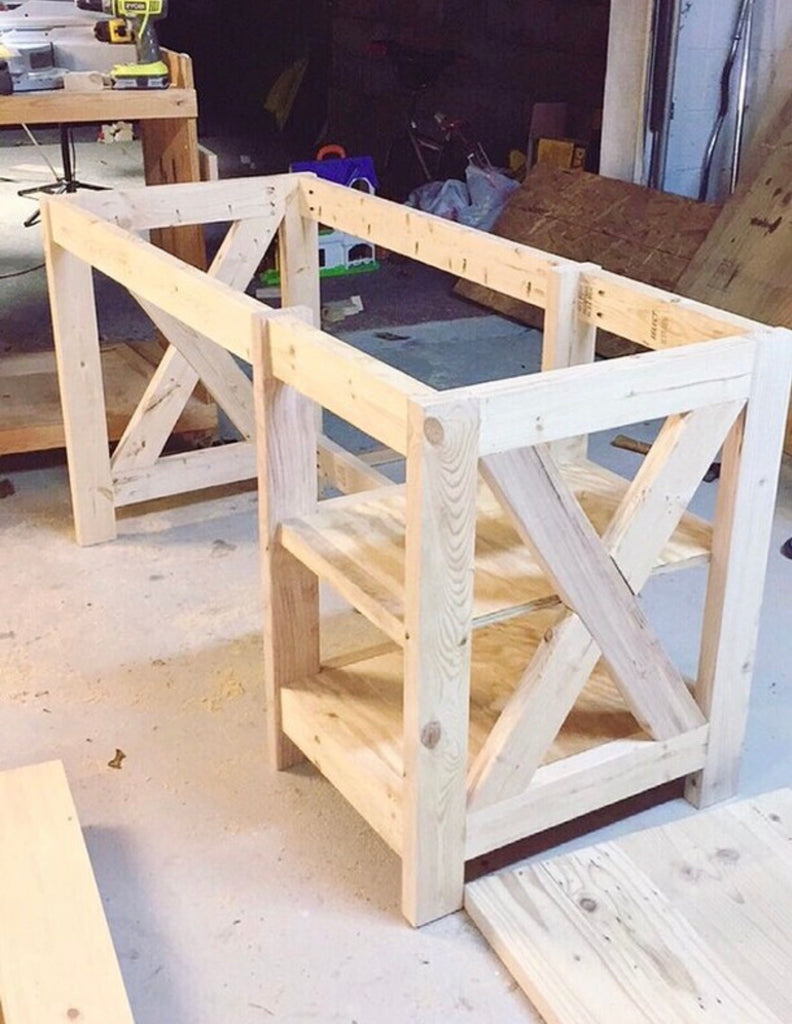
Step 1: Assemble Outer Desk Legs
The first thing you need to do to start the process of building the farmhouse desk is to build the two outer desk legs. You will be using a Kreg Jig K4 Pocket Hole System and pocket Hole Screws to attach the 2x4 lumber together. Feel free to use a right angle clamp to help you clamp the pieces together.
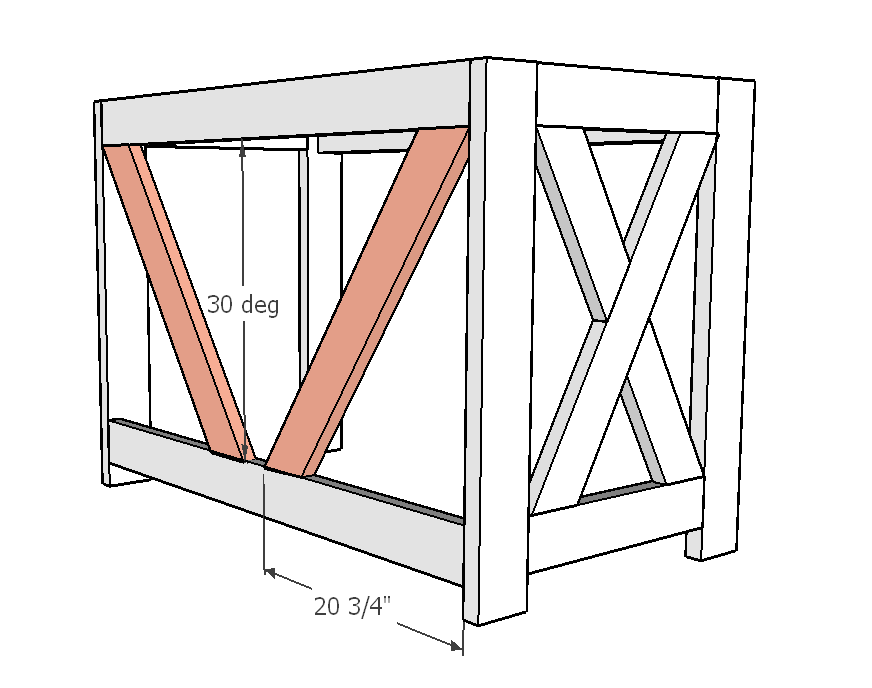
Step 2: Create Decorative X Pieces
Next you will be adding the decorative X pieces to the assembled desk sides you just made. You will do this also using a Kreg Jig K4 Pocket Hole System. For the best fit, you should measure your 2x4s up agains your assembled desk leg and then make your cuts accordingly. These degree angle should serve as a guide.

Step 3: Assemble the Middle Desk Leg
Next, you will build the the middle desk leg. This leg is similar to building the first two desk legs . You will also use a Kreg Jig K4 Pocket Hole System and see pocket Hole Screws to attach the 2x4s together. Again, your right angle clamp will come in handy here.
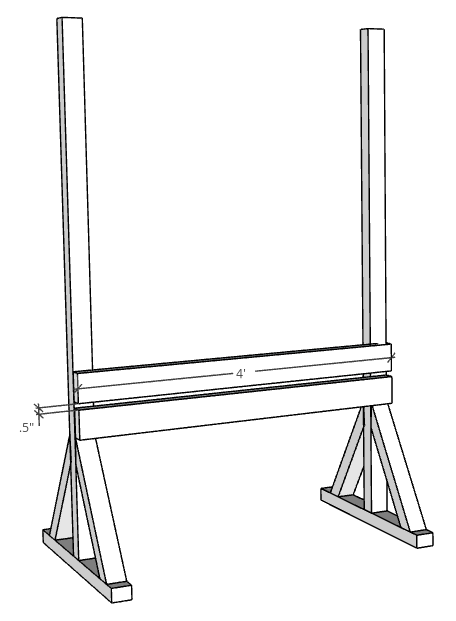
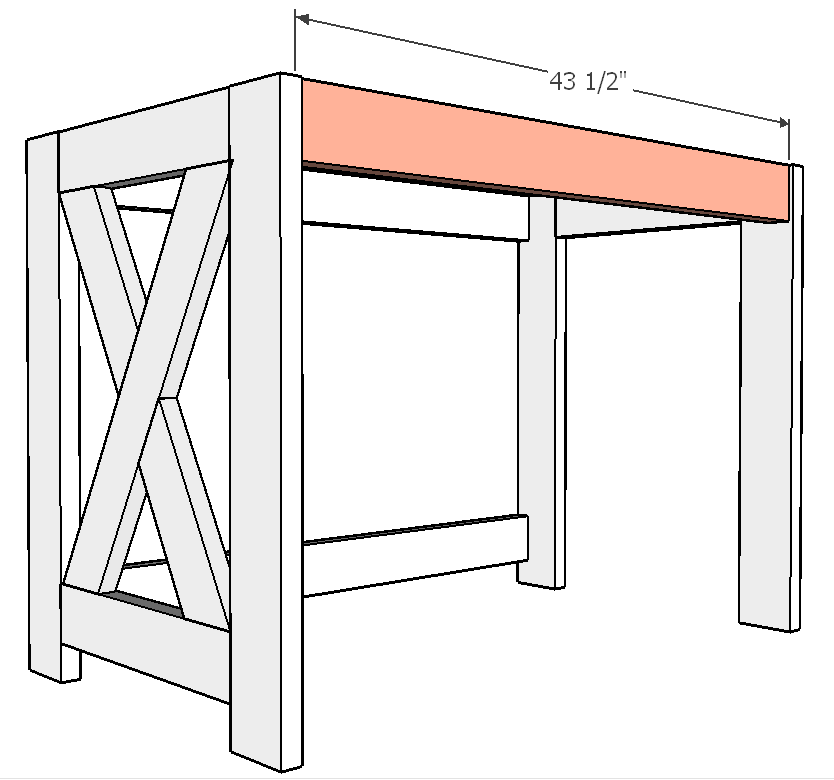
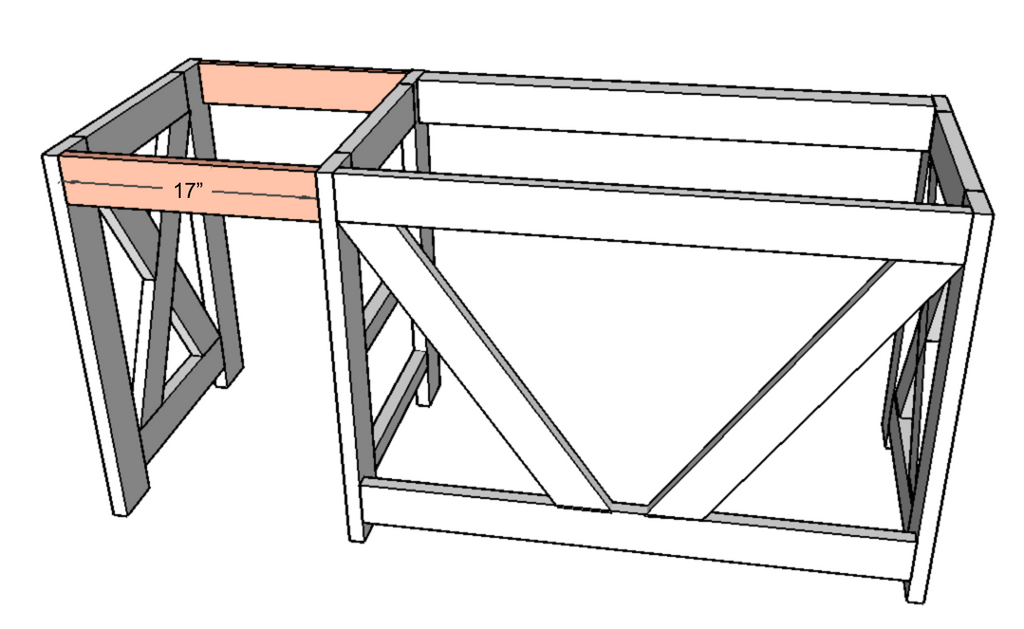
Step 4: Assemble the Desk
Now it is time to start assembling the farmhouse desk together with the assembled pieces you have built. You will be attaching the left assembled leg with the middle assembled leg together using a Kreg Jig K4 Pocket Hole System and pocket Hole Screws.
You will also be pre-drilling pocket holes upwards on the top stretcher for later attachment of the office desk top. Utilize a Kreg Right Angle Clamp to help hold the piece in place while screwing in screws. This will definitely help you assemble the desk together if you are building it by yourself.
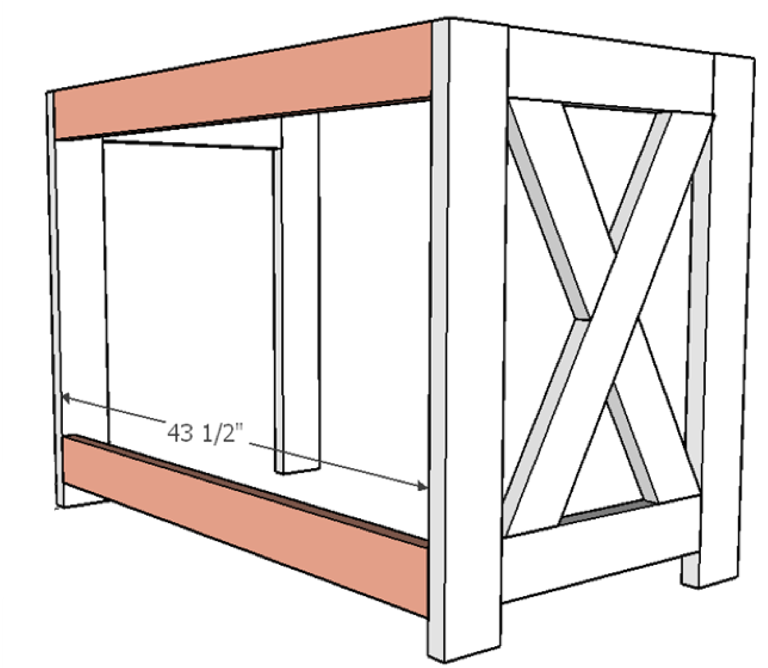
Once the top and Botton back stretcher pieces are set into place on the farmhouse desk you will attach the 2x4 front stretcher to the assembled desk the same way. The stretcher board should be inset .5" You again will pre-drill pocket holes upwards on the front stretcher for later attachment of the desk top.
Step 5: Add Decorative V Pieces
Now that the main inner frame of the farmhouse desk is assembled. you will be adding the 2x4 V braces to the back of the office desk using a Kreg Jig. This assembly will be similar to that of adding the X boards. Measure the wood up against the office desk, make your markings and cut as needed using your miter saw.
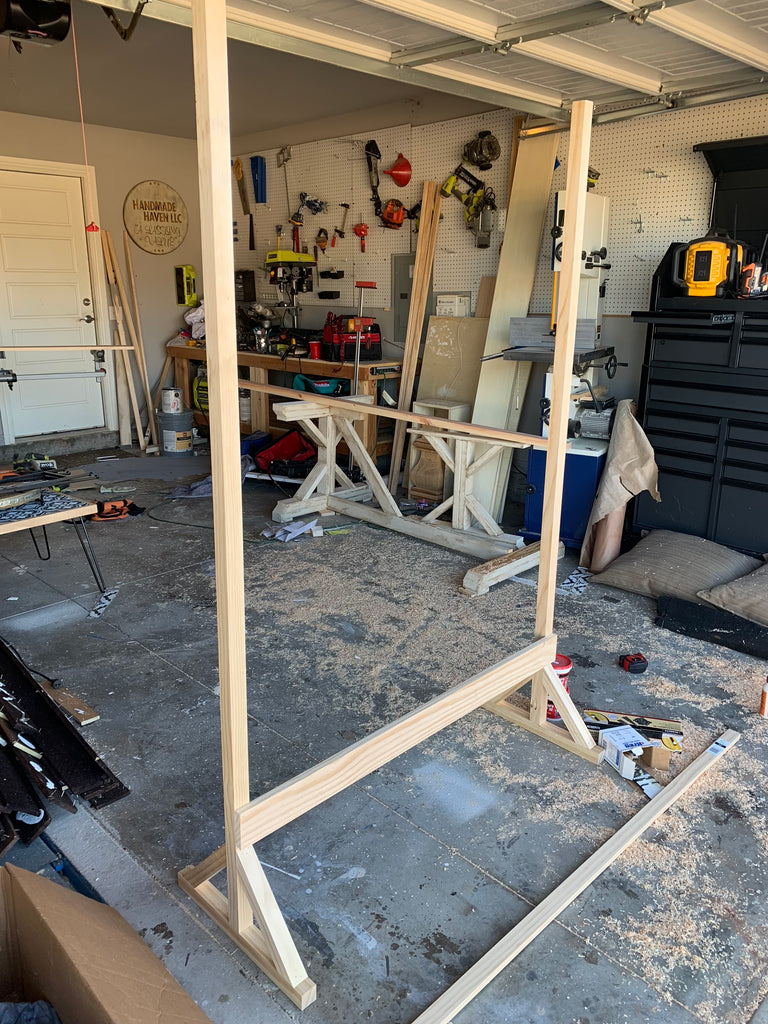
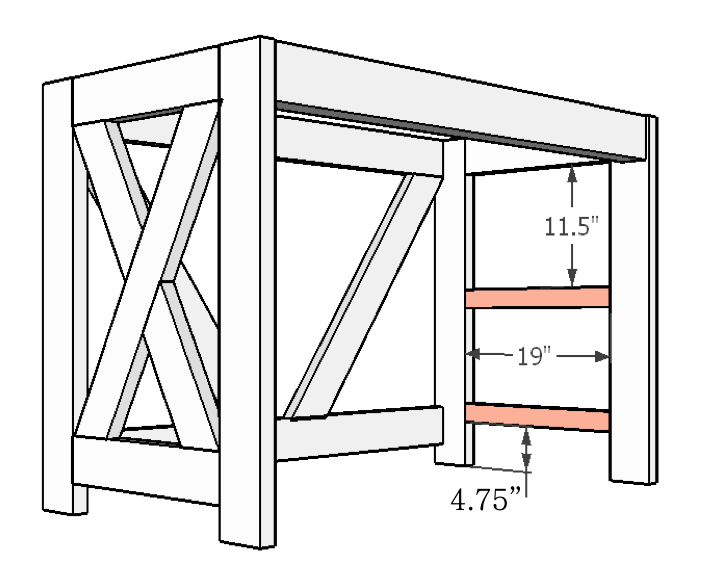
Step 6: Assemble the DIY Desk Side
Next we will begin assembling the side of the DIY desk by adding the 2x2 stretcher pieces. The 2x2 boards will be attached to the middle assembled leg using a Kreg Jig.
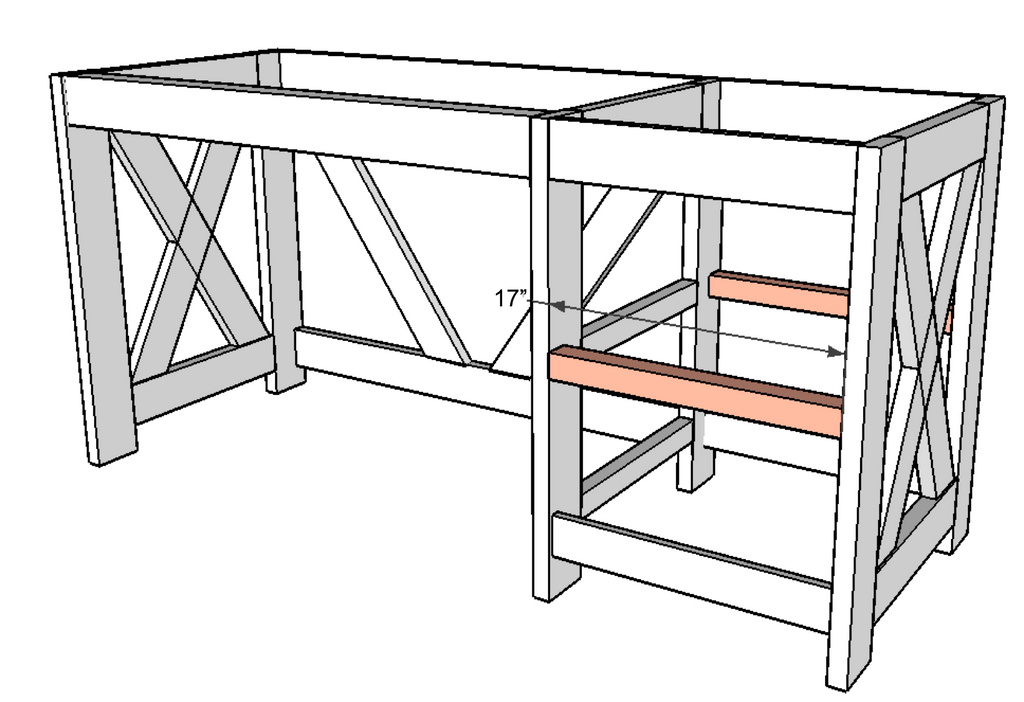
Next, you will attach the right assembled leg to complete the whole frame of the the DIY desk, again using a Kreg Jig K4 Pocket Hole System. The front stretcher should be inset .5" Note: Predrill pocket holes upwards on the stretcher pieces for later attachment of the desk top.
Then you will want to attach the two bottom 2x4 stretchers to the side of the desk using a Kreg Jig. The front stretcher should be inset .5"

Like above, attach the middle 2x2 stretchers to the bottom of the right hand side of the desk using a Kreg Jig.The front stretcher should be inset .5"
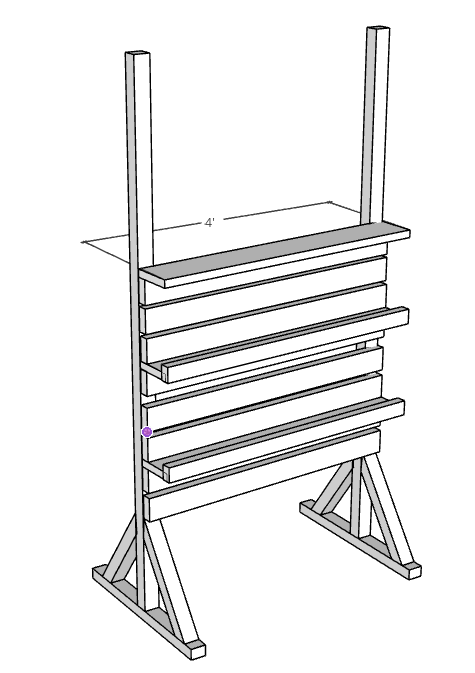
Step 7: Add Desk Shelving
With most of the farmhouse desk frame assembled, it's time to add in the desk shelving. You will need to attach the plywood pieces to the desk using a Kreg Jig but be sure to change your setting for 3/4" plywood.

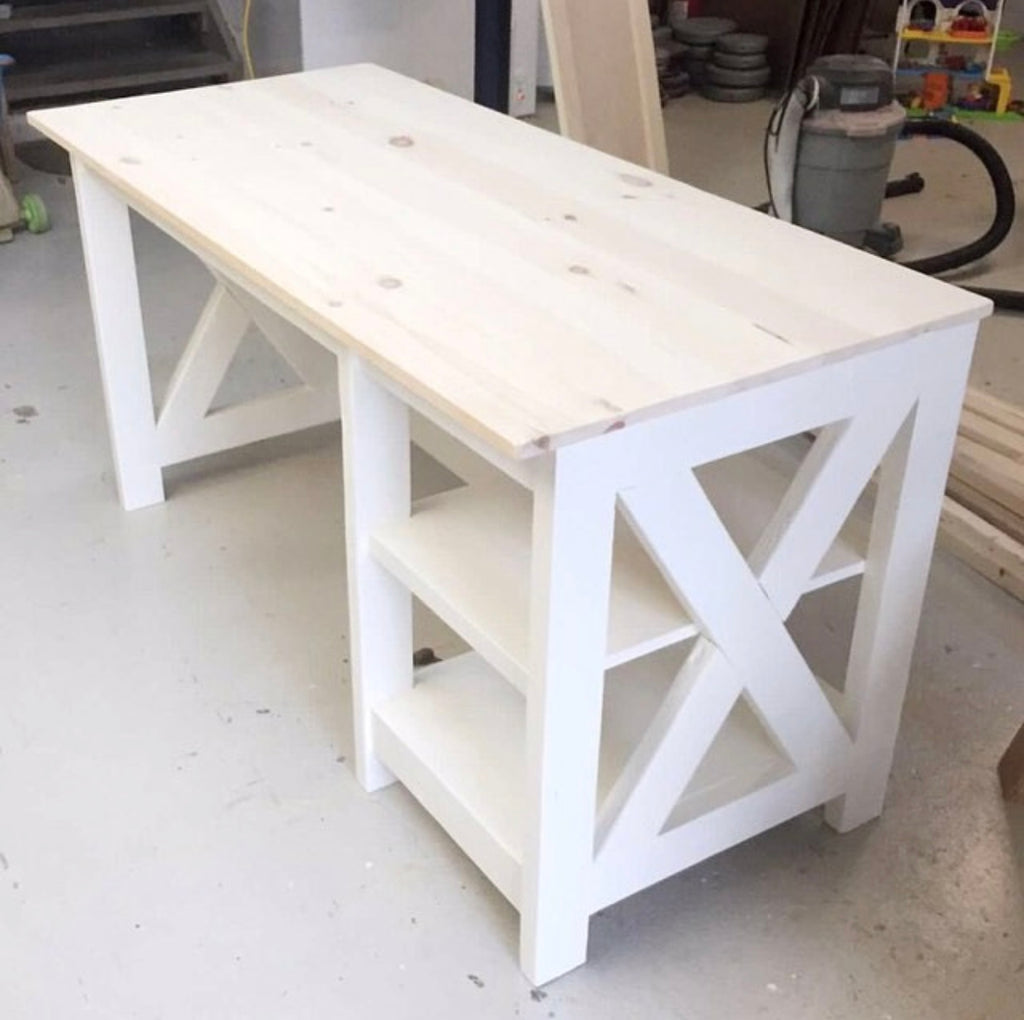
Step 8: Assemble and Attach the Desk Tabletop
With the farmhouse desk all assembled, the last step to make is assembling and adding the farmhouse desk tabletop. You will assemble the table top by attaching five 1x6s together using a Kreg Jig K4 Pocket Hole System and pocket Hole Screws to attach along with wood glue. you can also opt to use biscuits.

Then you will attach the table top to the office desk base using the pre-drilled pocket holes from previous steps and fill all seen pocket holes with wood dowels or wood filler for a clean look. For help on how to easily fill pocket holes, check out my technique here.
I hope you enjoyed these farmhouse desk plans and have fun re-creating your own.
Here is a great video on how to make one yourself as well.
Let's take another look at this beauty. Michael and Sara used Sherwin Williams "Creamy" for the base and Minwax Provincial for the top and man is she a Beaut.!
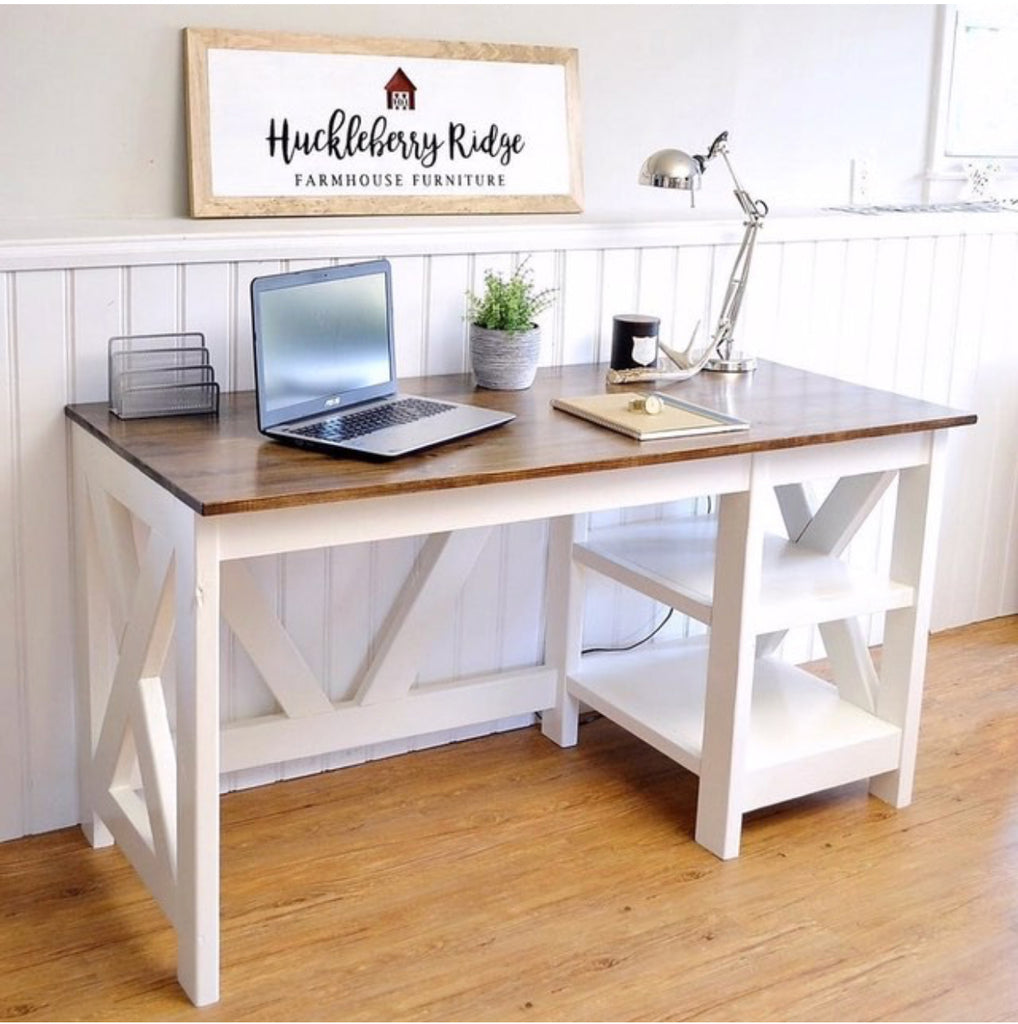
This farmhouse desk gives me all the feels!
Thanks for reading guys, XOXO Ashley

Wooden Shiplap Placemats
I havent always been a fan of Shiplap but the more and more I see it the more and more I start to like it more and more. So I figured I'd start off with this small project to test the waters and I'm sold. I am now a Shiplap fan!
There are some affiliate links in this post, meaning I get a small commission if you purchase through these links, at no cost to you. Click Here to read my full disclosure.
This was a super easy project that anyone can handle.
First I gathered all of my materials.
Materials Needed
Wooden Square - 12 5/8"x11 13/16
1 - 1x3 ( cut down to 5 (11 13/16"))
2 Quarters

First I started by nailing the 1x3 blocks to the wooden square. I used to quarters to evenly space the blocks apart from each other.

After nailing down all the 1x3 boards, I begin filling all the nail holes

After filling the holes, I let the filler dry for about 5/10 min. and I sanded it down.

After sanding, I spray painted the Shiplap place mat, I let it dry and she was done.

This DIY project is sure to spice up any dinner party!
See it in action!
Don't forget to Pin it!

YOU MAY ALSO LIKE...


Rustic Console
When I saw the plans for this on Ana White’s website it was like DIY Love at first Sight..
This build was pretty easy for me!! and I was super excited to be able to use my Kreg Jig again (love that thing!). Here’s a picture of the frame!!

I was so excited about it that I had to take a pose with it before church haha

This is when I learned that MY BOARDS WERE UNEVEN!!!! haha a photo will tell it all…which brings me to my next point!!
Make sure you measure and mark EVERYTHING!!!! I know sometimes we like to think we have hawk eyes ( I’m really talking about myself) but its way better to measure each piece correctly then to have to undo screws and fix it (Which is what I had to do)
But after an hour of unscrewing! Yea an hour I finally got it looking right!!!

I applied the top and opted to do 45 degree cuts on the ends instead of the 60 degree X angle cuts (mainly because my saw only goes up to 45 and I had trouble measuring the 60 degree angle ). With my way you can also add two more pieces of wood to have double X’s. All depends in what you like.
I used two coats of MinWax’s Dark Walnut for the finish and topped her off with two coats of the Minwax Water Based Polycyclic Protective Finish.


and my rustic console was Finished!!!


I ended up staging this piece for a friend to show her how to decorate it…This almost made me want to keep this for myself!!

Happy DIYing!!